

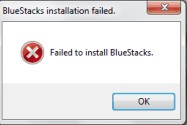
So as you all know that Bluestacks is one of the best emulator for running Android apps on your PC for free, but while installing the Bluestacks some users might face the problem of ‘Failed to Install Bluestacks‘ error problem. So for that today we are going to fix and solve this error problem in this today post.
Other Android Errors and their Fix
- Error 919
- Error 492
- Error 927
- Fix Error 492
- Fix Error 651
- Fix Error 522
- Fix Error Code 36
- Fix Runtime Error 339
- Fix Error 1719
- Fix Gmail Server Error 707
- Fix Obtaining IP Address Android WiFi Problem
- Fix ‘Mobile Network not Available’ Problem
Bluestacks app player is used to download android apps to run on your Windows PC or Mac Computers. Bluestacks is basically brings all your favorite mobile apps to your PC, Mac or TV. It is a great tool that allowing you to run your favorite mobile apps or games in the full screen on your PC or Mac.
So, finally back to the topic that How to Fix & Solve ‘Failed to Install Bluestacks‘ Error Problem on your PC or Mac computers.
The ‘Bluestacks installation failed‘ error is occurred by some of the below reasons, you can check that & get the solutions of that problems from here.
Reasons for ‘Failed to Install Bluestacks’ Error Problem
- The system does not fulfill the min. requirements to install the Bluestacks.
- Graphic Card error problem.
- Another version of app player is already installed on your PC or Mac.
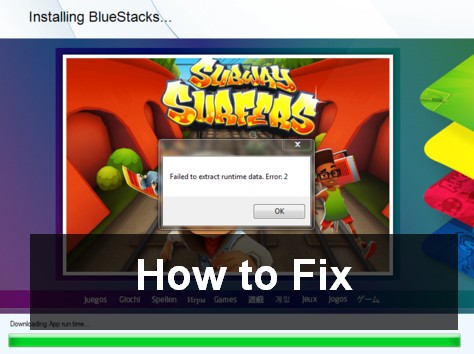
- Downloading Runtime Data error.
(In that case you have to first uninstall the previous version and execute the setup again) - Failed to connect to Server.
- The Bluestacks app player is downloaded from a source other than the official website.
(Download the official version from here – Bluestacks > ” Download “ - Can’t access Hard Drives from Bluestacks.
How to Fix & Solve ‘Failed to Install Bluestacks’ Error
1. Update your Graphic Card Drivers
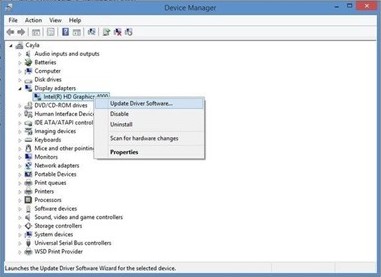
- Go to Computer & Right click on that
- & Click on Properties
- In the Properties Section>Go to Device Manager
- In the Device Manager>Go to Display Adapter
- Now, right-click on your Driver
- & Go to ‘Update Driver Software and Update it
2. Run the Program in Compatibility Mode
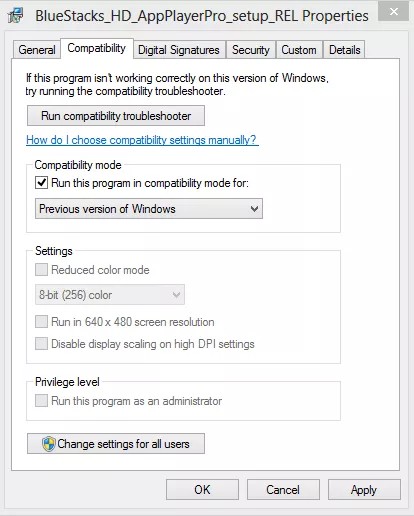
- Go to the Bluestacks App Player & right-click on it
- & Go to Properties section
- In the Properties section>Go to Compatibility
- In that click on ‘Run this program in compatibility mode for’
- Now select your packages & click on “Apply” button to apply changes
- That’s it, now Bluestacks will run on your compatibility mode.
3. Reconnect your Internet & Try again
Go to the Bluestacks error
- Click on Retry option or reconnect your internet
- You can also off your internet for a min. & then reconnect it
- That’s it, it will solve your error problem.
4. Upgrade your RAM for your system
 If these upper solutions doesn’t work, then upgrade your RAM for your PC system.
Also Check :
- Solve ‘Connection Problem or Invalid MMi Code’ Problem
- Fix Waiting for Available Socket Chrome Error
- Error 927 Google Play Store
- Fix ‘Mobile Network not Available’
- Solve ‘Connection Problem or Invalid MMi Code’
- Error Code 80048264
- Fix “Unfortunately Google Play Services has Stopped “
- Solve err_ssl_protocol_error Problem
- Fix Err_Connection_Reset Problem
- Fix Bluestacks Error 25000
- Fix Error This App can’t Run on your PC
- Fix Microsoft Outlook Disconnected Problem
These are the some top 4 tips to Fix & Solve ‘Failed to Install Bluestacks’ Error Problem. Hope it will help you to fix this error problem from Bluestacks and get rid out it. If you are then also having any error problem, comment down will fix it surely soon