Your computer is attached with many hardware and software support. They are to be fixed from time to time, otherwise error message will start continuing in that. CMOS Checksum error is one such error that you will be finding in your PC. Once you know the reason of the error, you can easily sort out the problem for yourself.
What is CMOS Checksum Error -Defaults Loaded
Before going into any more deep. There is need to understand the symptom of the error message, at the beginning. You will get an error message at the start up, just like that shown in the below image.

You will get two option for yourself, on the start-up screen. It will show you like:

Pressing F1 will resume the service, and you will continue with the configured setup. While you press F2, your system will start, taking the default CMOS settings. If you press F2, the existing CMOS, setting, which can be faulty, will be replaced by the initial values.
Fix CMOS Checksum Error – Defaults Loaded
There are basically two solutions, here. the first one is the re installation of BIOS set up. It is better to go for this one, since it has no cost and you can do it, by yourself.
Resetting Bios
There are certain steps to do that on your own. Initially turn off your PC and open up the cabinet. Locate your motherboard and search for any one among CLR BIOS or CLR CMOS. It can be written there as Clear BIOS or Clear CMOS too. You will get a jumper attached there with 2-pin plug. The process is simple, after you find the jumper. Just open it once and fix it again after 10 seconds. Turn on your system and your BIOS set up is reset totally.
If your problem is not resolved with it, then there is additional need of hardware configuration and you will have to call a hardware expert for the purpose. Your CMOS battery has to be changed. Here is the complete procedure of the battery changing. If you are aware about the hardware settings, you can easily fix it with the following steps.
Change the CMOS battery
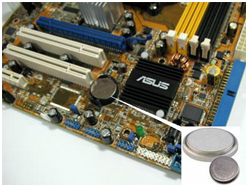
CMOS is the place which store data, after your system is shut down. You can easily change the battery, if you know your motherboard well. The battery is a tiny on your motherboard. Generally, the battery model used is CR2032, where CR refers to Lithium battery, 20 is the diameter of the battery in millimetre and 32 is the thickness, when multiplied by a decimal. Do not touch the mother board, unless the static charge stops flowing. Check it by touching a metal part in the system. Once it gives no shock, locate the battery, as shown below.

While removing the battery, make sure that you have not touched other parts of your motherboard. It is the most sensitive part and is having many connections. Since you are not a professional, you will not be able to understand, whether any alteration has been there in the system or not. Just like you opened up the battery, follow the same style and get the new battery attached. Your system will run smoothly.
