

Fast User Switching is kind of a boon for the multiple users of Windows. This process is quite convenient especially when the multiple users are working on Windows 10. Basically, Fast User Switching endows you a facility of Signing in the Windows 10 with the presence of other users. By having few advantages, it comes with some deprivations also, such as if other users are working on the computer in the signed in mode then you will not be able to restart or shutdown your computer before them or before signing them out.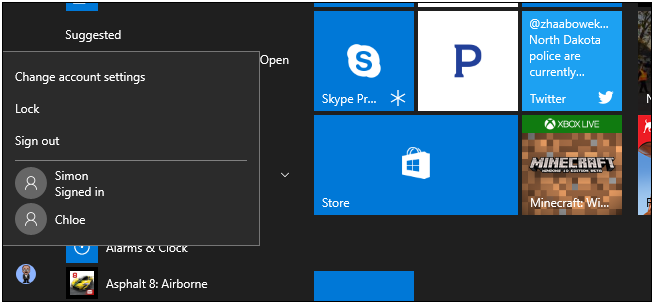
How to Disable Fast User Switching on Windows 10, 8, 7
So, if you are oppressed with this entire nature of the User Switching mode of Windows 10 and feel like to disable Fast User Switching on Windows, then you can disable it by following few easy steps.Today I will let you know “How to disable the Fast User Switching on Windows 10“.
How to Disable the Fast User Switching through the registry (For Home Edition Users)
You need to perform some editing in the Windows registry to accomplish this task, but only if you are the user of Windows home edition. Although you can go for the group policy editor instead of performing this task in the Windows registry group policy editor is recommended for the one who uses Pro edition of Windows.
Note: Windows registry editor plays a vital role in the Windows 10 and its operations. A little wrong change can make your computer unstable and misuse of this “registry edit” can harm your work. You are recommended to adopt the process with the keen focus.
So, disabling the Fast User Switching is a quite simple task and if you follow the instructions given by us then it will be beneficial for you.
 Step1: To perform the editing in Windows registry you need to open the registry window.
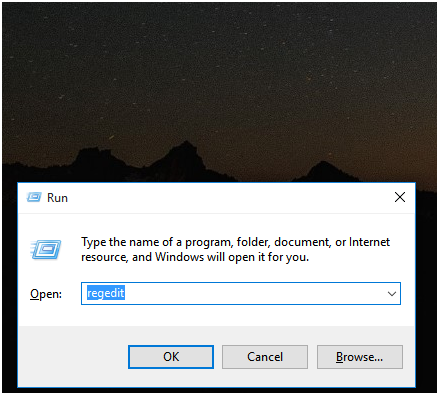
Step2: Now type “RUN” in the Search the web and Windows box.
Step3: Type “Regedit” in the box and press enter and it will be opened.
If your PC asks for any permission then allow it to make this change and here you will get the regedit window.
How to open the registry (Direct way to open Registry)

If you want to open the registry window without “Run command” then you need to type “regedit” in the search box of Windows and press enter.Then you will get the view of the above mentioned image. After that just click on that icon and registry window will be appeared in front of you.
To follow the entire process you need to go through few steps.
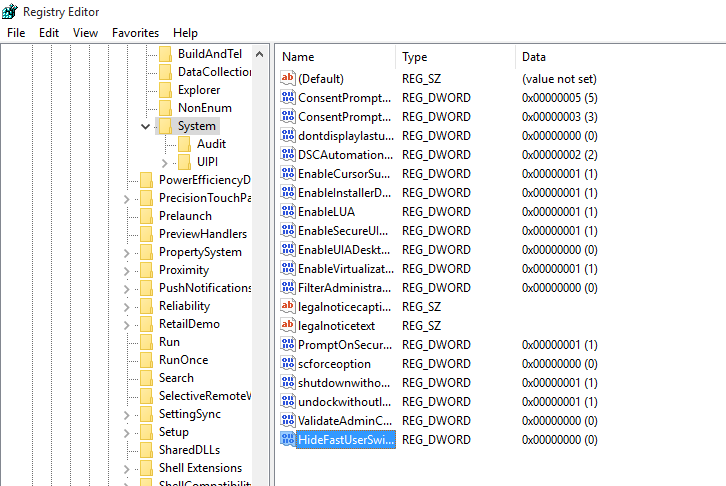
Look at the left slide bar in the appeared registry editor and navigate towards the HKEY_LOCAL_MACHINE>>SOFTWARE>>Microsoft>>Windows>>CurrentVersion>>Policies>>System
- Now you will have to generate a new value inside the system key.
- Open the options by hitting the right click on the system key and select “new>DWORD (32-bit)Value“.
- Now put the new value as “HideFasterUserSwitching“.
- Here you need to open the property of the mentioned value.
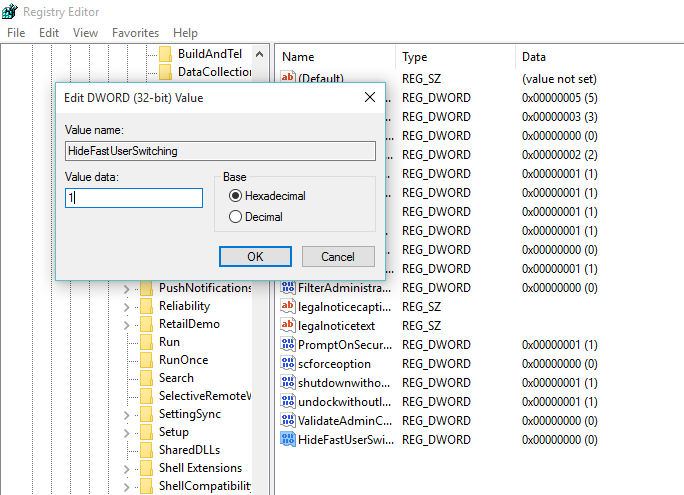
5.To open the property window of “HideFasterUserSwitching“just double click on it and it will appear as a small box you can see in the above image. Look at the value data box and change the current value as 1 from 0 or any other number, choose hexadecimal in the base corner and click ok.
This was the little process to complete this task of disabling the “Fast User Switching”. After that, you can close the registry editor.
At the moment, if you have any kind of account running in your computer then you
will have to sign it out because the entire process will take place when you will sign out from any other user accounts.
Now restart your PC and you are free to sign in back with your user account.After getting signed in if you want to verify the authenticity and completion of the previous process you have done then you can test it by clicking on the start menu and you will see that there is no other option is showing to switch the account.
If anytime you get a desire to reverse the entire process and make it according to its previous values then you can just do that by following the same steps.All you need is to set the “fastuserswitching” values again or you can delete the
How to “Enable or Disable” the Fast User Switching in just one click.
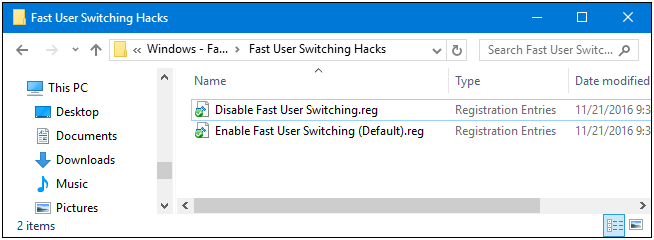
The entire process of disabling the Fast User Switching from the registry values was the default process designed by the Windows and programmers. Anyhow if you find it a long process and bunch of commands then we can help you out by making it more simple.
To make it procurable, few third party options are still available by which you can disable the Fast User Switching in Windows 10 and similarly you will be able to enable the entire task again just by one click.
After clicking below link, a download option of a Zip file will be served. Download that zip file and run it.
Click to Download the file
It will execute the process of disabling or enabling the Fast User Switching in one click effortlessly.Basically, the third party option is the combination of hiding Fast User Switching values which we have defined in the above process and exported it to REG file.
If you run the switching process by this third party option then it will set the entire value as 1 automatically in one click and save your time with the easiest way of operations. To enable or restore the previous values you can follow the same procedure by clicking once on the Enable Fast User Switching.
- How to disable the Fast User Switching by using the local group policy editor (For Enterprise user for Windows 10)
If the user is working on Windows 10 Enterprise or Windows 10 Pro then we will let you know that we are going to serve you by the easy and simple process of disabling the fast user switching. You can adopt the local group policy editor which is apparently accessible like child’s play.
Basically, this tool is very important and has a powerful ability which can affect your windows, so take some time to learn about its behavior.
You need to follow the coming steps to perform this task:
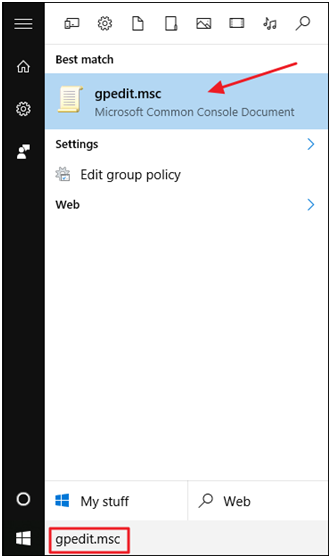
- Click on the search box of the Windows and type a command “gpedit.msc” and press enter.
- Local group policy editor will appear and you need to have a gaze on few commands there.
- At the left pane of this window navigate towards the Computer Configuration and then click on the Administrative Templates.
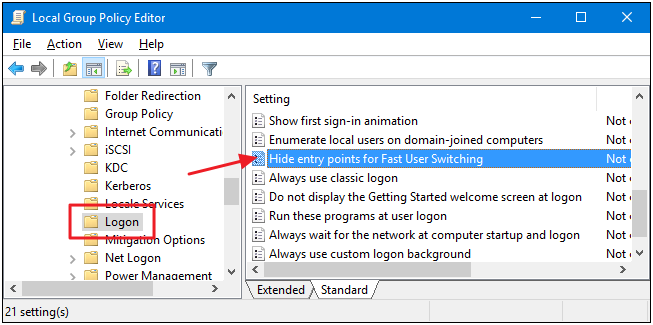
- It will take you to the system option which should be clicked by you and you need to click on “Logon” file.
- On right hand side just try to find “Hide entry points for Fast User Switching” in between or at up bottom side in the settings as you can identify that in the above image.
- Now just open its property by clicking on it. Then choose the “Disabled” option and then click “OK“.
Hence close this “Local Group Policy Editor” and log out from the running user account. Restart your PC and get back to your user account and sign in.
Note: Must verify the changes you have done. Check from the start menu if the option of switching the account has been removed or not. If, in the future you want to get the previous settings back and want to enable the Fast User Switching again then just walk towards the process we have discussed above and select “Enable Option” and its done.
Bonus Tips (For all Users of Windows 10)
Make your own Windows registry short-cut.
Sometimes , if you feel to create your own Windows registry short cut to perform fast and to save your time and efforts then here we will reveal a tip by which you will be able to generate your own Windows registry edits to stripe out HideFastUserSwitching value.
Once you make this, it will help you out time by time. This is particularly related with shortcut of “one click changes” we have provided above. Just learn it to make your own short cut to Enable/disable the settings or you can use the previously mentioned methods as per your privilege.
Conclusion:
Fast User Switching plays the immense role in the Windows 10. Significance of enabling of disabling the Fast User Switching is very heightened especially when multiple users perform at the same time. So, you are always free to “Enable or Disable” it as per your convince and desire by adopting our working and short methods. All the methods which are mentioned above are used by the bunch of highly professional users and then we have served those to you.
A classification of all the methods can be used by the different divisions of users. No matter you are using home edition or pro version of Windows as we have conferred all types of methods for all types of users. By using the inbuilt Windows programming you are also able to use 3rd party methods to perform this operation.