

OST file is created when you setup your Outlook 365 profile with Microsoft 365 at the default location on your system. As this file keeps all of your mailbox items locally, this allows you to access the items even without having access to internet connection.
You need to note that the OST file is linked to the particular Outlook profile in which it is created. This signifies that you cannot directly open the file in the profile or account of any other users. You have to first convert it into the PST format if want to access the file items in other user account or profile. This article will explain how to convert OST file into PST for Outlook 365.
Understanding Common Reasons for Converting OST to PST
Below are the reasons why you need to convert the OST file into PST:
- To back up important mailbox data
- To access emails when the Outlook account/profile is removed
- To restore data from a corrupt or inaccessible OST file
- To move mailbox data to a new system or Outlook profile
- To extract emails from an old or inactive Exchange/Microsoft 365 account
- To reduce mailbox size and store older data locally
Methods for Converting OST to PST for Outlook (Microsoft 365)
The methods, we have mentioned below, can help you to convert OST to PST format.
- Convert OST to PST using the Outlook Import & Export Wizard
Microsoft Outlook provides a built-in feature – known as the Import/Export Wizard – to convert OST file to a PST file. This is quite an easy and free way of converting OST to PST. But it works only when your Outlook profile is active and connected to the server. Here’s how to use this feature for converting OST file into PST:
- Open Outlook.
- Go to File on the main menu.
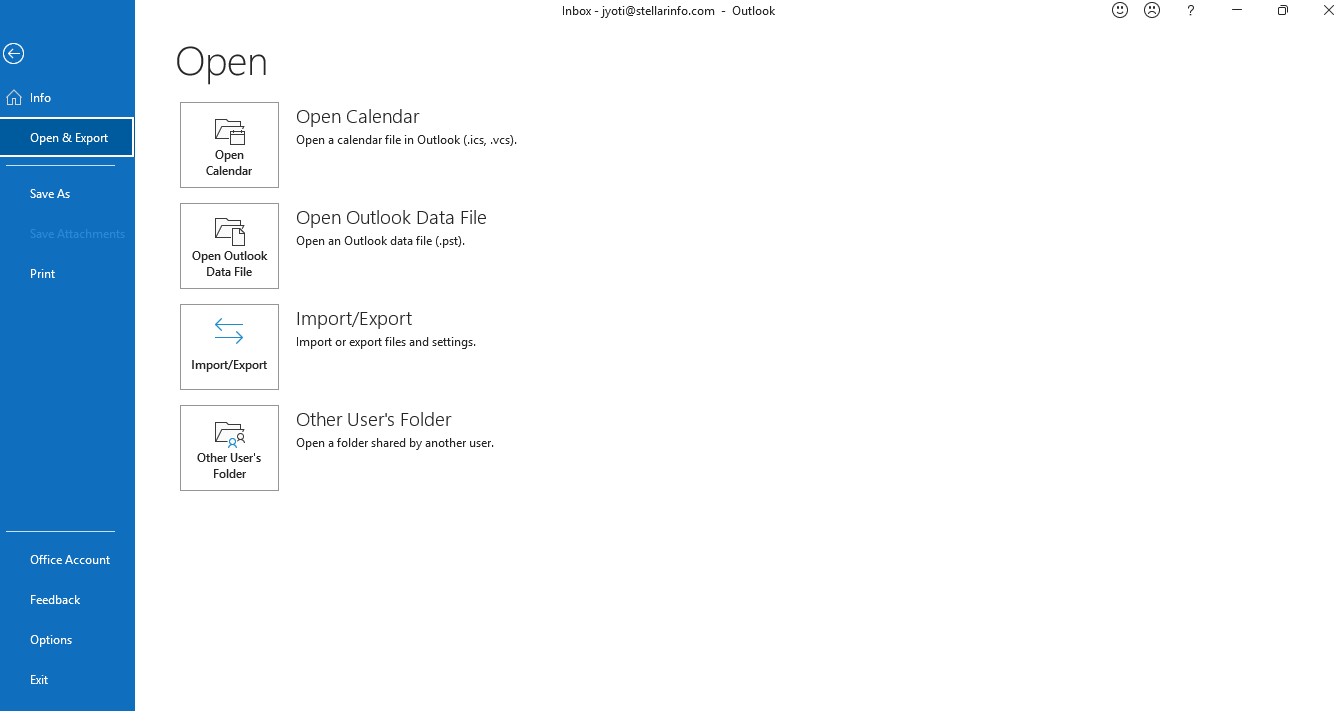
- Click on the Open & Export option.
- Select Import/Export from the given options.
- Next, select the Export to a file option.
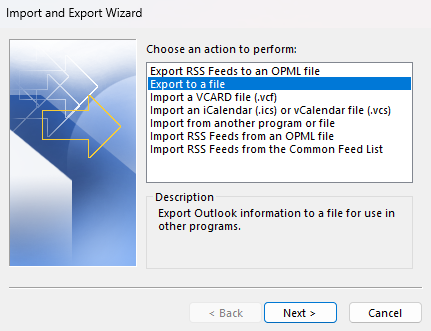
- Click Next.
- Select Outlook Data File (.pst).
- Click on Next.
- Choose the mailbox or the folders you want to export to PST file.
- Click on Browse to choose a desired location to save the PST file.
- Click on Finish.
- Convert OST File to PST using Archive Feature
Outlook’s Archive feature is another option to convert your OST file into PST. Basically, this feature is used to move older mailbox items to a PST file. Follow the given steps to convert the OST file into PST:
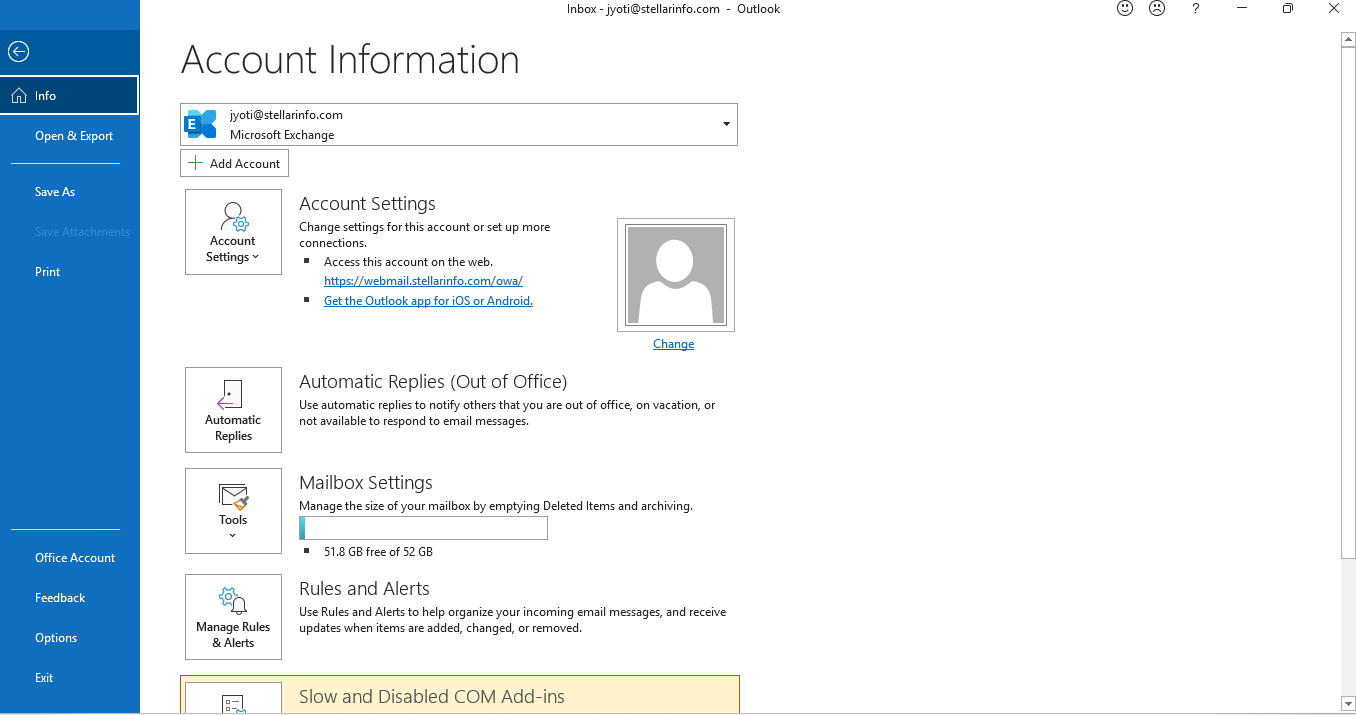
- Go to File > Info in Outlook.
- Click on the Cleanup Tools option.
- Select Archive.
- Choose the “Archive this folder and all subfolders” option and then select the folders you want to archive.
- Specify a date under Archive items older than.
- Click Browse to choose a location to save the PST file.
- Click OK to start the process.
- Use a Professional OST to PST Converter Tool
Using a professional OST to PST converter tool is one of the fastest and easiest ways for OST to PST conversion. You can use Stellar Converter for OST to convert your OST file to PST. This software can convert OST files of IMAP, Office 365, and Hosted Exchange accounts, without any hassle. What makes it stand out is that, this software can convert even orphaned, inaccessible, and encrypted OST files with complete precision and data integrity.
This OST to PST converter tool can convert everything in your mailbox — emails, attachments, contacts, calendars, tasks, and journals. Apart from the PST format, the tool also lets you save data in MSG, EML, PDF, HTML, or RTF format. Plus, before saving, you get a clear preview of all your converted mail items.
Follow the steps given below to convert OST to PST using Stellar Converter for OST:
- First, go to the official website of Stellar, which is https://www.stellarinfo.com/
- Download and install Stellar Converter for OST.
- Open the software and select the option List Profile to automatically see OST files from the default location.
- If needed, choose Select Manually to pick the OST file from another path.
- Click Convert to start the process.
- Click OK after the conversion process is finished.
- Now, you’ll see all your OST mail items in a preview window.
- Click Save Converted File from the main menu.
- Choose PST as the output format and then click Next.
- Click Browse to choose where you want to save the PST file.
- Click OK.
The software will save the converted OST file items in the PST file.
Conclusion
You can follow the above methods to convert the OST file into PST format. However, the manual methods will not work in case of orphaned or inaccessible OST files or when the Outlook is not working. In such a case, using a professional OST to PST software, such as Stellar Converter for OST is the only option. It recovers emails, attachments, contacts, calendars, and tasks from such an OST file and save them in PST while preserving data integrity.