Everyone are looking some method to increase ANdroid RAM due to its low speed or performance. Android is the best OS with great features. And in last few years, there is great increase in its popularity. You can get the good Android Smart phone under 10000. You can get the same Android version in any price but there is great variation in Hardware. And there is great variation in processing speed also due to difference in Ram and processor. But there are certain methods by which you can increase or boost Android Ram. But Before we go in detail, Let us understand some basics of How to increase Ram on Android.
Ram : What is Ram
Ram stand for Random Access Memory, it is used to temporary store the data of CPU usage. While doing processing, CPU stores its data in the Ram for temporary purpose and flush it away when process get completed. So the CPU working depend on the size of your Ram. More Ram means more processing CPU can do at the instance.
Advantage of Higher Ram : Why we need to increase Ram ?
Higher Ram not only make your Android phone faster. It also increase its multitasking performance, you can use multiple apps simultaneously. You must have face the problem like hanging. With higher Ram, such problem can also be minimized.
Let us know start our process of Increasing Ram of Android
- How to Increase Internal Memory of Phone using Memory card
- How to backup Android Data
- Boost Android RAM without root[/color-box]
Requirements Checklist
- Minitool Partition Wizard for SD Card Partitioning
- Swapper2 App : Download it from Google Play
- A High Class Micro SD Card (Class 6 or 10)
- Sd card Adapter
- Card Reader (Don’t use USB Mount)
- ADB Shell or terminal Emulator (to check if swap is activated)
- You must have BusyBox installed
How to increase Ram in android using Swapper2
Step 1: Creating Swap Partition
You must have Minitool Partition Wizard installed in your Pc.
- Now connect your SD card to your PC using Card Reader ( Preferably use the Inbuilt one) .
- Run MiniTool Partition Wizard and Look for SD Card
- First Delete Partition by Right Click Option
- Click On Apply to Delete Partition
- Now Again create Partition By Right Click Option
Partition Rules
Partition 1:
Label: Android-SD
Create as: Primary
File System: Fat32
Partition size: Any
Partition 2:
Label: Android-EXT3
Create as: Primary
File System: EXT3
Partition size: MIN: 256 MB MAX: 1024MB (1GB)
Partition 3:
Label: Leave Blank
Create as: Primary
File System: Linux Swap
Partition size: MIN: 32MB MAX: 1024MB(1GB) RECOMMENDED: 256MB
Now click on Apply to create Partition.
Step 2: Using Swap File
First Download and Install Swapper 2 from Google Play.
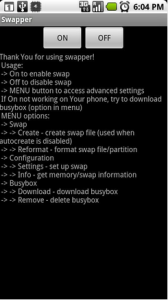
Run Swapper 2 and Navigate to Menu>> Settings.
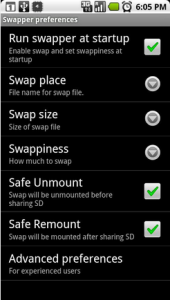
Swapper Preferences Settings
For kernels that doesn’t have swap partition support
Put Check On : Run Swapper at Startup
Swap Place : sd card/swapfile.swp (or you can place it in any folder you like)
- Swap size: MIN: 10 MB MAX: 256MB RECOMMENDED: 32MB (choose any)
- Swapiness: RECOMMENDED: 10MB SYSTEM DEFAULT: 60MB MAX: 100MB (choose any)
- Safe unmount :check
- Safe remount: check
Swap partition: Check
Swap partition: /dev/block/mmcblk1p2
After setting preferences, Go back and tap “ON” to turn on swap. Reboot device afterwards.
Now you can check your Android configuration and you will find increase in Android RAM. With this increase memory you can increase performance of your device. These method do really increase Android speed. So you must at-least try them. Beside that you can also download Android Ram Booster apps, they also increase Ram by killing unwanted process.


You don’t need the 2nd partition (EXT3) – just the FAT32 partition for data and the Linux-swap partition for the swap memory