Best Android Emulator for Linux
This is 21st century if anyone ask you which is most popular operating system in all aspect like user interface, easy to handle or any other the answer is Android. After 2009 there is a growth of mobile user, and when android came into market this growth goes aggressive. Now a days everyone who is using mobile wants Android because of its interface so basically people are going habitual to Android. After using Android when we use other operating system like Linux, Ubuntu,Fedora, all we can do on android also can access on other operating system. For that we use Android Emulator i hope you have a brief idea about what is Android Emulator. No, you don’t wary, Android Emulator is third party software which give you permission to install apps on other operating system. Today we are going to talk about which is Best Android Emulator for Linux. Although there is many Linux Android Emulator in market but we tell you which is Best Android Emulator for Linux so let’s go.

Best Android Emulator for Linux
Here i am providing you the list of Best Android Emulators for Linux according to my research. So, please make sure to decide which one best suites your system configuration and all. Now using these Linux Android Emulator, you can run Android on Linux system.
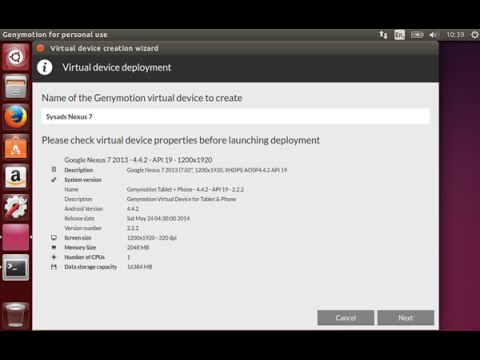
1. Genymotion Android Emulator
Genymotion is one of the best Android Emulator which is available in the market. It is easy to use also very user friendly, and takes less space on your OS. Genymotion is the only one android emulator which is multi-platform by multi-platform it can rum on Linux as well as Mac, Window, Ubuntu and other Operating system. But there is some condition so we don’t have to worry about that. Genymotion have some key feature which makes it so much popular like fast, simple & reliable and apart from that if you are a developer then there are also some feature for development QA testers, Help Desk, Sales Team etc.
 2. Andy Android Emulator
Andy Android Emulator is good Android emulator for Linux. It is also easy to handle and user friendly but some feature are missing form it. Now when install Andy it took time to setup in os but after installation it works well. Andy is a very decent Emulator on Linux and over all performance on gaming, music feature, productivity, Arm supporter are very good. There is one drawback is it’s not good for Developer.
 3. Bluestack Android Emulator

Bluestack is an another Android Emulator which is very popular. The main reason is its simple and very similar to android phone.There is a another reason of it’s popularity is versatility and simple to use algorithms. In my personal opinion i am using Bluestack on my computer so i personally suggest you first you should check if it can match your system. Bluestack have both online and offline installer so if you want to install online you should have a good speed internet connection otherwise you can try offline installer. The drawback of the bluestack is you can not do development kind of work on that but overall it is a best Android emulator.
 4. Jar of Beans Android Emulator

Jar of Bean is a basic android Emulator with a good and simple feature like installation of app and playing music and other. You can install it online or offline it depends on you which method you choose. Jar of Bean offer you a very good resolution option like if you want change the resolution of you app you can do it easily, this is the main feature of Jar Bean.


")