Your workplace or company culture is one of the most important aspects of your business. Your culture directly impacts your company’s bottom line. If your culture is bad you will struggle to find good employees because the best jobseekers will avoid your company like the plague. If your workplace is tied up in boring procedures and out-dated policies, your employees won’t feel respected or value and they won’t stay working for you. They will be out of the door at the first available opportunity. Here are 10 signs that a company has a progressive culture.
There Are No Forced Ranks
Forced ranking makes employees fit into one box and doesn’t allow for employees to be categorized in any other way. If the lower ranks don’t feel appreciated or valued, they will go against the rules and policies enforced by those in the management ranks. Managers need to be excellent leaders and all successful leaders earn respect and loyalty; they don’t demand it. Make sure your management teams are filled with mentors and not just dictators.
Employees Have Latitude
Progressive companies don’t just allow their employees to have reasonable control over their work schedules, they encourage it. Flexi-time schedules allow your employees to do what they need to do before they come to work or allows for them to leave throughout the day if they want to. It also allows for work to be done remotely, like now during the biggest global health crisis in over a century. Flexi-schedules are all about trust, give your employees the opportunity to show they are deserving of this, you won’t know unless you try.
Pay Attention to The Recruitment Process
Progressive companies have fast, friendly and reasonable recruitment processes. If you interview for a company and the vibe seems controlling and deceitful, chances are that that company is still in the 1950’s in terms of the rest of their employee policies and procedures. If your opinion is clearly valid and respected during the interview process, then you should take this as a sign that the company has a great and progressive culture.
The Company Offers Prioritizes Health
A progressive company encourages their employees to make healthy choices throughout their day. Pay close attention to your employee lunch menus, you’ll soon be able to see if the options are limited to healthy options or cheaper and therefore more processed options. A company needs to have a healthy and happy culture that provides healthy snack options from a vending machine franchise. If your company can, it should also offer fantastic health benefits to its employees. If you keep your employees healthy then they’ll be able to spend more time being productive and less time being sick.
They Embrace Technology
Technology makes our life so much easier. This shouldn’t only be the case at home. Companies with a progressive culture drives the idea of constantly evolving in all aspects. A progressive company will have many technology driven programs and use an array of project management software in order to stay up-to-date and relevant within their industry. Companies who embrace technology have improved efficiency and increased productivity which leads to a better overall company culture.
They Don’t Have Outdated Disciplinary Procedures
The outdated disciplinary processes from yesteryear should be all but gone from a progressive company. Progressive discipline consists of disciplinary measures that give the employees a chance to improve. Common progressive measures include issuing warnings to an employee and following a process before considering dismissal.
There Is Trust
Progressive companies have trust, more importantly they have trust that works both ways. Employees need to feel safe and secure within their workplace, if they feel like the can trust their company, they will give 110% of themselves. Trust does work both ways, so just like employees need to be able to trust their employers, employers need to be able to trust their employees. If there is any kind of breakdown in this, then the entire trust relationship will fall apart. Trust is the most important business and brand asset you manage, especially in relationships with employees.
The Absence of Fear
Fear is a toxic thing to have in the workplace. Employees acting out of fear will never be able to focus and perform at their best. A culture of fear creates a culture of mistrust and lies. If your employees make a mistake, and they will because they are human, they need to feel safe enough to admit that and receive the help they need to fix it. If your company culture is based on fear, then your employees will be too scared to admit when they have made a mistake and that mistake will keep on happening. Many studies show that a fear culture is a very short-sided approach and it leads to a toxic work environment that all but kills motivation and staff retention.
There is Open Communication
Progressive companies are open to listening to the input of their employees. Smart companies, and even smarter leaders, are aware that there is great value in having open-door policies. There is no one better to improve your workplace policies than the actual people doing those jobs. Transparency is undervalued and underutilized in most organisations and this needs to change. Your employees need to have open access to all the resources they need to do their jobs to the best of their ability.
There Are Limited Issues
Companies with bad culture have interdepartmental fights and squabbles all the time. This is largely owed to a culture of fear and insecurity. If your employees are forced into acting like animals, then they will, and your organisation will stop being a well-oiled machine. If your company employs a healthy and progressive work culture, then your employees will feel safe and secure and won’t throw anyone under the bus. Less fights will lead to a more productive environment.
The idea of having a progressive company culture isn’t just about nap-pods and in-house yoga. A truly progressive company culture is more about respect and having your company recognize and celebrate the fact that your employees are the ones that make your company great.
Data is a significant asset for each business today. If the device data is tampered with, the company can face severe consequences that will result in its reputation, customer service and financial loss. As a result, a reliable storage device can help small businesses assure the safety of their data. Network-attached Storage (NAS) can come to their rescue in many ways to serve the purpose.
Recovery support hard disk drive to repair screw hard disk in service center
What is NAS?
Network-attached storage (NAS) is a storage device that allows you to retrieve or store data using a network. Unlike a hard drive, NAS does not require any wire connection. Instead, it works using a network and can function on multiple computers at once. NAS can serve as a resourceful way of protecting data comprehensively. It can help protect small businesses by offering to preserve many hard drives inside them. So, if one hard drive fails to back up your data, the others will continue to provide a helping hand. Such a system ensures the safety of your data by all means. Moreover, the scalability, reliability and affordability of NAS are hands-down.
How to buy the best NAS for your business?
NAS has proven to be an exceptional storage device over the years. However, when you purchase this device from the market, you must consider a few factors. Taking these factors into consideration will ensure the best. It will help you make sure that the NAS device you buy will serve the purpose without a hindrance.
Potential connectivity- The NAS connectivity comes in various kinds. Many NAS boxes connect using wired gigabytes when others require wi-fi. However, these vary in prices to a drastic extent. So, consider what type of connectivity will suit your best. If there is no need for wi-fi connectivity, then pick according to your business suitability.
With or without disks- Many NAS devices come with disks already installed. However, these may require some extra time to set up. If you feel that there is no requirement for disks, opt for it accordingly. However, NAS devices that come with disks prove to be more useful for small businesses. They help you get more control over the type and capacity of the device you are using.
Hands-down storage capacity- The more capacity your NAS device offers, the better it gets for your small business. So, consider the device capacity of your NAS device before purchasing it from the market. NAS drives come in capacities varying from 2TB to more than 40TB. So, choose according to your business requirement.
Software- When you choose the perfect NAS device, it will guide you in setting up the drive without a hindrance. As a result, it will offer a step-by-step guide to you about using the NAS file server, the storage and a lot more. So, you will find yourself at ease while working with such a device. With such convenience, there is hardly any reason to opt for devices that provide anything less.
The bottom line
There are many NAS drives available in the market at affordable prices today. However, your business requirement is the primary consideration when you forge ahead to buy a potential NAS drive. So, make sure to consider your budget and all the other tips we have stated above for you. If you are all set to buy a NAS device today, make sure to buy it from an online store that offers Asustor data recovery. Such a thing will ensure your data back-up like no other. So, choose your service provider wisely as it can make or break your small business.
An API (Applications Programming Interface) is a computing interface that allows applications to communicate and share data with each other. They are being used in almost every other application and device that we use today, for instance, if you look at IoT trends enhancing business processes, you will find that they are all linked to APIs.i
This means that deprecating or changing it can cause problems that could lead to a lot of losses in terms of money, resources, and information. This gets even worse for public APIs. Public API developers are supposed to make sure that their APIs work well and meet the requirements of their consumers.
Things that affect the performance and quality of an API such as downtime, server load, controller code quality, encryption level among others need to be looked at at all times.
Developers are supposed to test all these factors that affect the performance of an API before they offer it for consumption. However, you also need to monitor the same factors even after deploying your API since some problems might surface when it’s being used. You can set it up with RapidAPI testing to make sure that all tests are done properly.
Monitoring an API
As a developer, monitoring APIs you consume or provide should be an essential part of your development strategy. As a beginner, you might find yourself wondering about the things to monitor or even how to monitor your APIs. In this article, we will talk about some of the things to get you started easily.
Using Functional Tests from Development
This is an important aspect of monitoring and testing APIs especially for developers using or providing their own APIs. They can re-use functional tests they created during the development and testing phases of the API. This has a number of advantages;
If you set up your functional tests during development and testing to give you error messages in case of an issue, you will be able to get detailed information on errors during the API monitoring making analysis easier.
The functional tests will scrutinize the functionality of your API during monitoring instead of getting just the availability reports.
It is easier since you know how the functional tests are written and helps in saving time.
If the functional tests are written to show statistics on the expected usage of the API, they can be used during monitoring to show how your APIs are being used and how they will be used in the future. This can help in improving the API to meet future demands.
Creating Tests that Mimic Actual Use Cases
Developers integrating public APIs with their applications are supposed to make sure that they not only know how those APIs operate, but also about any failures associated with them before their application users notice the failures.
This means that developers are supposed to create monitors that mimic how an API is used in their applications. For instance, if you are using a Facebook API that shows the feed of a certain page, your API monitor should be doing the same thing, not doing anything else.
It is also important to monitor all your use cases. Some developers monitor a single request, especially the first one, and think that they are monitoring their APIs. All requests should be monitored in sequence just like they are used by your application.
Using a Dedicated Account
APIs require one to use their access key or credentials in their requests. When monitoring an API, it is important to use a dedicated account to make sure that monitors are run with the same access rights as the API users.
Conclusion
API monitoring is an important part of the API lifecycle. It helps developers to avoid problems or to solve those that arise quickly. Since APIs are part and parcel of running applications, developers should make sure that they develop strong mechanisms to protect them from failure.
Public internet access is a convenient feature for mobile and laptop users when they’re on-the-go — what is often forgotten is the risk that comes with using a network outside of your home or office. Having insight into the safest practices and tools for proper public Wi-Fi access is vital to protecting your data.
While Mac devices have some malware protection pre-installed, they aren’t invincible — these resources will ensure your computer is as safe as possible, so you can enjoy Wi-Fi access wherever you are.
Securing Connections
When connecting to an outside network, use an HTTPS connection — a hypertext transfer protocol tool. This extension is designed to secure communications over a virtual network. You’ll know if you’re connected if your browser has HTTPS before the website you’re surfing. Once you’re connected to the server and are on the legitimate HTTPS site, your web browser confirms the site’s security and will verify if it was provided with a legitimate authority certification.
When you connect to an HTTPS-secured server, your web browser checks the website’s security certificate and verifies it was issued by a legitimate certificate authority.
Anti-Virus Protection
Using a shared network exposes your Mac to more malware and security risks than a private network, which makes antivirus one of the most important tools to utilize.
Antivirus and malware removal software from a reputable company protects your computer from outside threats and shares alerts when it detects anything harmful attempting to access your data.
Malwarebytes antivirus for Mac for example, tracks malicious attacks by studying program behavior (rather than just the signature) and also offers two-factor authentication — which helps ensure that if your Mac is hacked and your username and password are accessed, the hacker will be unable to retrieve documents.
Importance of a VPN
Investing in a VPN — a virtual private network — from a secure source is a key part of protecting your Mac. The best VPN service acts as a tunnel between your local network and another location often miles away. This gives off the illusion that your IP address is located elsewhere. VPNs are designed to protect your browsing history, streaming location, and internet activity.
You’ll need to do some research to find the right company, but the VPN software you choose should ultimately be able to provide you with detailed protection, so you can work or browse from that local coffee shop that you love without worrying about the safety of your data.
Limit File-Sharing
When you’re working on a public network, it’s important to turn off any features that automatically enable file-sharing. For Mac users, this feature is found through the system preferences tool — find the airdrop tool and deselect if it’s been turned on.
Use the Available Firewall
Your Mac laptop comes with its firewall installed, so why not take advantage of this added security? Firewalls are designed to prevent and monitor any outside attempts to connect to your system. You don’t have to worry about incoming and outgoing threats because your Mac will do it for you. For an added security measure, you have the option to select the websites and services that you trust to connect.
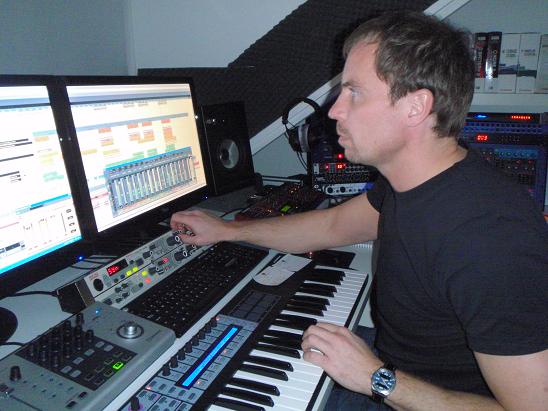
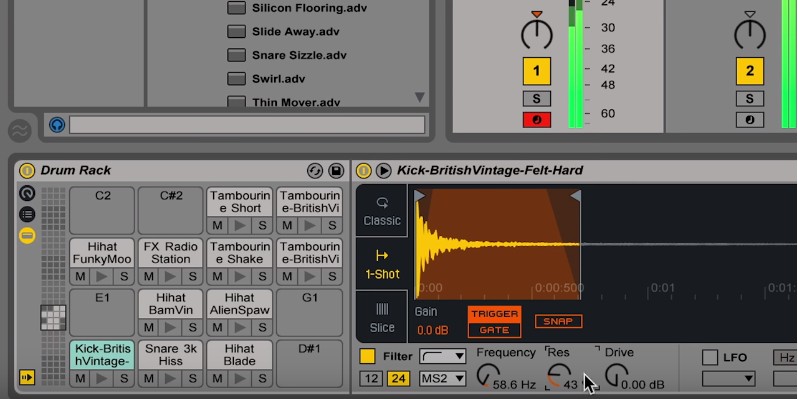
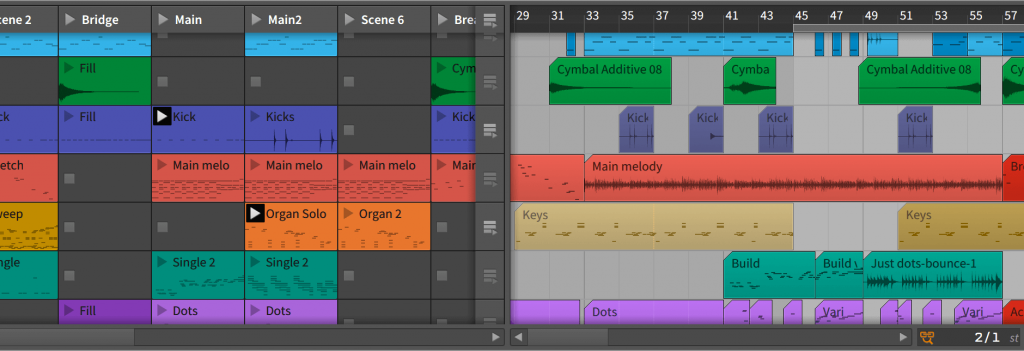
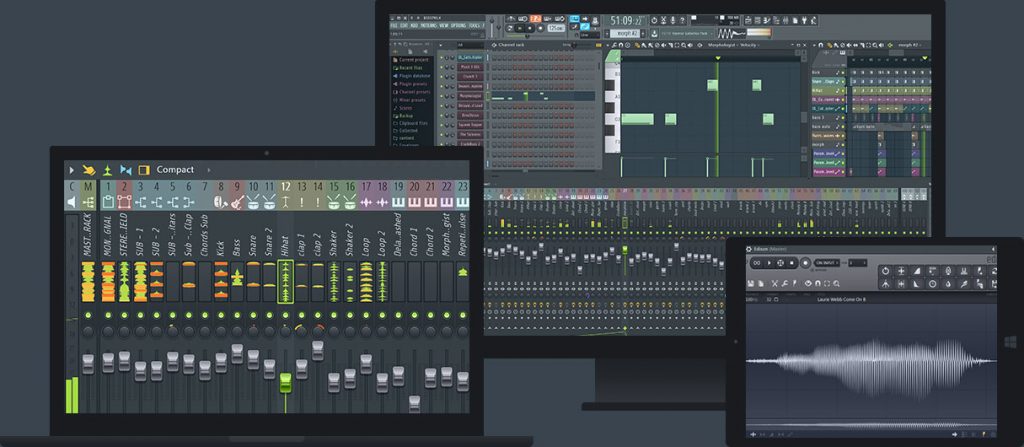
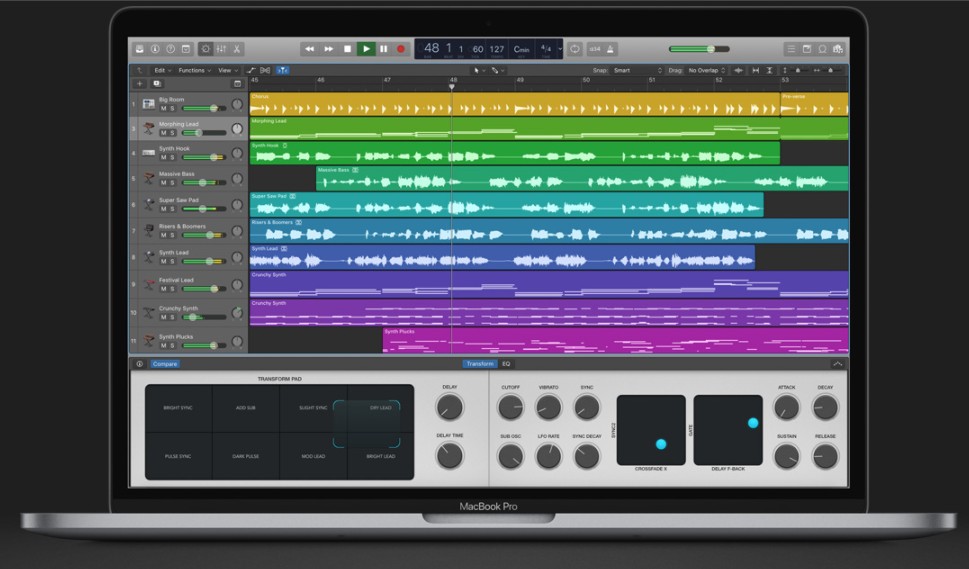
Unlike years ago, things have changed today in regards to how music is created. It is no longer about live session musicians coming together with drums, guitars, and keyboards, but rather it all about software. The coming of the digital era has greatly simplified how music is being made.
Be it a newbie or an experienced singer or just a fun guy who likes sing, tinkering with software can produce the best of results. The software that is being used are called Digital Audio Workstations or abbreviated as DAW.
If you are new to music production, an aspiring producer, or you are recording artist, take a dive in this review of the best Music Production Softwares, and you may find the perfect software to help your career. You will also like to see our list of best beat making software’s and audio editing software. Android and iOS user may try these beat maker apps.
Contents
What is Music Production Software?
It is a Digital Audio Workstation that an artist or a music producer uses to record compose, mix, edit, arrange, and refine his audio tracks. They assist the artist in creating music without the need for any live instruments. There are many production software’s in the market out there; some are free while others are sold at a price. Some have been there for some quite some time while others have come out just recently. The choice is a broad one; you can choose a product depending on what you want to achieve with the tracks that you are creating.
Like anything that one would want to buy there would be certain things, you would like to consider when you are buying or using a particular device or software.
Listed below are some of the considerations that you would like to consider when before you decide to buy a DAW.
1. Budget and Future Upgrades
Out there they are free software’s and software’s that one can buy. If you are new to this business and you are limited in finances, it would be advisable that you use the free softwares.
You must consider how much you are prepared to spend now and in the future even as your skills continue to grow. Do you want to start small with free software and progress high-end software? Or do you want to buy expensive software that will not cost you to upgrade in future?
Major DAWs have:
Introductory version
Intermediate, mid-range version
Premium, flagship version
Researching on the particular features of a DAW and checking the price range helps one to make a considered opinion of what one is comfortable in paying and the features one will get from the DAW bought.
2. Support
What is the support level that is being offered by the software company that you have chosen? Are there any active online groups, message boards or forums that can provide help in case you have doubts on the respective products. You may want to consider the size of its online forums they can be used to gather knowledge, ask for advice and also trade ideas. A good DAW will have a large online community that will have a number of online tutorials.
3. Style of music and preferred workflow
What do you want to focus your making your music with? Do you want to work with milked instruments or vocals or other recorded material?
You have to select the DAW that based on what you will plan to produce. Though most of them have the same features, there are others that have particular strengths in particular area, for example, Ableton live is good in live performances while Pro Tools is used in mixing large numbers of audio tracks recorded in various instances. The major deciding factor comes out to be the price point.
4. Experience
Are you a newbie or an experienced guru in the art of music production as explained earlier if you are new to this industry it would be better to use the free software that is in the market. But if you have years of hands on experience it would be better that you go for the more complex software that has more features.
5. System requirements
Which operating systems are you running? How powerful is your computer? What is the amount of memory and the processor speed? Some DAWs can only run on a particular operating system such as Windows, Linux or Mac, for example, FL Studio only runs on Windows while Logic Pro runs on Mac OS.
You also have to consider how powerful your computer is; every DAW has got its system requirements. Any powerful computer allows you to run any DAW. Of importance here is to check the amount of RAM of the computer that you will be using.
6. Effects interconnectivity and Outboard synths
What outside the box production will you be doing?
They may come a time that you may want to incorporate external synths or drum machines. You may also want to use external stompboxes and processors, which can be used in recording in computers in a return loop. If this appeals to you, have to look and try and strike a balance in outside the box work that you may be involved. If this is the case, then these can determine what kind of DAW you will be purchasing as some DAW are designed for external connectivity than others. So here you have to consider the amount of outside production you will be involved in and the suitability of the DAW you will purchase as some are easier to setup than others.
7. Work environment
What environment will be using the DAW? Will it be at the studio, recording, and mixing or will it be at live events?
These are some of the options you have to consider before getting a music production software; there are some music production softwares that can be used for both live and studio uses.
8. Bundled plugins effects, instruments, and library sound content.
A majority of the inbuilt DAWs in computer operating systems come with custom plugins effects and tools. However, they might not be as good third-party versions. Here you have to choose whether to buy an expensive DAW with bundled instruments or buy a mid-range DAW that has good quality effects and one can be able to add plugins from the internet.
Major workstations will have nearly the same functionalities as the rest of its competitors. More often than not a mid-level DAW system you choose will serve your needs competitively.
But different software companies emphasize on some features more than the others and here come the differences.
Coming up with this list, we have tried to check the following:
• The software popularity.
Cost at which it is available on the market.
• The audio capabilities,
• Live performance compatibility
• Versions available
• Compatibility on various Operating Systems
List of Best Music Production or Making Softwares
Here then are the 12 most used music production softwares today.
1. ABLETON LIVE 9 (Best Music Making Software)
Launched on 2001 Ableton live is by far the most popular among the best music making software. Currently, on its 9th edition, it is being used by a lot of people in music production. It is said that it is easy to follow as it has “arrange” and “session” features which are the main views and are linked well, making them easy for composing and editing. It is designed in a way that it is easily usable for professionals as well as amateurs. It enjoys a huge following that is why we have put it as the first DAW system.
What we liked
It has a controller which comes with 64 buttons knobs and controllers which make Push 2 a producers dream. This makes it one of the best hardware in the market.
With its live instruments, you can get up to a maximum of nine instruments and 41 plugins.
It is a new music production software in the market it was released in 2014. It has rapidly become a favourite among music production enthusiasts.
It was made by former employees who developed Ableton live.
It improves on the Ableton Live in a couple of ways. The BITWIG STUDIO 2 comes with 25 new modulators to help you in your editing. Also, the new 2.1 update is out with a lot of bug fixes and performance upgrades.
It has a central display that has editing panels that enable smooth workflow while switching between arranging, editing and mixing tasks. With every new update, the software has become well optimized for the OS it works on.
It easy and simple to learn and use appeals to professional and amateurs alike.
What we liked
You can run popular plugins side by side with no issues relating to latency as each VST runs independently.
It has a “sandboxing” feature that ensures that your project does not lag behind and no plugin will interrupt your project. This feature helps your computer not to freeze when running a plugin.
It has powerful MIDI editing and audio editing striking a balance between them.
If there is software that has been there for quite some time is Fruity Loops known in the music industry as FL. Developed by image-Line in 1997, it has undergone a couple of upgrades with its current version being version 12.
These versions come with scalable interfaces and multi-touch interfaces.
It also comes with a wide variety of plugins including samplers’ virtual effects synths as well as support for VST, VST2, VST3, Rewire and DX.
It has free lifetime updates after you have purchased a copy you will have access to upgrade free for every version. It is available for Windows only.
What we liked
It has Sytrus which is fruity loops operator 6 FM.
FM synthesis is a bit hard for starters Sytrus makes this easy and satisfying it also makes one make monstrous sounds.
It can found in three versions – Fruity Edition, Producer Edition, and Signature bundle.
It has a number of plugins and synthesizers.
It can efficiently cross-work between working with MIDI virtual instruments and audio.
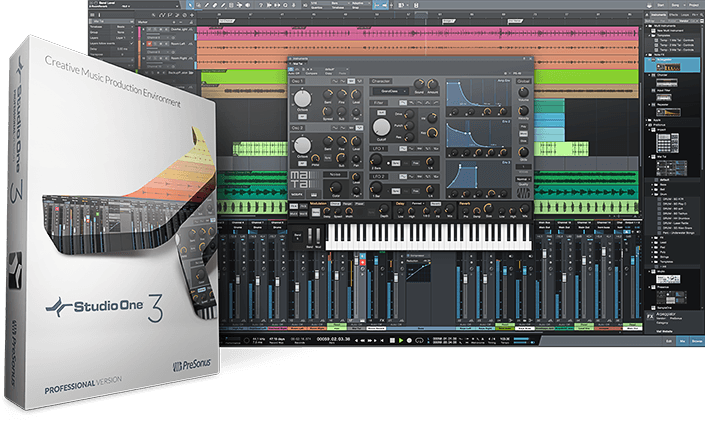
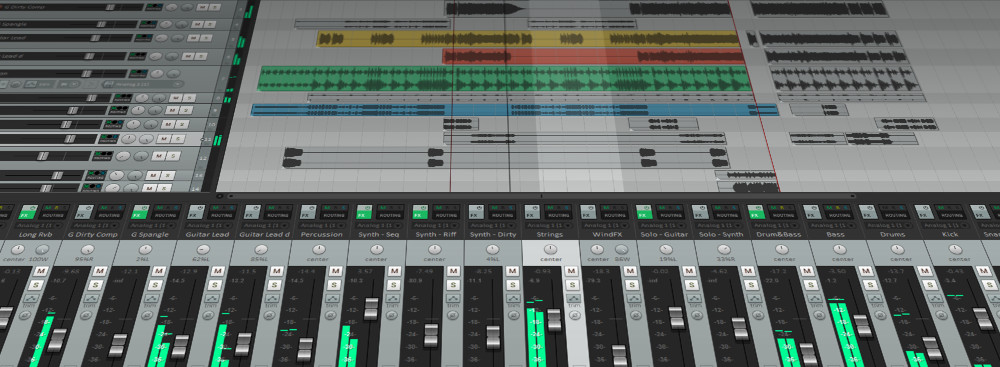
The workspace of Studio one 3 is easy to navigate its workflow allows one to go a full mix session quickly. It has good editing capabilities which enables one to test other ideas as work goes on.
The screen interface is touch which allows you to navigate different screens quickly and easily. It comes with a lot of preloaded instruments and sounds. It is available in two versions – artist and professional.
Available in Windows and MAC OS.
What we like
Scratch Pads this is a feature in Studio 3 that allows one to sketch ideas that you can, later on, drag in your project.
Before putting anything in the mix, they duplicate areas of your mix in a side panel.
It is one of the older software. Touted as one of the best DAW out there.
It was initially released in 1991, and it has grown to be a powerful music creation software. It has an interface called Skylight which is separated into five regions that make it easy to navigate.
You can move hidden or moved depending on what you are working on.
It has a control bar to enable one access all their tools.
It also has a drum replacer tool that can be used to enhance your drum tracks.
Its vocal Sync is used to sync easily vocal tracks that are different together.
What we liked about it
It has a Paint MDI function that is quite useful for composing.
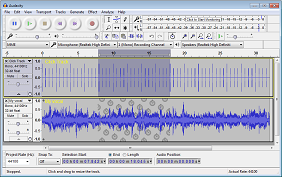
First released in 2009 as a free recording software, it continues as a free software to this day. It also has support for different operating systems.
It has a flexible interface that is easy to master. Therefore Audacity is a good platform to start if you are trying out your luck as a beginner. The software has a frequency analysis tool that allows a user to adjust bass, treble, pitch and analyses tracks. Using the program users can edit audio files as the program presents tracks as editable waveforms.
Compatibility: Windows |MAC | PC
What we like about it
It is simple, and that is its primary strength. It is easy to learn and has many advanced features as that of many top tier music production softwares.
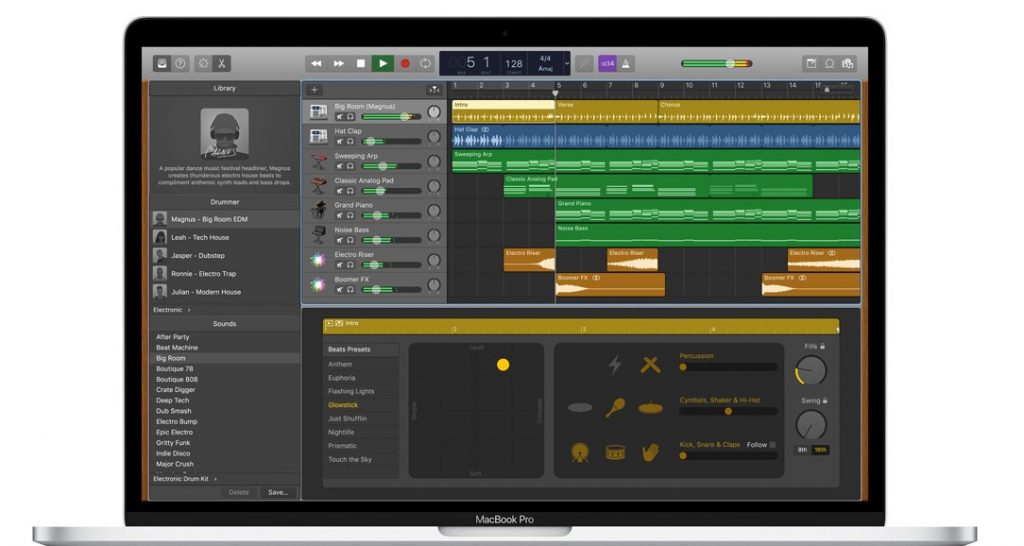
7. GARAGEBAND (Best Free Music Making Software for MAC)
Garage Band this is a free DAW developed by Apple. It comes free with all its Mac OS versions it is also quite popular among the Apple fans. Its principal likeability point is its accessibility and ease of use
It is simple to use and has a straight forward format when you add an instrument you see it on the tray.
Its’ straight forward coding makes it easy to follow. All tracking is simple to understand, and the instruments loops are easy to navigate.
It has a simple layout so that first-time users can be able to understand.
What we like
It is simple to use and comes pre-installed on Mac OS.
It is also easy to upgrade to the more advanced operating systems which are also developed by Apple.
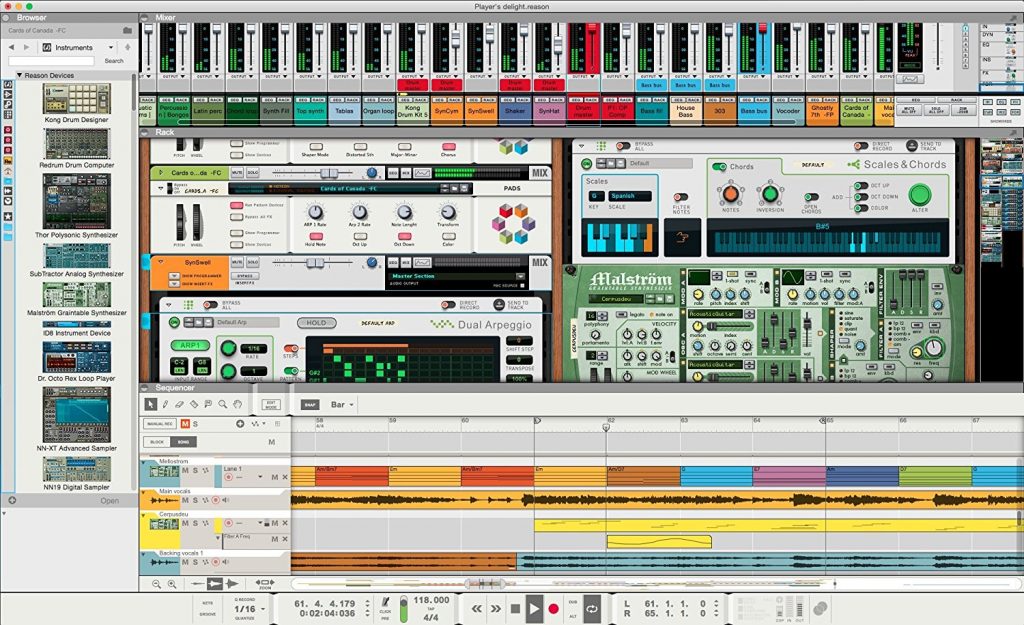
The first version of Reason was launched in 2011. Now it’sin version 9.5. It has the loyal following of many music artists and producers.
Its key features centers around ‘Rack’ view. Instruments, processors, and modules can be added for simple, arranging to sample, and editing.
The tool at the center is the rack as you create your song you insert the sounds effects and instruments. With the new version that is the reason 9.5, the developers have added VST plugins to the software. The addition of VST plugins was one of the most requested features on PROPELLERHEAD forums. This shows that the developers are always paying attention what the customer want from the software.
The software allows you to add more Rack extension and more VST plugins. Their VST plugins are Reason strong point. It offers one of the best virtual instruments among the DAWs.
Reason VST capabilities are its strong point. It offers some of the best virtual instruments out there.
What we like about it
Reason is used as music workstation or as a VST instrument for recording companions.
It also has a 30-day trial version which can be downloaded and tested out to see how it performs and works.
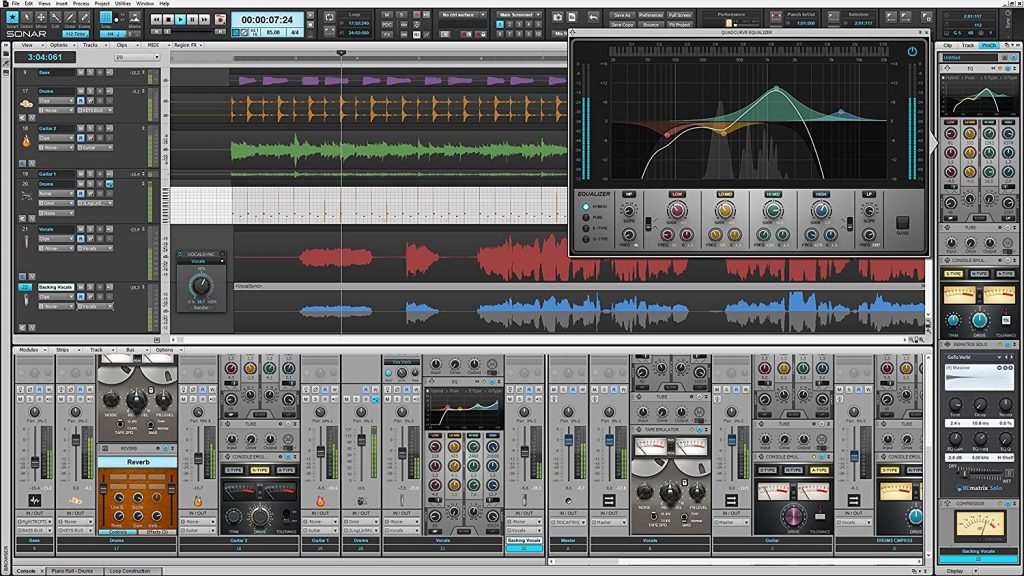
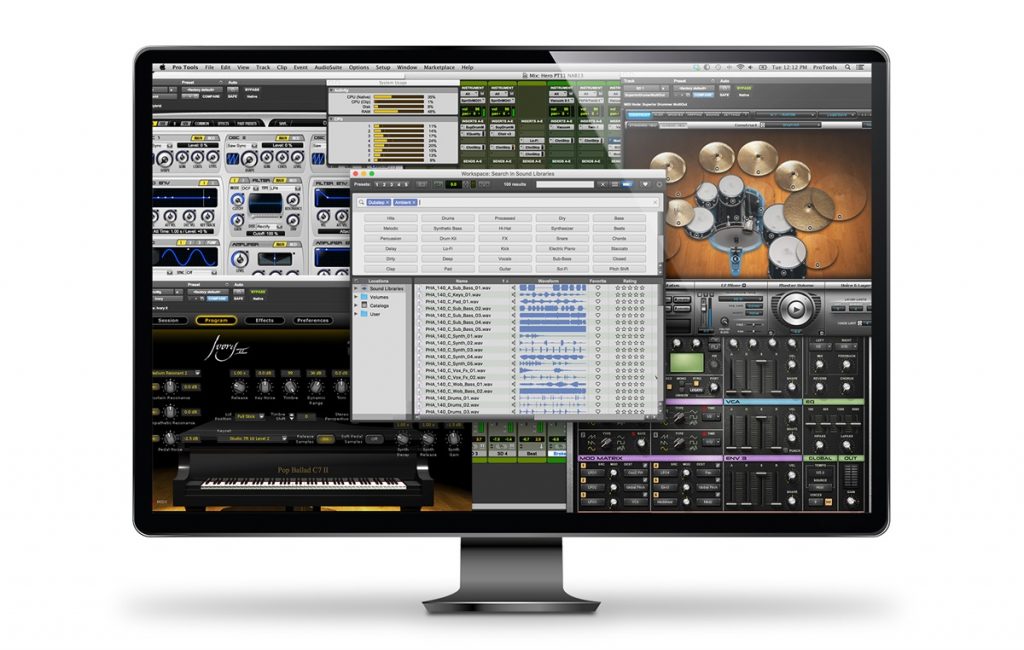
First released in 1991, it offered four tracks at that time. Currently, on its 12th version, it has improved compared to its predecessor. It enables one to record, compose, edit, mix and share records.
It requires a lot of patience to master its true capabilities, but when you finally get a hold of it, there are only a few DAW systems that can rival Pro Tool’s capabilities.
It provides every single tool that a music producer would ever want.
It comes in three versions depending on one needs they are:
• Pro Tools: – This is for singers who are starting to use Pro Tools.
• Pro Tools: – Pros for musicians and producers who want to create advanced music.
• Pro Tools HD – is for experienced music producers who need audio production who need to check surround sound, track counts, and performance.
It has the distinction as the software used by Ricky Martin back in 1999, and his songswere at the top of the charts. This was way before many of the moderns softwares came into existence.
What we liked about it.
It has free version a starter version which newbies in the industry can start using as they progress on their way up
It enables one to freeze and unfreeze plugins so as to free up computer processing power.
It has project revisions this feature keeps a present version and history of an audio organized, so you can have various versions use the one you are really impressed with.
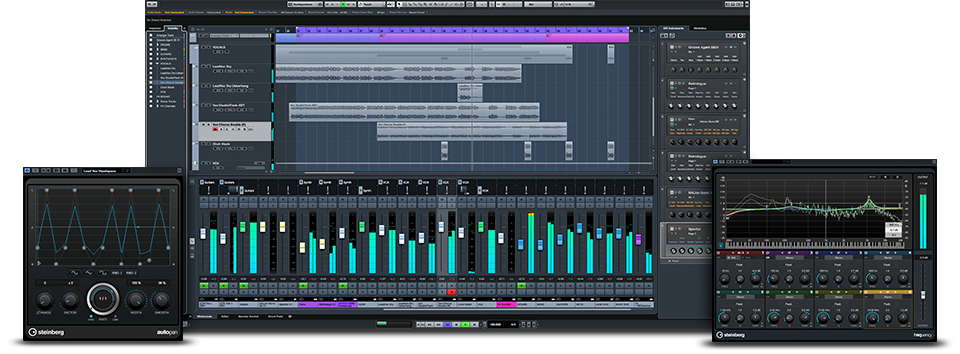
It is one of the earliest, music production softwares, and its earliest version was made by Atari ST in 1989.
It quite respected and widely used, currently the newest iteration is the PRO 9 version. It has editing composing and mixing tools laid out in a very simple design. This particular version is dubbed as their best product yet. The new version is said to have many major UI changes. The whole experience has been enhanced to suit every customer out there.
It has plenty of advanced features for the experienced in the field of music production.
Cubase elements – it turns your computer into a fully equipped music production system. Here you can edit record audio and MDI tracks.
Cubase Artist – it offers musicians additional editing tools
Cubase Pro – it consists of highly advanced music tools specifically suited for the experienced producers and musicians.
It has a cloud feature enabling one to work from anywhere and also collaborate with anyone using the same platform.
What we liked about it.
The ability to work from anywhere is a big plus for Cubase.
It has VST expression which lets you automate each note individually.
This software is from the developers of Win-Amp software. It is an adaptive Music Production System that has no quality compromises. It has a free 60-day retail period and has video and tutorials to enable one get to know and use the product.
The uncluttered interface is a multi-track arrangement window on a timeline. The arrangement view offers easily moveable media items.
Each track that is made can be done with whatever one wants as there are no track types. This makes customizing the layout simple.
What we like about it
It has a fully customizable interface and can be adjusted to your liking.
It was originally released in 1993 by Apple. It has undergone quite some enhancements and has added a ton of plugins. It stands on repute as one of the best DAW systems that one can buy.
It makes everything simple because the developers opted for a single window view. This makes the arrangement, composition and mixing simple as it is done all in one place.
The drummer plug– in is one of the most noticeable effects of the Logic X. A drummer plays along with your tracks. In each session, a virtual drummer comes in with a playing profile and some patterns to pick from.
There are many music production software’s out there. The number is huge and can really be confusing. The Softwares listed above are the major players when it comes to choosing the best music production software. The choices have grown considerably compared to what was available ten years ago. Before buying, you can always choose to test as many software as you want as the companies listed here give free trials. Some offer monthly subscriptions. Offers like this can be used to test the features that you want from each music production software. Remember to choose a software that helps you grow as a producer.
Growing food is one of the core human occupations due to its determinant meaning for every one of us. Living in the highly urbanized society of the modern era, many may not completely realize their dependency on farming and fields. In 2050, just one generation from now, there will be 9.7 billion people on Earth. This figure means mankind will require 70% more food than it does currently. Meanwhile, the future shortage of water is predicted and it’s a challenge for agriculture and all of us, though we aren’t aware. There is no way to deal with it other than finding more efficient farming technologies.
Since ancient times to the Industrial Revolution to the present time people have struggled to get more yield from farming. From the very start, people have used animal husbandry and crop cultivation for both food and income. Using the development of agriculture machinery along with a scientific basis, farming has become a systematic industry and billion-investment business. Thus, it requires proper management.
Due to the complexity of modern agricultural holdings, cooperatives, and related trading systems, their operation depends on technological connectivity and the processing of big data. These include analyzing agriculture satellite imagery using special algorithms. The technology is proven to help increase productivity and significantly reduce costs. Nowadays, every family farm can use field monitoring from space to make data-driven decisions.
Observing the Earth with Benefits
Conventional farm management was enhanced by digital transformation decades ago, then comes the era of Earth Observing technologies. New software services collect imagery from satellites and terrestrial sources to create the most profound agriculture maps ever seen. These SaaS products utilize spatial and spectral analysis of satellite-derived data to provide accurate visualizations of arable lands, soil types, irrigation, crops, and their condition.
Remote satellite monitoring is the superior alternative to traditional collecting information on crops. It is fast and complete and no one has to ramble on the field. Computer vision processed with special algorithms can detect the crop growth stage and assess the canopy condition of huge areas on different mainlands in a click. It allows farmers to act immediately and save the harvest.
The further away, the more EOS tools become “intelligent” helpers, not just interactive maps for real-time field assessment. They would analyze the satellite imagery to alarm owners if something goes wrong with their fields.
Additionally, different agritech services embrace layers of weather recordings and other tracking data (e.g. in-field sensors) that enable field planning, “smart” grazing management, harvest forecasting, and other possibilities to improve yield. For example, the nutrition map of the land will prevent excess watering or fertilization, thus saving resources on growing.
For the first time in human history, this novel satellite precision agriculture makes growing crops a clear predictable task for any agribusiness stakeholder. The new approach helps reduce the costs of production compared to intuitive management. In the UK, the data-driven tactic brings farmers about 3-8% over their regular profit.
EOS-based software has the potential to sustainably leverage food production without additional territories, chemicals, or fertilizers. Thanks to the analytics of structured data sets, professionals get instant decision support on when to irrigate or harvest their crops, are there weeds or pest infestation, and how to arrange the crop parcels to gain more profit.
The more data-savvy farming means precision profit mapping which is crucial for successful entrepreneurship.
Foresee the Future by Satellite Constellations
Satellite data is already the base for official interactive maps of national agribanks from across the globe. Utilizing crop identification technology governments estimate the actual quantity of every crop type and its allocation. What is more important, the combination of historical field records and EOS data from multiple seasons provides data sets for generating the best models of agriculture development.
Up-to-date ML-based solutions offer precise crop/pasture management strategies, catchment models, field profiling, and yield forecasts hence in-season sales prognostication. This is what makes any family farm innovative right away. On a larger scale, stakeholders and officials can use crop spatial information and related data to predict global trends such as climate risks in order to enhance the long-term sustainability of the agriculture sector. In 15 years, there will emerge disruptive operational business models fully harnessing the capabilities of satellite constellations.
New uses of satellites in agriculture go far beyond looking at fields through visualization of spectral imagery. The innovative space technology provides decision-makers of any rate with incredibly detailed information that was previously unavailable.
Speaking of producing food as business, the benefits from utilizing EOS include:
precision farming;
closing the yield gap;
on-farm monitoring;
better timing of input applications;
soil-less farming;
field phenotyping;
advanced breeding;
greater resilience to adverse conditions;
enhance soil fertility;
increase pollinators;
smart water use;
forecasting consumer trends;
accurate market outlook;
post-harvest storage and monitoring tech development;
new models for distribution;
and many more.
These opportunities lead to the core transformation of traditional agricultural businesses and affect every market player from “small” farmers to international corporations to investment, insurance, and trading companies operating in the sector. What’s next?
In the Scientific Foresight Study on precision agriculture by the EU Parliament, satellite connectivity technology is named among the profound approaches of preventing future food supply constraints. The researchers mention EOS not only as optimizing commercial services for entrepreneurs but as the start of high-level automation and robotics in the industry. They also anticipate emerging new business models in the rural communities and the rise of the bioeconomy era.
Videos are the best way to convey a message. Whether you want to create a professional video or personal video, editing software and tools makes our work easy. Many times when shooting a tutorial or educational video, it is necessary to record the computer screen. For that purpose, you need some kind of tool that will allow you to record the activity on the screen pixel by pixel. In that way, it becomes very easy to illustrate a complex topic.
Top 5 Best Video Capture Software
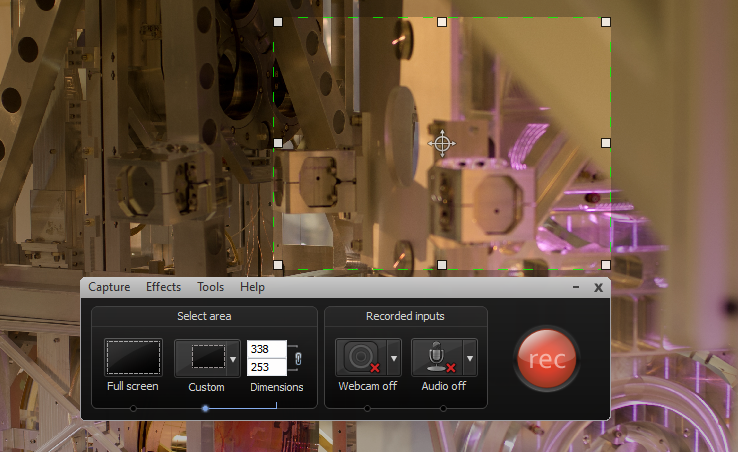
When looking for the best Video Capture Software it is very difficult to choose the right one as there are many options available. Screen recording software record the computer screen without the need for a video camera. It uses your display as a video recorder and produces a video file that contains the video of your screen.
As there are many options available for screen recording but the best recorder is the one that allows the user not just record the screen but also edit the video, make changes and many other features. The additional features allow the user to create a professional looking video.
For different requirements, there are different tools that suit the need of the individual. A professional video maker might need a specially designed software that will have many additional features. If you want video for the personal purpose it is necessary that you go for a light software.
Here is the list of top 5 Best Video Capture Software that allows the user to record screen videos without any hassle. After testing some softwares the best five are presented here.
1. Camtasia
Camtasia is easy to use video capture software. It provides the user a simple interface that is compatible and efficient. With the use of Camtasia, you can create professional looking videos. You have the ability to record the computer screen for the purpose of software tutorial, educational or for making YouTube videos.
This video capture software gives you the power to record the whole screen of your computer or a certain window of your choice. Also, with its help, you can capture a certain part of your screen. Choose the screen portion that you want to record and click on the record button that appears on the screen.
You do not have to worry about the window as it will not appear in the final output. After you complete the screen record, the final video can be saved in any format that you like.
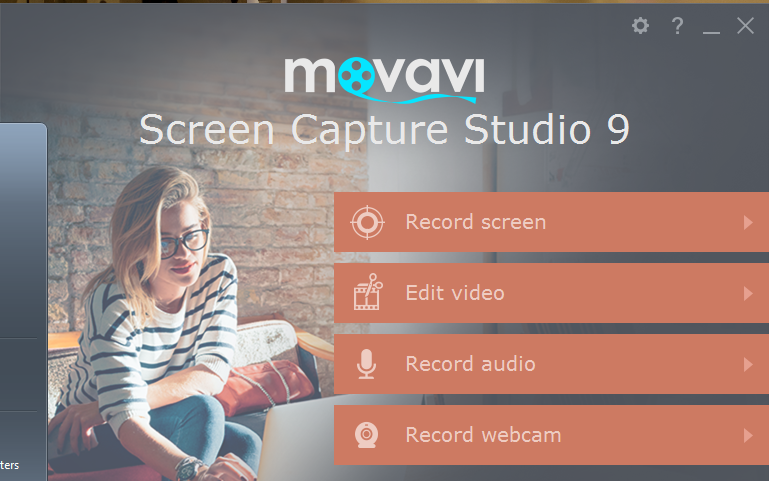
Movavi is a multifunctional video capture software. In addition to the screen recording feature, it offers many other options also. It allows you to save what activity is being done on your display. The interface is neat and it requires no technical skills to use this tool. It can record videos from webcam too. If you need to record the screen and webcam videos at the same time, it can be done with the help of Movavi also.
It offers many useful editing options that will allow the user to create an interesting video. For recording live Video games, this tool works well, without disturbing the gameplay. The sound recording can also be done with the help of Movavi. It will record the system sound so that you do not have to set-up any additional recording facility to record the game sounds.
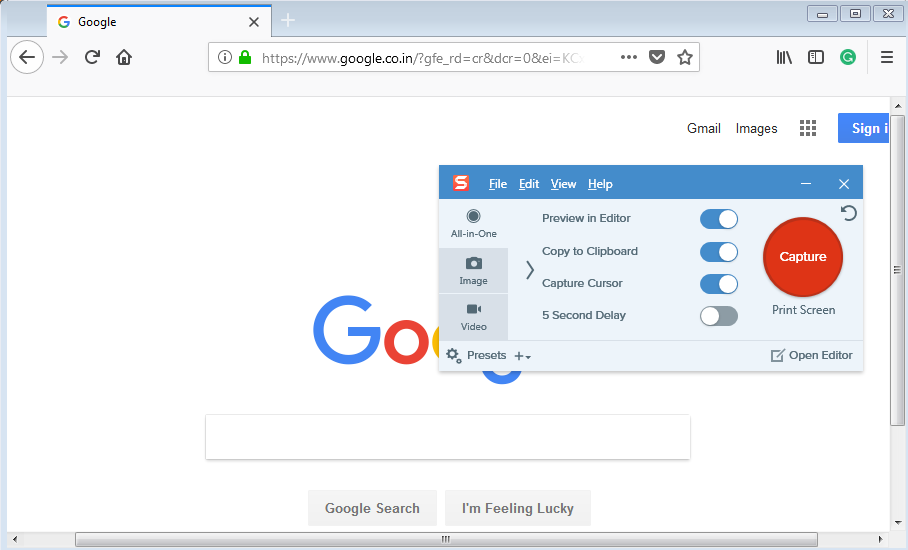
Snagit allows you to record a specific area of your display. Also with its help, you can capture a screenshot with ease. It is built to be more focused on capturing Screenshot but also works well for recording the screen. The intuitive user interface makes it a premium video capture software. It does not put a lot of stress on the system resources.
If you are in search of a basic video capture tool that is sufficient to create effective videos by screen record and webcam recording. It provides the user three different options, first is all in one which will allow you to record screen activities and take a screenshot in between without any interruption. It also allows you to add different types of effects to make your video or screenshot even more effective.
If you want a video capture software that uses minimum system resources yet works efficiently, then you should try Loom screen recorder. The best thing about Loom is that you do not need to install it on your system. Whatever operating system you are using it supports all. Loom is basically a Google Chrome Extension, that hardly takes any time to download and install.
After you download the tool, you can record the screen activities from one single click. Not only screen record but Loom also allows the user to record the record the screen and webcam video at the same time. If you need to illustrate something on your screen, you can adjust the place where the webcam video is shown on the screen. Overall, Loom is a lightweight and easy to use video capture software.
Adobe has given us some great video and photo editing tools. Adobe Photoshop and Premiere Pro are the professionally used software that offers tons of features. The Adobe Presenter Video is another great video editing tool that can be used to record high-quality screen video.
This software does not require a lot of skills and efforts to produce a great video. It guides the user step by step to record, edit and export a video. With all the features it offers, useful tools, and simplicity the Presenter pro is one of the best video capture software.
These were the top 5 best video capture software that allows the user to do the video work efficiently. For digital content creators, a well-organized screen recorder is a must-have tool. It allows creating professional videos, business presentations, video game recording and much more. If you have any other tool in mind that you use for video capture then kindly let us know by commenting below.
192.168.1.1 is the IP address that is used to access the admin panel of a router. When you open this IP address, it will take you to the login page of your router to which the PC is connected. To setup your router, you need to know its username and password or when you need change some settings like Wifi password. So here we are with the complete guide for this.
A WiFi router will enable you to access the internet in your home without the need of wires. It can be configured as per the convenience of the user. You can change WiFi name, network password to personalise your home network. There are many WiFi routers available from different manufacturers like Belkin, Netgear, Asus, Linksys etc.
We will explain you in brief, WiFi router login details and management panel settings.
192.168.1.1 – What is it?
All routers has administrator panel through which you can access the Router settings. Which can be used for network configuration, increasing security and for many other purposes. To access the router management interface, the user need to open the access page of the device on a web browser. Which can be open with this Ip address (192.168.1.1).
The thing to note here is that many time the address is mistaken as 192.168.l.l. Now, this can be a common mistake to misunderstand and type 192.168.l.l (L. L). The actual address contains all numeric in the IP address of the router. Both looks same but are actually different completely.
On typing the default router IP address it will take you to the admin login page. Type the login credentials on the page to get the access to all router settings. If the address does not open the admin page of your router try 192.168.1.2 or 192.168.0.1. It is because some routers use a different address but it will not be different from above-mentioned addresses.
192.168.1.1 Default Username Password
Most routers have the default username and password set as:
Username – admin or administrator
Password – admin or administrator or password
The thing to note here is that the default login credentials might differ from manufacturer to manufacturer. If the above-mentioned username and password do not work you can try finding the default login details which must be printed on the router’s back side.
Router manufacturers such as TP-Link, Cisco, D-Link, Linksys, Netgear, Belkin, Asus, Asus all have the admin login printed on the router.
How to Reset Router Settings, username and password
Once the router is set up, we rarely check the settings again. So it is highly probable that we forget the login details. And in case you need to do some changes in settings, then you must know its login credentials. Generally, all major router default access IP is 192.168.1.1 and have default username and password that we already discussed above.
But if your router has some custom credentials, then to recover the details you can reset the internet router to the default settings and log in using the username and password as described above.
Every router has a reset button which can be used to change all the router settings to default. It will work as it came right out of the box.
How to Login to 192.168.1.1
Here we tell you the simple method to login to your Wi-Fi router. In order to log in to your router follow the steps as described here.
You need to have your wireless router up and running. Connect your computer to the WiFi network or via LAN.
Open a web browser and go to address bar. Type 192.168.1.1 (confirm before typing that you do not mistype it as 192.168.l.l) and press enter.
Enter the username and password and click on Log In.
WiFi settings on 192.168.1.1
Different manufacturers have a different user interface. Although the basic settings are same, it is arranged in the different form. There are many WiFI router brands and each has many different models. So it is not possible to show all available options here.
But the good thing is that the basic settings remain same no matter what router you are using. You can login to the router management panel by following the above-described method. Here you will find many different settings the most important includes.
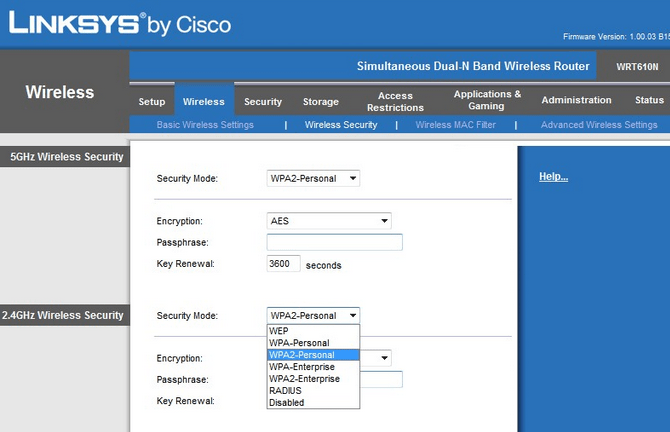
WiFi SSID and Password – It will be used to change the name of your WiFi network and the password. Make sure to use a password with decent difficulty so that it can be prevented from hackers.
Network Security – You can choose from various types of security options available like WEP, WPA & WPA2. A more advanced security means a much efficient encrypted network that is hard to crack.
Mac Address Filter – If you want to limit the access of the WiFi network to few devices then use this option. You can enter the mac address of the devices that can access the wifi exclusively. No one else will be able to use it even if he knows your network password. Apart from it, there are many other settings available but all are not used for a regular user.
If you have the manual of the Wi-Fi router device you can refer that if you want to know about a particular settings option. The wifi router works well in most situation but in case some software or settings issue arises, reset the device from the above working method.
If you have some queries regarding 192.168.1.1 login page you can comment below. For more such tech information bookmark Technofizi.
Most of us don’t use the middle mouse button too often, maybe just for casual scrolling. But for people who actually need that button, for example in some software for work, or a specific key mapping in games, it would be troublesome if the button malfunctions. In this guide, we are going to tell you all the possible solutions for the middle mouse button not working.
From different working solutions to alternatives, we are going to guide you step by step on how to fix your middle mouse button. Read the complete guide to know more.
To fix your middle mouse button, follow these steps:
Check if there’s an issue with your mouse
There’s a possibility that there’s a problem with your mouse itself. It is recommended that you do this check before proceeding further to the next solutions. We say this because not always there’s a problem with drivers or software, but with the device itself.
Follow these steps to check if your mouse is working correctly –
Unplug your mouse from your device.
Plug it into another system.
Check if the middle mouse button works on it
If the middle mouse button does not work, there’s a problem with the device. We recommend you to repair the mouse or get a new one.
If the middle mouse button works, then there’s a problem with your system.
Follow the below solution for the middle mouse button to fix it.
Solutions to Fix Your Middle Mouse Button:
1. Install/update driver
Whenever you install Windows or any other operating system, a set of default drivers are installed along with it. Usually, it is enough to facilitate the proper working of all the devices. However, this is the first thing you should look for if there’s a problem with your device.
To install or update your device driver, follow these steps –
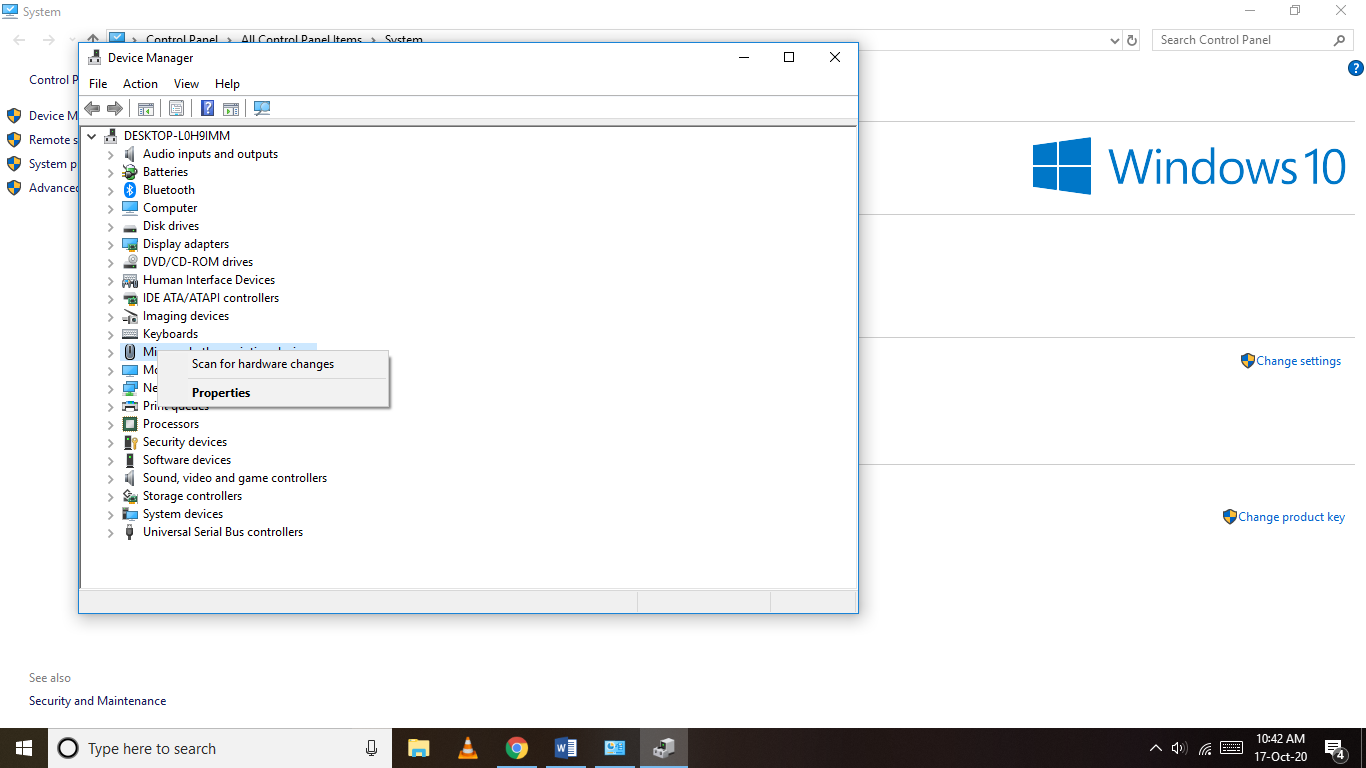
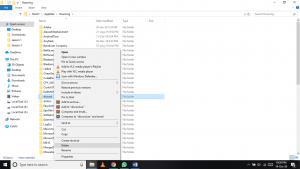
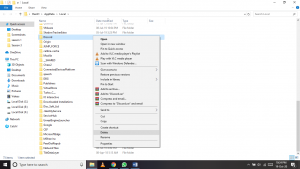
Right-click on the ‘This PC’ icon on the desktop.
Go to Properties.
Click on Device Manager.
Search for ‘Mice and another pointing device’.
If you have using a new mouse for the first time, click on ‘Scan for hardware changes’. Windows will automatically scan and install any drivers for the new mouse.
In most cases, the driver would be pre-installed. You have to update the driver in such a case.
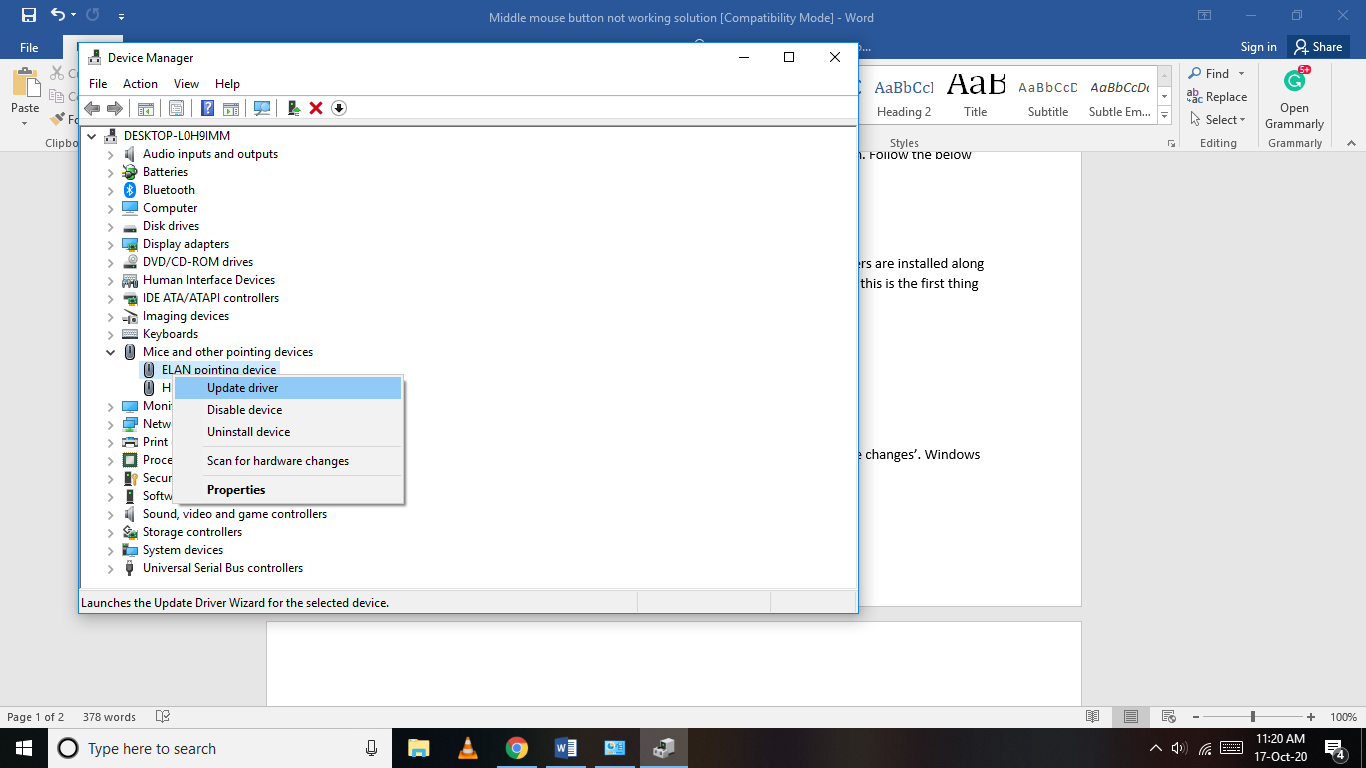
Expand the ‘Mice and other pointing devices’.
Select the driver’s name.
Right-click on the driver’s name.
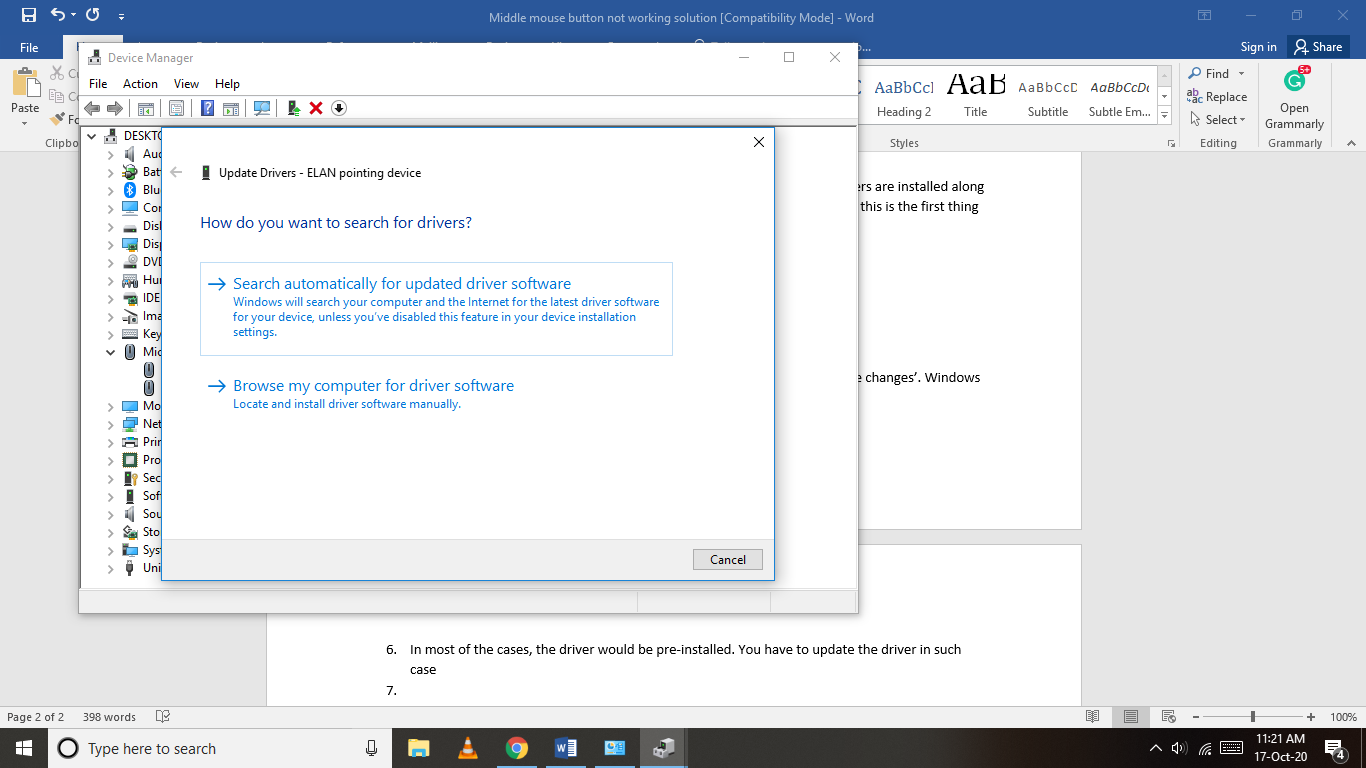
Click on Update driver.
You get two choices to update the drivers.
Select the most convenient.
Windows will search and update the mouse driver.
We hope that by following the above steps you were able to find a solution for the middle mouse button not working. You can also use Driverpacks to install and update the missing drivers.
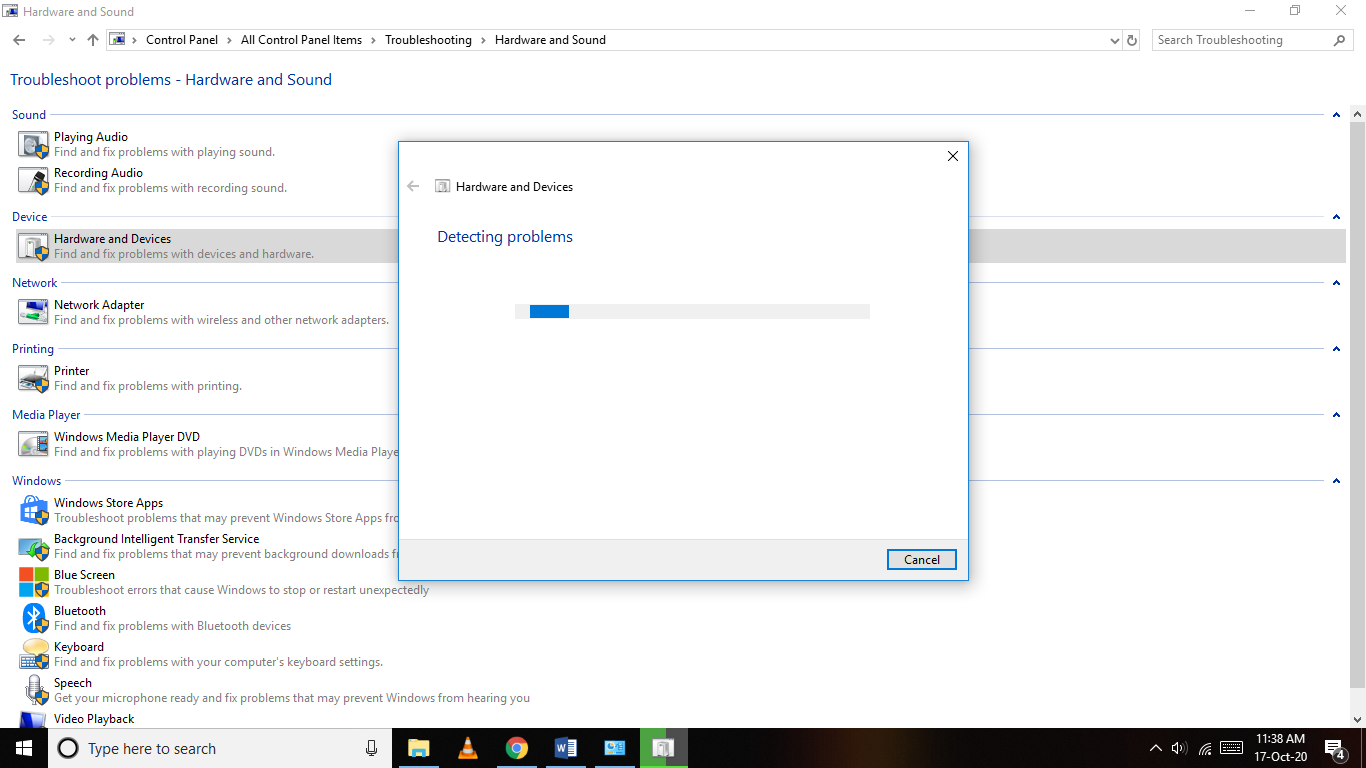
2. Hardware and Device Troubleshooting
In case the above solution didn’t work for, don’t worry, this will help you fix your middle mouse button for sure.
To find a solution for the middle mouse button not working, follow these steps:
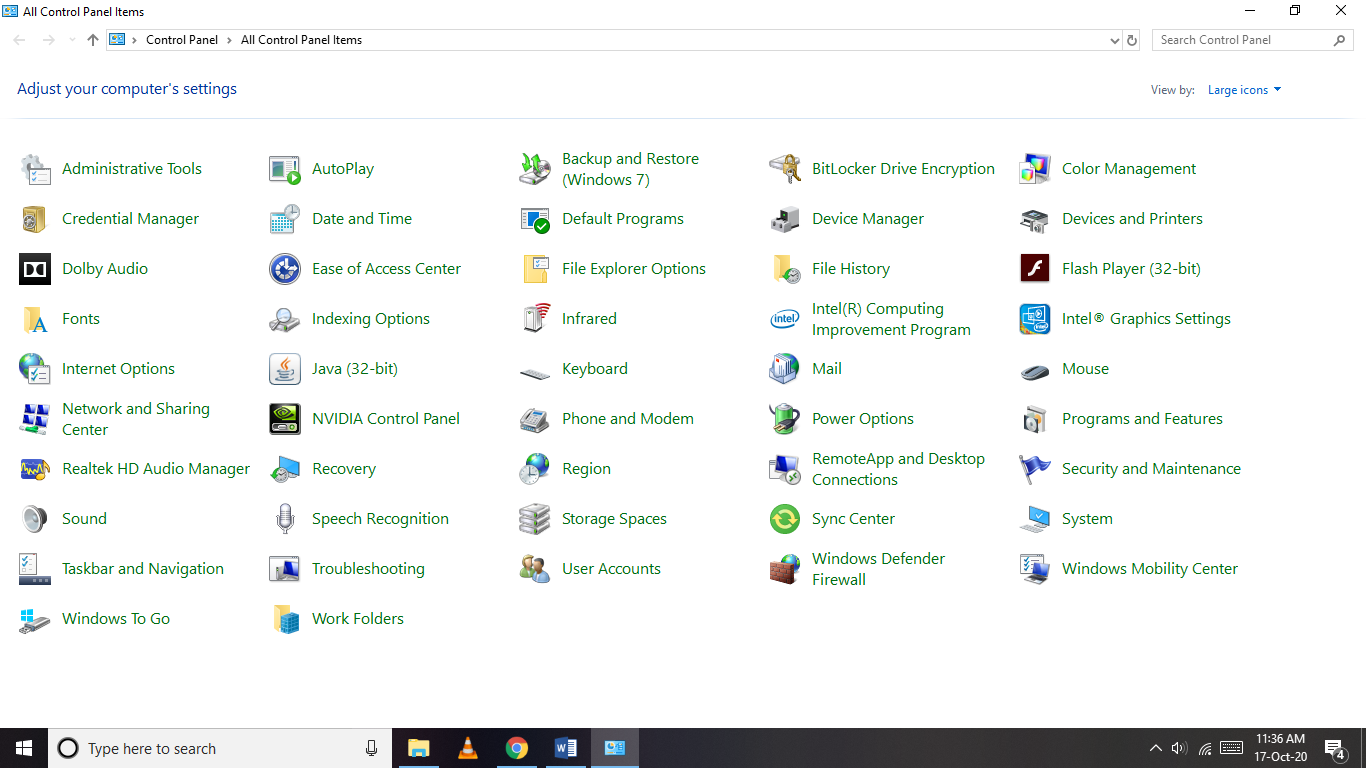
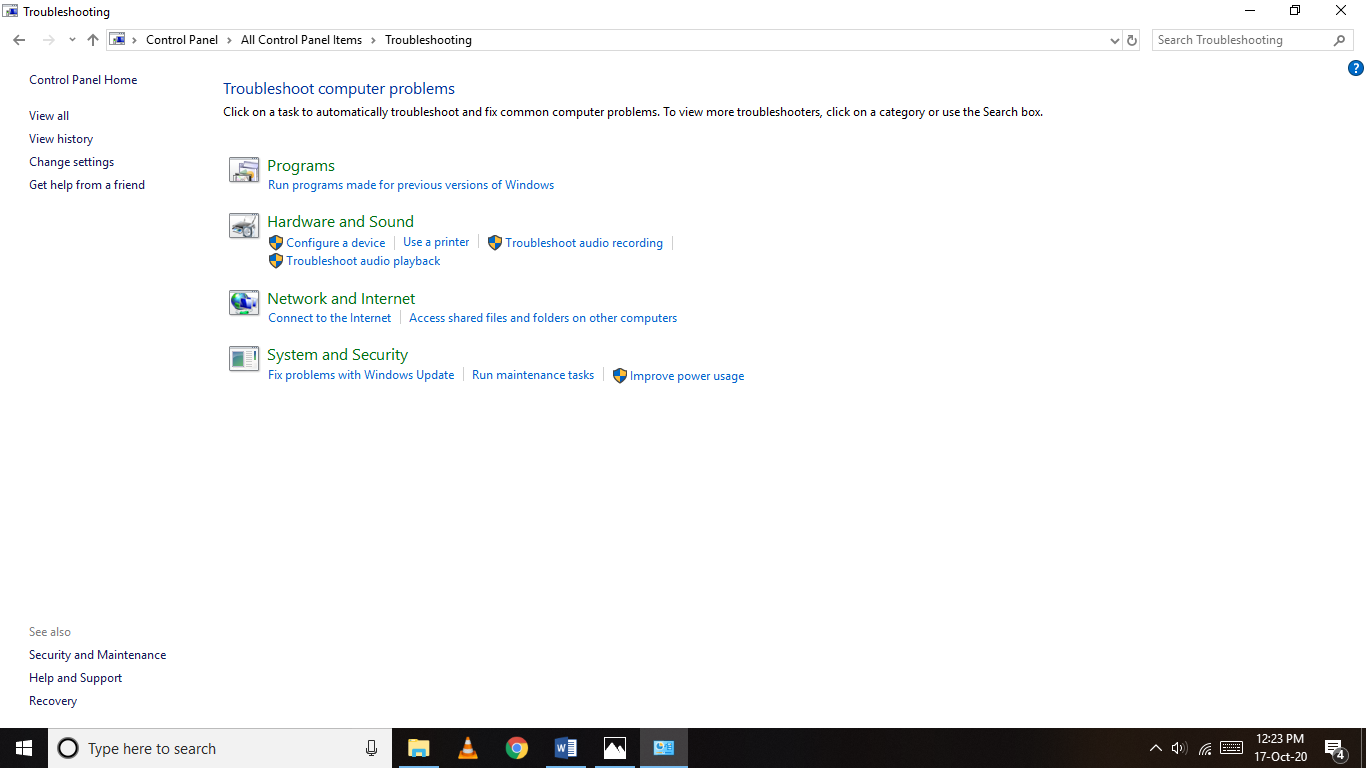
Open Control Panel.
Now, Click on Troubleshooting.
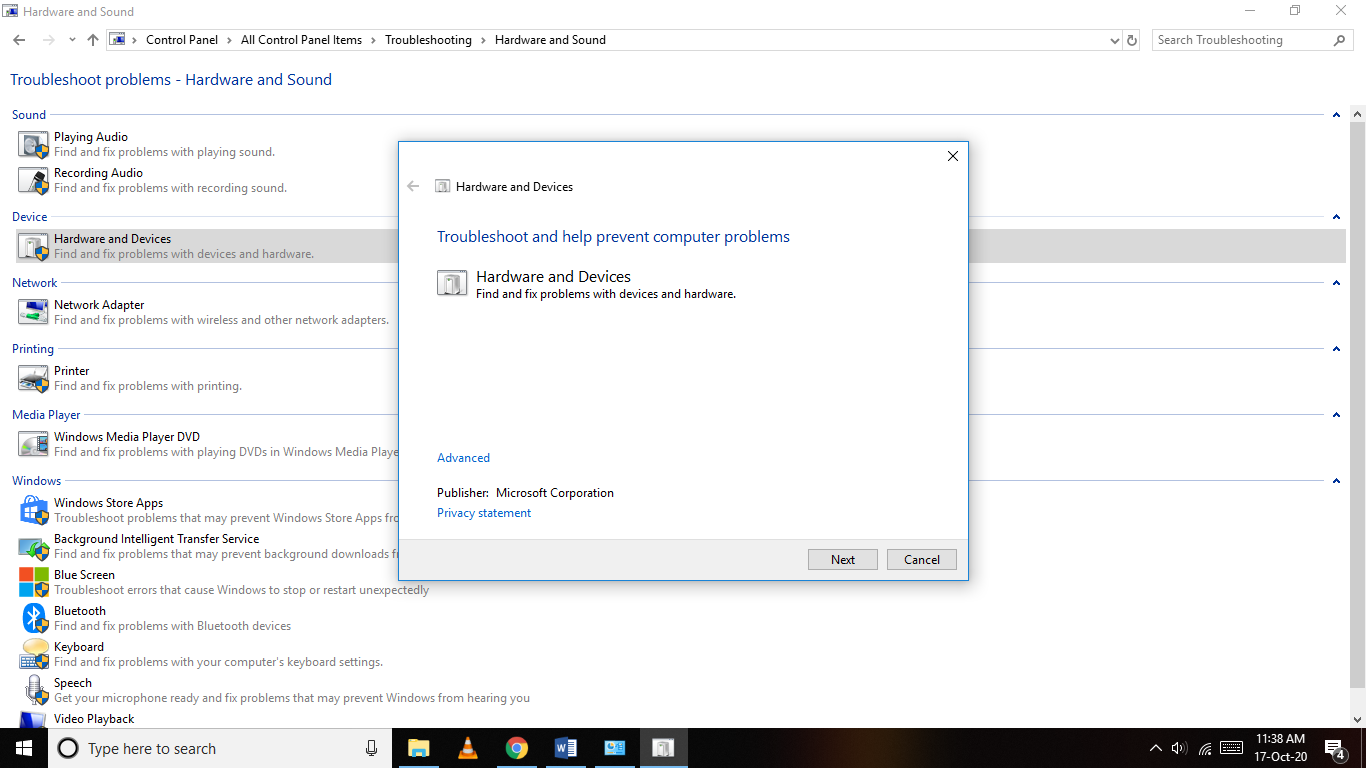
Then, Click on Hardware and Sound.
Click on Hardware and Devices.
Click on Next.
Windows will scan and if the problem is found, it will troubleshoot the error.
We hope that your middle mouse button works after following these steps.
3. Mouse Software Install/ Update
This is one of the possible cases which may lead to malfunctioning in your middle mouse button.
Generally, most mouse work with the default software installed in the operating system. If yours is a high-end mouse, it may use custom software, and may not work properly with the default Windows pre-installed one.
Check your computer if the software for the mouse is installed or not.
In case it is installed, update the software from its official website.
You should find a solution for the middle mouse button not working by using this method.
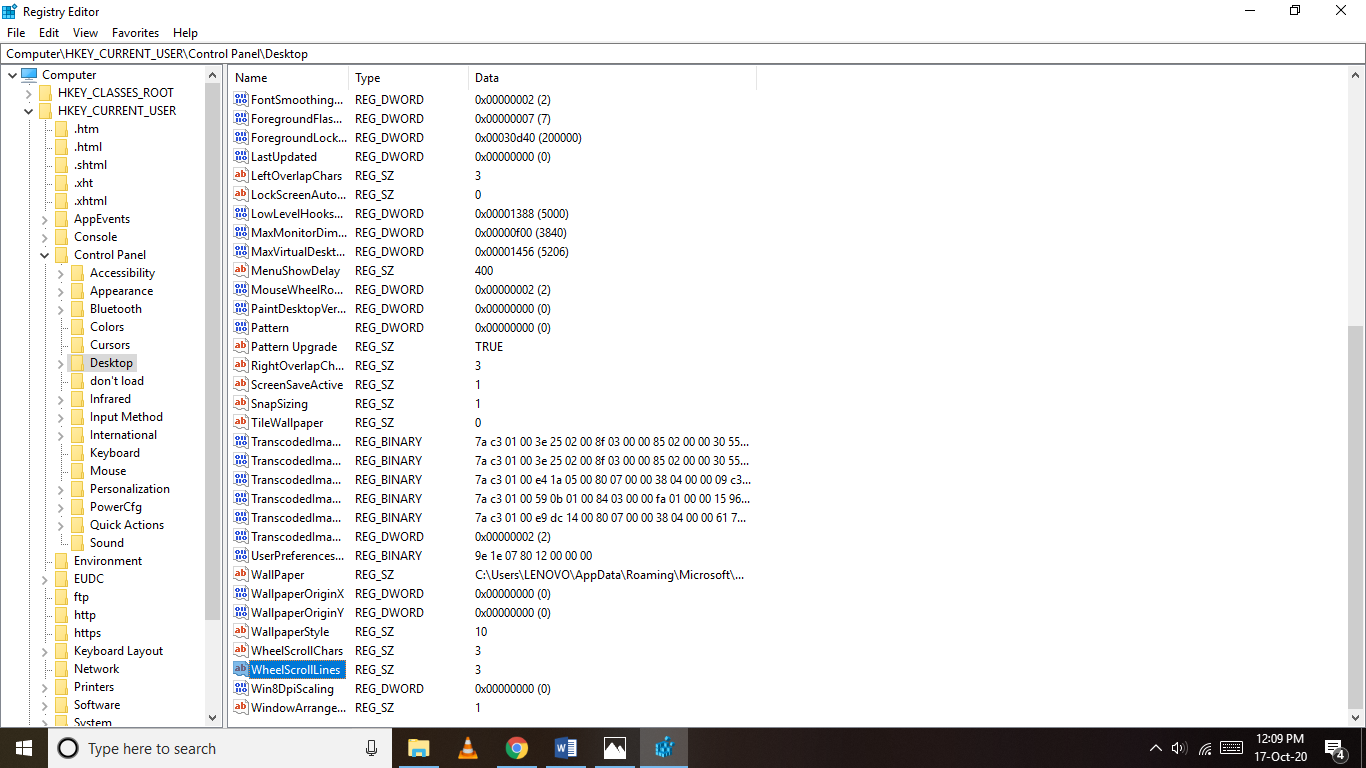
4. Change Registry Settings
Unlike other methods listed in the guide, this one is complicated and time taking. You should only use it to find a solution for the middle mouse button not working if any of the above methods do not work.
To fix your middle mouse button using the registry settings, follow these steps –
Open Registry Editor.
To do so, press Windows + r together, and type Regedit and click OK.
The registry editor will open and contains many different drop-down menus.
Search and click on HKEY_CURRENT_USER.
Go to Control Panel.
Click on Desktop.
Search for WheelScrollLines on the right side.
Double click on it.
Change the value data to 3.
Click on OK.
Restart your computer.
By following these steps, you should be able to fix your middle mouse button not working.
Alternatives to Middle Mouse Button:
In case you are in urgent need of the middle mouse button and are not able to fix it, here is an alternative that you can try for the time being. The middle mouse button is mostly used for scrolling purposes. If you want to scroll through the documents, you can do so by using the arrow key buttons on your keyboard. You can also use Page Up and Page Down to scroll the page up and down respectively. In case the middle mouse button is assigned to a certain move in case of gaming, you can map the action to another key on the keyboard.
Conclusion:
We hope that we gave a solution for the middle mouse button not working. By following any of the above methods in the guide, we are confident that you would be able to fix the problem. Follow us for more updates and more troubleshooting guides. Do tell us which method you used, and about any other way you know of.
We all know that nowadays traditional book reading habits are totally shifted by modern digital book due to many incredible apps, one of which is iBook. This app provided us with the platform from where we can easily purchase books on different genres and set foot into our secret bookland and gave us the opportunity to discover the hidden doors through iPhones and iPad. But some people like to read books on their PC/ laptop. For them the basic question arises is that “is it possible to read ibooks on your Windows PC? And if yes, then how can we run iBook on PC?”
If you are wondering about all these questions then this article is for you. In this article, I have shared a complete step by step detailed information about what iBook is and how to get iBook on PC.
Methods to install 9 iBooks on PC
Step by step guide to transfer a ibooks into PC from iPhone and iPad using iTunes
If you want to transfer books which are purchased from the iBook store then this is the best way to copybook. iTunes provides a free way to transfer book in an easiest and simplest manner. Follow the bellowed mentioned steps to transfer books.
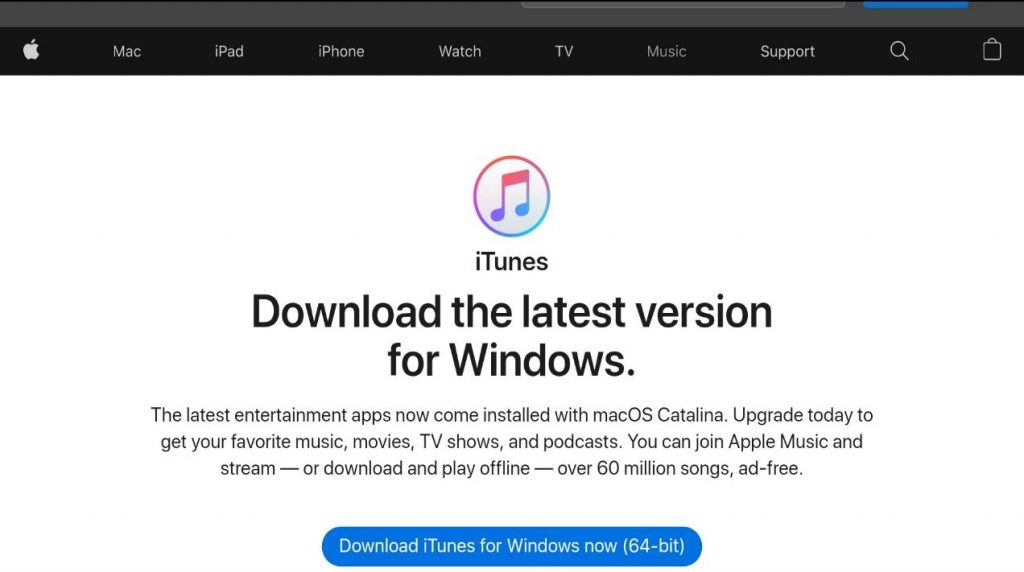
First of all, you need to install iTunes in your PC through iTunes page https://www.apple.com/itunes/. And then after making your account connect the iTunes in your PC to your iPhone or iPad.
Then you can easily transfer any book from your iPhone into PC through file option. but while transferring books using iTunes always remember that you can only transfer those books which are purchased from the iBook store.
Note: For these books to read you need to download any software in your pc with help of which you can read the transferred booksTransfer of books into PC using A power manager
Transfer of books into PC using Apower manager
This is also the most common way to transfer your books, songs, picture, messages into your PC. If you feel the above-mentioned method is only for limited use then you can try this manager.
To get books in your PC using A power manager follow the following steps carefully.
Step 1: Install A power manager in pc
For downloading A power manager first visit their official website https://www.apowersoft.com/and then click on download option.
Step 2: Connect to your mobileAfter installing A power manager go to my device and connect to the iPhone through the given option.Step 3: Install app in iPhone
For connecting your iPhone to PC install A power manager into your iPhone.
Step 4: Transfer book
After connecting your iPhone with PC go to click on manager option and from there you can transfer any books into your computer. With the help of Apower manager, you can also transfer pictures, songs easily into your PC
3. Another method to transfer books
There many other techniques and programs through which you can export your books into PC without any limitations but some have limitations, one of which is an iOS device. Through the IOS device, you can transfer only those books which you have purchase from iPhone or iPad.
iExplorer
iExplorer is also the program which you can use to transfer your books into your PC. But iExplorer is not limited to the only transfer of books, through this program you can transfer many other things. Follow the following steps to transfer any books.
Go to their official website and download iExplore in your PC to get books, songs.
Also, download their iPhone app and connect with PC. After installing the app you can transfer the selected book or anything like music, messages, voicemails and any other thing in a quick and easy way.
Discord is a popular app that has been used by the gaming community to improve their teamwork during multiplayer games. Not just the gamers, Discord is now being used by many YouTubers and other influencers as a means to communicate with their fans.
If you were trying to update Discord and got a Discord Update Failed message, don’t worry. In this guide, we will tell you various methods on how to fix the Discord Update Failed error.
This is useful in most cases. To fix discord update failed using this method
Right-click on the Discord icon.
Click on ‘Run as Administrator’.
The app should run.
If it asks for permission, click on ‘yes’.
We hope that you were able to update Discord using the above method. If not, try on the next methods.
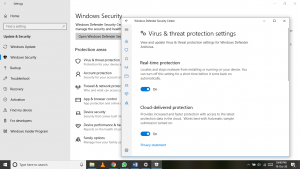
2. Disable Windows Defender:
Windows Defender blocks software and restricts usage for the apps that it considers being a potential security threat. Sometimes it may not work well, and even the genuine apps may get affected due to it.
Install Discord after disabling the Windows Defender. To disable windows defender, follow these steps:
Click on the Start button.
Go to Settings.
Click on ‘Update and Security’.
Click on ‘Windows Security’.
Go to ‘Virus and Threat Protection’.
Go to ‘Virus and Threat Protection settings’.
Turn off the ‘Real-time protection’.
Windows Defender is now disabled.
Run the Discord updater now.
We hope that you were able to find a solution to the discord update fixed problem. Make sure to turn on the Windows Defender after the completion of the setup.
3. Disable your Antivirus:
Anti-virus is crucial to the system. They monitor your system and prevent any unauthorized entry of processed. This may be one of the possible reasons for the failure of the Discord update.
Disable your anti-virus. Or you can pause it for some time. Run the Discord Updater. We hope that you were able to fix the Discord update failed error. Turn on the anti-virus after the setup completes.
Many people have confirmed that we’re able to update Discord successfully after changing the default installation directory.
If you have installed Discord in a custom directory, go there and move the entire Discord folder to a new folder. If you have used the default settings while installing Discord, follow these steps to fix the Discord update failed error.
Open the Run box. To do so, press Windows key + r at the same time.
Type %LocalAppData% in the dialog box and click on Ok.
This will open the Local App Data folder.
Search for the Discord folder.
Change the default directory by moving it inside another folder.
Run the Discord update process.
When asked for a location to install the updates, enter this directory.
We hope that this method fixed the discord update failed error
4. Rename the Installer:
This is an easy method. It has been proven to fix discord update failed error for many people, and we hope that it solves your problem too.
Firstly, close the Discord app.
To ensure that no processes remain, close Discord from the Task Manager.
Open the Run dialog box by pressing Windows + r.
Type %LocalAppData% in the empty field and click on OK.
The Local App Data folder opens up.
Search for the Discord folder.
Double Click on the Discord folder to open it.
You should find a file named Update.
Rename the file name according to your choice.
Try to run the update now.
We hope by using this method, the discord app on your PC has now been successfully updated.
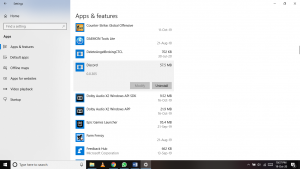
5. Uninstall and Install Again
This is the last and final option to update the Discord app. You are not actually updating it, but installing a completely latest version.
To Uninstall the App:
Ensure that the Discord app is properly closed from the Task Manager.
Click on the Start button.
Click on the Settings icon.
Go to Apps.
Search for Discord.
Click on Uninstall.
A window pops up. Confirm the uninstaller.
Discord has been uninstalled, but some of the files are still present on your system.
To Delete them –
Press Windows + r.
Type %appdata% and click on OK.
On the folder that pops up, search for the Discord folder.
Delete it using the Delete button or your keyboard.
Or select the folder, right-click on the mouse, and click on delete.
There’s one more location to delete the temp Discord files:
Open the Run box by pressing Windows + r.
Type %localappdata% and click on OK.
Search for the Discord folder.
Delete it by Right-click and then click on delete.
Discord has been uninstalled and all the temporary files have also been deleted. We recommend you to restart your PC before going through the next steps.
You have now the latest version of Discord on your system and successfully found a fix to the discord update failed error.
Conclusion:
We are sure that by using the above steps, you were able to fix the discord update failed error, and successfully update Discord to the latest version on your PC. Follow our guide to read more tips and tricks about more such errors. We will update the guide if we find new methods.
Consisting of several captivating game modes, Escape from Tarkov is a tremendous first-person shooter RPG in which your main objective is to either bring the enemy teams down, or kill all your enemies and escape if you’re playing the solo mode. The game became an instant hit upon its release back in 2017 and received a lot of praise for several gameplay aspects from the critics and fans.
One problem that this game faced was the increasing number of hackers. The gameplay got a little competitive overtime which saw people using hacks and all sorts of other enhancements that could make them win games. To this day, the problem still persists and it’s affecting the game largely so in this article, we’ll be discussing the effects of these hackers in full detail to help you know everything that you should.
“Hackers took drastic measures to enhance their game which saw them become almost invincible but if you’re thinking of beating them and want to take your game to an even higher level than them, we recommend that you start using Escape from Tarkov cheats.”
Effects of Hackers on Escape from Tarkov
The worst thing that can ever happen to a popular game is watching its popularity decrease. Well, that’s one major effect that these hackers had on Escape from Tarkov. As mentioned earlier, the game was absolutely loved by fans from all over the world and it gained so much popularity that it was started being compared to other top-tier FPS shooter games. Again, as popularity increased, so did the level of competitiveness and once people started using these hacks, the game lots all its charm.
Hackers started to increase with each passing day and what annoyed the people most was that the developers had absolutely no answer to this major problem. Despite constant complaints from the users, the problem kept on growing and then came a point where people actually stopped playing this game.
Ideally, with the fame that this game achieved, the developers should’ve taken a strong action against this big problem in order to keep their fans happy and to make sure that the game only grows bigger but their constant negligence towards these hacking issues saw the game slowly losing its fame and now it’s got to a point where either the players have stopped playing this game or, they’ve jumped on the bandwagon and have started using these hacks themselves.
Talking about using hacks, this was another problem that came up. There were players and fans who loved this game so much that, instead of stopping, they started using the hacks too. This only points towards one thing, if you go online to play EFT, the majority of the players you’ll find will be hackers so there’s no shame in admitting that you wouldn’t stand a chance against these guys with all their hacks and enhancements and that’s what killed the charm of the game.
To some people, using these hacks seemed like the only sensible solution and that’s exactly what they did in order to get on the same level as other hackers.
How EFT Players Use Hacks as a Solution to This
People had to find some way of tackling this problem and they did the obvious- started using these hacks to get on the same level as other hackers. As mentioned, the game was really competitive and the maps in the game were fairly big which means the combat of the game was really intense and due to the large size of the map, keeping an eye on your surroundings was a big task.
To make sure they could survive, people started using enhancements that saw them improving a lot. With the help of these hacks, players improved their aim by a large margin that helped them bring enemies down during intense combats. As for the surroundings, people started using radar and wall hacks which allowed them to see enemies from almost everywhere in the map.
The aforementioned hacks are just a few of many hacks that people used in order to battle other hackers and to win games. Similarly, if you’re one of those who love the game and don’t want to stop playing it, the best possible solution for you is also to start using these hacks as they can help you take your game to the same level as other hackers.
The Best Escape from Tarkov Hacks You’ll Find – Battlelog.co
For those who are planning to take their game to an absolutely new level and want to surpass the abilities of even the deadliest players, Battlelog brings top-of-the-line hacks for Escape from Tarkov. As mentioned, hackers took drastic measures to enhance their game which saw them become almost invincible but if you’re thinking of beating them and want to take your game to an even higher level than them, we recommend that you start using Battlelog.co’s hacks.
The platform offers a massive variety of all sorts of hacks for you to use. No matter which area of your game you’re looking to improve, Battlelog.co will have a hack for that particular aspect of your game which means you’ll not only get on the same level as other hackers but you’ll surpass their abilities and will start dominating games in Escape from Tarkov. Visit their page to get started with your hacking journey!