Blog Page 63

How to pop out Twitch Chat? | Pop Out Twitch Chat when Online or Offiline

0

Twitch is one of the most popular live streaming services for games and other things. Whether you want to entertain yourself with amazing videos or show off your skills, Twitch is the best platform that you can watch the live streaming for the latest games, talk shows and many more.

Mostly used by gamers, Twitch streaming services are popular even among influencers, content creators, and a lot of other communities. If you are a regular Twitch user and want to know how to pop out the chat window, then this is the perfect guide for you.

Twitch can be used on almost every gadget, you can use it on your PC, smartphones, tablets, and other devices too. However, if you want to pop out the chat window, it can be only done on the PC version of Twitch. You will not be able to pop out chat in the mobile app.

How to pop out the chat window

How to Pop out the chat Window?

Popping out the chat window means displaying only the chat dialogue box on your screen. This can be efficient in a lot of ways.

If you are a streamer, and you get disturbed by the chat message, you can simply pop it out and put all your focus on the game. If you are a viewer, and just want to enjoy chatting with different people, you can do so by popping out the chat window alone.

Note: That popping out the chat window works only on a Livestream. 

There are two ways to pop up the chat window. The first way is quite easy and effective to use. We suggest you use the first method for an easy experience. 

Method 1

We strongly recommend you to use this method. Follow these steps to pop out the chat window:

How to pop out the chat window

Step 1: Log in to Twitch using your Login credentials.

Step 2: Open the channel you want to stream.

Step 3: Wait for the channel to load.

Step 4: Once the chat box appears, on the bottom right corner of your page, go to the chat settings.

Step 5: Click on the settings icon.

Step 6: This will open a small popup window.

Step 7: Search for Popout chat in the options.

Step 8: Once you click on Popout chat, the chat dialogue box will open in a new tab.

Step 9: This window can be used only for chat.

Step 10: If you want to return to default settings, simply close the tab.

Step 11: This will restore the original view.

Method 2

This method involves creating HTML files and opening them. Don’t worry, it’s not a difficult task. Follow these steps to pop out the chat window:

How to pop out the chat window

Step 1: Log in to your Twitch account.

Step 2: Click on your username.

Step 3: In the dropdown menu that appears, choose the “Channel” option.

Step 4: Click on the Share button.

Step 5: Click on copy code from the “Embed Chat” option.

Step 6: Paste this text in a notepad file.

Step 7: Save the file using the .html extension.

Step 8: You can use any name, for example, chat.html.

Step 9: Go to the Stream folder.

Step 10: Double click on the HTML file that you created, chat.html in this case.

Step 11: This will open the chat in the browser.

Step 12: You have now successfully popped out the chat window.

FAQ:

1. Do the pop-out chat option work on Smartphones?

 Answer: No, you can use this option on your PC.

2. Can I pop out a chat from a Repeat Telecast?

 Answer: No, you can only pop out chat from a Livestream video.

Conclusion

We hope that by using the above methods you were able to pop out the chat window. Keeping a popped out chat window has many benefits. Enjoy streaming your content.

In case you need any help, feel free to ask you in the comment section below. We will help you as soon as we can. If you know of any other methods, do tell us. Follow us for more such latest guides in the future.

How to Get a Free US Phone Number for Verifications

0

In this article, we are going to discuss, how you can get a free US phone number for verification and other purposes. By following these methods you can get a free US Phone number to exchange SMS and voice calls. 

It is very easy to get a temporary virtual phone number. You can open WhatsApp, Facebook, or other social media accounts. It only takes under 10 minutes to get a number. Another advantage of getting a virtual number is that your privacy is secured. There isn’t a risk of hacking or any other cyber threats. 

Get free USA Number

Methods to get the Free USA Phone number for Verifications:

Method 1:

Text Plus app:

Download Textplus App

Step 1: First of all Install the Text Plus app. It is easily available for both iOS and Android users. 

Step 2: Then open it and sign in or create a new account using your email id.

Step 3: You can import your contacts if you want to. 

Step 4: Now, open the settings and scroll down to find the “get a free text plus numberoption. Now click on it and it will generate a free US Phone number

Step 5: After that, select the state and area code of the state. Then, click on the “Continue” button with which the process is complete. 

Once you’re done you use that number to make calls, exchange SMS, or complete the verification process of different sites. Another astounding feature of this app is “call back text”. Suppose you don’t have enough balance you can send a free text to your friend to call you back. 

URL: DOWNLOAD TEXTPLUS APP

Method 2:

GoHeyWire app:

Heywire app download

Step 1: Install GoHeyWire app from the play store or the Apple Store. 

Step 2: Open it and create an account of your own

Step 3: Click on the “get a free number” option and it will provide you with a new number.  You can get a free real US number using this app. You can text or call other people who don’t have this app. Else you can directly contact them on their mobile phones. 

Some Exciting Features:

  1. You can text to any Canadian or US number free of cost
  2. You can send audio messages
  3. You can use all the social media accounts through this app. 

URL: DOWNLOAD GOHEYWIRE APP

Method 3:

TextNow app:

Textnow app

Step 1: Install the TextNow app on your phone. Both Android and Apple users can use it. Also, you can download it on your system or Mac

Step 2: Now, once the app is installed open it and set up an account. Then provide the area code to get a number of the code. The app will ask you to choose a free number. Now, remember to write down or save that number. 

Some Exciting Features:

  1. You can call or text anyone using that number. 
  2. You can set a voicemail for that number. 
  3. It is mostly used for verification purposes. Most of the users use the number to open a telegram or other social media accounts
  4. You can get the premium version for extra features such as free Wi-Fi and an ad-free experience
  5. The Interface of the TextNow app is clear and easy to use. 

URL: DOWNLOAD TEXTNOW APP

Method 4:

Google Voice:

Google Voice

Step 1: Go to your browser and search voice.google.com to open Google voice. You can use this on your android, windows, or iOS device. 

Step 2: Once you open the website you have two options. Either you have to sign up using your number or you have to choose an area code to select a number. 

Step 3: After that, you have to verify that you already have an existing number

Step 4: After that, you’ll receive a code on your number. Now enter that code to complete the process

Step 5: Once your number is verified you can use your free US number. As you can see it is a web-based service provided by Google. The only drawback is that it’s not available in every part of the world

Some Exciting Features:

  1. You can use this number for business purposes
  2. You can verify different social media accounts using this number. 
  3. You can make calls and texts and set a voice mail

URL: ACCESS GOOGLE VOICE WEBSITE

Method 5:

SMSRecieve:

SMSRecieve download

Step 1: Open your browser and search for SMSRecieveFree.com and open the website. 

Step 2: Now enter your valid email id to proceed. After entering your email click on the “sign up” button. 

Step 3: After that, you’ll get a thank you message on your screen. A link will be sent to your email using which you can get your US number

Step 4: Open your mail and open the link. It will open a website and ask you to choose either the US or a Canadian number

Step 5: Now you have to select your number

It is also a web-based app. It provides a temporary US number. You can use it to sign up and verify social media accounts. You can use that disposable number for 24 hours after that it will become invalid. 

URL: ACCESS SMSRECEIVE WEBSITE

Method 6:

VirtualPhone.com 

virtualphone.com

Step 1: Open your browser and search VirtualPhone.com and open the website. 

Step 2: Once you open the website it will ask you to choose your country, which country number you want, area code, and number. Once select all three clicks on the “free” button to start the process. 

Step 3: Now click on the virtual number option to get started. 

It is a web-based application. Its drawback is that if you want to make a call or use the internet on that number you have to get the premium version. But if you only want to use the number for the verification process then you can use it free of cost. If you get the premium version you can get exciting features such as Call Management, Call Routing and Extensions, and Automated Attendant. 

URL: ACCESS VIRTUAL PHONE WEBSITE

Conclusion

We hope our article was helpful enough for you to get a free US Phone Number. You can use that number for various purposes. It also ensures your privacy on social media accounts as no one knows your number. You can also avoid spam calls and messages. Best of luck choosing your number. 

For any help related to US mobile number and how to verify your accounts, please contact our team from comments in the bottom of this article.


VideoDuke Review | Download & Manage Online Videos Easily

0

VideoDuke is one of the best applications if you want to download online videos directly on your Mac computer. In this article, we will try to provide you with a full review of VideoDuke, along with its essential features and a user guide for the same. 

What is VideoDuke?

VideoDuke review

VideoDuke is a software which allows any user to download their favourite videos from popular hosting websites such as YouTube, Dailymotion, Vimeo, etc directly on their Mac computers. 

VideoDuke also provides its users with the options of choosing the file format for the downloaded videos and you can also select the quality of videos being downloaded. You also get the option of saving a video directly in the audio format using the .MP3 extension. 

With the help of VideoDuke, you can also save your favourite HTML5 videos on your Mac computer without any speed or quality restrictions allowing you to watch them even when you are offline. 

Major Websites Supported with VideoDuke

As of now, VideoDuke supports more than 1000 websites. But some of the most popular websites compatible with the software are:

  1. YouTube
  2. Vimeo
  3. Dailymotion
  4. Instagram
  5. Tumblr
  6. Facebook
  7. Twitter
  8. Vevo
  9. MySpace
  10. LiveLeak
  11. Metacafe

VideoDuke Essential Features:

  1. Huge list of supported websites: VideoDuke supports more than 1000 websites meaning that there is a high chance that the website you are looking to download videos from would be supported by the software. 
  2. Browser Mode: Using this mode, you can directly search for a video thanks to the in-built search option present in the download window. 
  3. Quick Access: The in-built browser allows you to access your favourite websites directly from the application itself. 
  4. Bookmark: You can bookmark your favourite websites so that accessing them again in the future would just be a click away. 
  5. Download History: VideoDuke keeps a list of all the videos you have downloaded so that you can access or view them anytime you want. This download tab also shows you the current status of videos that are being downloaded. 
  6. Browser Support: You also have the option of adding VideoDuke directly to your web browser by simply adding a bookmark button. 
  7. Different Modes: VideoDuke allows its users to select from two different modes namely: Simple and Advanced mode which can be selected by the users on their personal preferences.

VideoDuke Software

Download YouTube Videos:

If you spend a lot of time on YouTube or you download a lot of videos from the same, VideoDuke has plenty in store for you. 

  • Download YouTube Playlists: If you happen to like any YouTube playlist and you want to download all the videos present on the playlist, VideoDuke allows you to do that. All you need to do is play the first video on the playlist and VideoDuke would then automatically load the rest for you. You also have the option of downloading every video according to your own preferences. 

Download youtube video

  • Download High-Quality videos: VideoDuke allows you to download every video according to your own preferences. With the help of VideoDuke, you can download your favourite videos in 4K, 5K and even 8K quality which would be recommended if you want to play them on desktop or computer screen. You also have the option of downloading files in 144p, 240p or 480p which would be suitable for smaller screens. 
  • Download Entire Channels: If you want to binge-watch all the videos from your favourite channel, VideoDuke allows you to do that as well. Just open the Videos tab on the application and proceed with the instructions given there. 

Different Modes:

As we have mentioned earlier, you can use VideoDuke in 2 modes namely: Simple and Advanced Modes. 

  • Simple Mode: In the simple mode, you can download your favourite videos from any website by just pasting the URL of that video in the application window and download them according to your personal preferences. 
  • Advanced Mode: The Advanced mode of VideoDuke allows you to download all the resources present on the web page including the likes of images, audio files, flash animations etc. In the advanced mode, you can also download the subtitles related to the video in the.SRT format.

VideoDuke Mode

Download and Manage Music:

VideoDuke is not only one of the best applications for downloading videos, but it is equally effective in downloading audio files. Following are some of the essential features:

  • Download MP3: If there is an audio MP3 file present on the website, you can download them directly by using the Advanced mode of the application. It is really that simple. 
  • Convert Videos to Audio: If you like any video but you want it in an MP3 format, you can use this application to convert the video into an audio file. 

VideoDuke Pricing:

In order to use VideoDuke, you will have to pay a one-time fee of 19.95 US dollars. If you are not sure whether you want to buy it or not, you also get a Free version of this application. 

You can use this Demo version to download 2 videos which would give you a basic idea of how this application works and would it be able to suffice your needs or not. 

If you are satisfied with the application in the Demo version, you can purchase it.

VideoDuke comes in the following Two Plans:

  • Personal License: It would cost you 19.95 US dollars and you can use it only on one Mac computer. 
  • Family Pack: The family pack of VideoDuke costs about 39.95 US dollars and it is best suited for a family because it can be used on 3 different Mac computers. 

Apart from this, VideoDuke also promises you Lifetime Upgrades for an additional fee of 9.95 US dollars and if you decide to pay an additional 15 dollars every year, you will also get their Urgent Support Plan

How to use VideoDuke Software?

VideoDuke Pricing

Once you have decided to purchase VideoDuke, you need to make the payment for the same on the official website.

Once it has been done, you will get the link for downloading the application on your personal email address or if you have already downloaded the Demo version, you can just buy the Full version from there itself. 

Final Thoughts

I personally believe that VideoDuke is certainly one of the best video downloader for Mac simply because of the features it provides to its users. 

Not only do you get thousands of compatible websites, but you also get the option of downloading videos based on your personal preferences. 

Apart from that, it is really simple to use and we would definitely recommend you to check it out at least once. 

MacDroid Review : Manage Data Between Android & MAC

0

Have you ever tried to transfer files from android to mac using a USB cable? If yes, you might already be knowing how difficult it is to do the same.

But what if I say that there is an easy and a much more efficient way to do the same. Let us discuss it. 

In this article, we will be providing you with every information you might want to know about MacDroid, the tool to manage data between Android and Mac. 

What is MacDroid?

MacDroid is a software which has been developed with the aim of transferring files such as music, videos, images and folders between Android Devices and Mac computers using a USB Cable easily. 

Benefits of using MacDroid:

  1. It is a Cost-Efficient Option: MacDroid will cost you just 1.67 US dollars per month and you can share unlimited files easily. All you need is a USB cable and the MacDroid software. 
  2. Move your Entire Folders: With MacDroid, you can move an entire folder and the files stored in them between your devices which would make it easier for you to access them. 
  3. Edit files directly on your Android Device: MacDroid would make it possible for you to edit your Android files without having the need to save them on your Mac computer. All you need to do is connect your phone, make the required changes and save them. It is really that simple. 
  4. Entertainment on-the-go: If you are taking a long flight and you have the episodes of your favourite TV show or your favourite movie stored on your computer, MacDroid will allow you to transfer them directly on your Android device almost instantly. 
  5. Support for MTP devices: If you have a device which can connect only in the MTP mode, MacDroid has support for that as well. 

How to Use MacDroid?

Even if you have never used any Mac to Android file transfer tool before, you would not find it difficult to work with MacDroid. All you need to do is follow these simple steps:

Android Device to your Mac computer

Step 1: Download MacDroid from here. Once the download has been completed, install it on your device.

MacDroid

Step 2: Connect your Android Device to your Mac computer using a Data Transfer or USB cable. After the installation is complete, click on “Devices” option in MacDroid and connect your Android device. 

Step 3: Allow your Mac computer to access the files stored on your Android device. In order to do so, select ADB or MTP connection mode and follow the steps mentioned. After this, your computer would be able to access the Android files. 

Step 4: Your devices are now connected with each other and you can transfer files between them easily now. 

Different Modes of Macdroid:

MacDroid can be operated in two different modes namely: Multi Operation Mode or ADB and Single-Operation Mode or MTP. Let us discuss them one by one. 

Mac to Android

  1. Multi Operation Mode or ADB: ADB stands for Android Debug Bridge. It is known to be a versatile command-line tool which allows you to communicate with your device using some commands. It is useful if you want to install or debug certain applications on your mobile phones. 
  2. Single-Operation Mode or MTP: MTP stands for Media Transfer Protocol and it is an extension to PTP or Picture Transfer Protocol. It is a communication protocol which allows media files to be transferred between supported devices. 

MacDroid Pricing:

You have the option of selecting from two different packages if you want to use MacDroid. 

Free Version:

As the name suggests, this version of MacDroid is free for all and it allows you to transfer files from your Android to your Mac devices. You also get a 7 day trial period for the premium version of the application. 

However, the downside of using this version is that you can only use it to transfer files from your Android to your Mac devices but not vice versa. This might not be beneficial for everyone because it only gets half the job done. 

Pro Version:

With the Pro Version, you get the option of transferring files from your Android devices to your Mac and it works the other way around as well. You will also get frequent updates of the app if you decide to proceed with the Pro Version which is definitely a great thing. 

The Pro version would cost you about 19.99 US dollars annually which comes down to mere 1.67 dollars per month. The billing would be renewed automatically but the users have the option of cancelling their subscription any time they want. 

How to Run Macdroid on Multiple Devices?

Macdroid app

You can install the MacDroid software on up to 5 different Mac devices which are owned by you and you would not be charged any extra fees for doing the same. 

However, there is no limit on the number of Android devices you want to use.

MacDroid Free Trial

Once you have downloaded the free version of MacDroid, you would be asked to activate the Pro version by the software. You will have to enter your payment details to proceed with the trial version. 

However, you will not be charged anything as of now. Once you have entered all the required information, your 7-day trial period would begin and you will be able to use all the features which are offered in the Pro version. 

MacDroid offers you a 7-day trial period so that you can test the product completely and make up your mind whether you want to buy the Pro version or not. If you think MacDroid is not suitable for you, you can cancel your subscription anytime and you would not be charged anything post the trial period. 

MacDroid Download App Link: https://play.google.com/store/apps

How to Cancel your Subscription?

If you do not want to proceed with your macDroid subscription and you want to cancel it, you just need to get in touch with the MacDroid support team using the following link: [email protected]

Compatibility:

The latest version of MacDroid i.e 1.3.110 was released on 26th November 2020 and in order to use it, your Mac computer must be running on macOS version 10.10 or newer. You can use any Android device as long as it supports MTP extension. 

Final Thoughts:

Transferring files between Android and Mac devices has never been an easy task because both these devices run on different operating systems. However, MacDroid really makes this task very simple and it is undoubtedly one of the best softwares for transferring files between your Android and Mac devices. 


5 Normally Difficult Tasks Made Easy by Mobile Apps

0

We often take mobile apps today for granted, but that only shows just how intuitive many of them are. Long before mobile apps, we had to do things the hard way. When you look back, there are so many examples of things that used to be far more difficult than they are now. 

Just a few examples: 

  • Checking our bank balance involved logging into a website or phoning the bank. 
  • We had to own an expensive computer to perform many tasks online. 
  • Communicating with friends and family meant typing out SMS text messages at a cost.

Thanks to mobile apps, there are so many tasks that have become easier. We can do online banking via apps, online shopping, booking flights, and booking a taxi. Tasks can be done with nothing more than a few taps on the touchscreen on your mobile device.

Below are some of the more common tasks or activities that have become massively simplified thanks to mobile apps.

Travelling

Travelling is extremely difficult at the moment but we will not go into that as you all know why. However, before mobile apps came around and when the world was not in its current turmoil, travelling used to be a chore. We had to scour the internet to find the best deals for flights and hotels, make our reservations and then keep our itineraries in our email inboxes ready for printing out.  

Nowadays, there are apps that can find you the best deals instantly, apps to help plan your itinerary, apps to convert currencies, and even apps that can tell you what you need to pack depending on your destination, time away, and the activities you have planned. Travelling has essentially been made easy.

Sports Betting

Another task made easy thanks to apps is sports betting. Before the internet and specifically mobile apps became a thing, placing bets on your favourite sporting events was not an easy thing to do. You either needed to have a home computer and use the actual websites of sports betting companies or make the journey to a high street bookmakers. 

Today, all you need is a mobile phone. There are apps that can allow you to compare the best odds offered by major sportsbooks, and sports betting apps that make placing bets simple. E-wallets also offer apps that allow you to transact with those sports betting apps far more efficiently.

If you do enjoy sports betting, make sure you find the bonus offers such as the betting offers on freebets.com.

Working From Home

For obvious reasons, working from home is a lot more common than it has ever been before. While it sounds easy to do, it actually comes with a lot of downsides. There are distractions to deal with, the fact that you have to stay focused, and the need to keep in communication with your bosses and colleagues. 

If you work from home, there are tons of apps that can make this far easier. You can use apps for team communication, to cut out distractions when working, to access your computer from any device, and to keep track of deadlines. In fact, there are not many work tasks that are not easier thanks to mobile apps.

Working from home will always be difficult for some but with such a plethora of apps to help, for the rest, it will be the best thing ever.

Online Gaming

Remember when you had to own an insanely expensive computer or the latest gaming console to enjoy good quality gaming? Not any more. Mobile gaming has now overtaken all other forms thanks to the ever-improving tech that is being used in our smartphones and tablets. 

The great thing is that unlike consoles and PC’s, most of the games are free. You just download them and play. Of course, micro-transactions can aid your enjoyment but this is completely up to you. And all you need is a mobile device to start playing – something that you will need to buy anyway if you want to phone people or browse the internet.

Summing Up the Brilliance of Mobile Apps

For those of you old enough to remember life before the internet was completely different. The problem was that the internet was a luxury at first and used only by those who could afford the expensive subscriptions and desktop computers needed to surf it. 

Now with mobile technology, Wi-Fi, and apps, the world has taken another step towards complete convenience. Most people now have a mobile device and thanks to much lower data costs, have access to the internet. They also have the ability to make use of thousands of different apps that were designed to make the tasks and activities we do each day, more simple and efficient than ever before.

SyncMate Review : Sync Android with MAC

0

Worried about syncing your devices? Then, stop worrying! Now, you can easily sync all your accounts and devices efficiently at the same time. Isn’t it great?  

For Android users, there are many services. But what about the macOS users? Here, we have got the solution. It’s SyncMate, responsible for sync android phone with mac, and also syncing your personal data and information from any other device or account to your personal computer.

Most Apple users use iTunes as an option but why not go for the better option. When we talk about SyncMate then we can use adjectives like versatile, intuitive, and compatible.

What Type of Data can be Synced with SyncMate?

The question might arise that what type of data you can sync using this SyncMate. Well, that totally depends on the type of device or service you are using.

Here, we have listed out the different types of data that can be easily synced with SyncMate. Have a look!

  • Photos: All you need to do is select a particular picture folder that you crave to sync. Then decide whether you just wish to sync from one device to another or to your Mac or vice versa.
  • Calls Records: Now, you don’t need to maintain a record of your calls. With SynMate you get to maintain a record of your calls with date, time, and duration. So, sorting of phone calls becomes easier. You can easily differentiate between the outgoing, missed, and received calls. 
  • SMS: Get a comprehensive account of your chats or conversations in a sorted form by the recipients. It will help you to decide whether you want to export all messages or not.
  • Calendar: Calendars are important. So, you can plan out which calendars to sync between your devices. Set the time when you want your calendar to be synced in between a period of one to 47 weeks or at once only.
  • Folders: With SyncMate, select a particular folder which you want to sync on your device or Mac and again on your device or just one way. Also, you can encompass or eliminate different types of files, paths, and folders from syncing.
  • Reminders: Reminders give you a syncing option that is Dropbox. It is known to cover all the same properties as calendars in SyncMate.
  • Contacts: A contact list is important. With SyncMate, you can select your contacts which you’re willing to sync. And these contacts are set forth on different devices or services that are ready for syncing. In the end, you can also decide whether you want to send it one way or the other way round.
  • Music: When we talk about music we all wish to listen to your favorite playlist. Now, you can easily sync your iTunes library based on the playlist, genre, artist, or album you choose.
  • Backup: Backup is necessary. In case of file corruption or any accidental deletion of files, SyncMate automatically features a secure backup each time you click on the sync option such that you can go back to the previous version of your files.

That’s it! These are the following options which you need to follow whenever any of us try to sync to a new device or service. And you don’t need to worry about syncing.

Services and Devices Supported by SyncMate

There are many options available that can help you to utilize the features of SyncMate. For example, you can use it on devices like Android devices, iOS devices, Google accounts, MTP devices, iCloud, external hard drives, and Microsoft Services.

Also, Syncmate is supported by many services and devices so that maximum people can sync multiple devices with their computer. With this advanced software, you can easily access android from mac devices.

Moreover, we all know that syncing isn’t an easy job. Keeping all your devices synced together is quite challenging but with SyncMate it’s much efficient and easier.

How to Initiate Syncing?

The process of syncing depends on the type of device or service you’re using. In case you have cloud services, then you need a proper internet connection. Else on other devices, you can sync them and connect them with a WiFi connection, USB-C, or Bluetooth device.

Features of SyncMate:

  • Security: It is responsible for securing your data on multiple devices or services from any type of viruses or disasters.
  • Automatic Backup: An important feature of SyncMate is backup. Select the essential files or folders and click on the backup option. And you can automatically backup your data.
  • Compatibility: Android, Mac, and iOS all users can use SyncMate.
  • Restore Data: Recovering and restoring files and folders is done easily with SyncMate.
  • Improve Plugin: 3.6 version of SyncMate offers a lot of fixes, features, and plugins.

Get ready to know the real value of SyncMate which is best for syncing your data and library across all devices and platforms.

For example, if you add events in the wrong way on your calendar then it disappears forever. But with the help of SyncMate, you can efficiently fix and recover data anytime anywhere without worrying.

Syncing takes a lot of time to set everything you want. Just use SyncMate and your life will become a lot easier.

Staring Your Podcast? Ensure To Do These 8 Things Before You Begin The Journey

0

Since its start, Instagram has only soared to greater heights. It reached the two billion active users mark while expanding at the fastest rate ever recorded for a social media platform. Despite being primarily considered as a lifestyle photo-sharing app, Instagram has impacted the world of technology massively.

Instagram has redefined the meaning of social media engagement. The astronomical success of Instagram has seen the conception of influencers turn into a reality. Often termed as micro or quasi-celebrities, these users promote and recommend goods or services to their immense network of followers.

While there is no eligibility test for one take to become insta-famous or an influential Instagrammer, but it is not easy to become one because there are already millions who are doing the same thing.

If you want to become an Instagram influencer, it is a must to build a follower base. It needs to be loyal and engaging in your brand. Here, you will know how to create winning Instagram content. The practices listed below will help you to make and edit Instagram videos like a pro.

Let’s dig into the details.

1. Share Your Experiences:

Those who are investing millions of hours on this platform are searching for visual experiences- that can be compelling or engaging.

You will have to realize what your audience is looking for and then cater to it. It’s crucial that you focus on your experiences than your content and services- this will rapidly gain an audience.

2. Understand Your Audience:

It is impossible to meet the whole community. Instead, attend to those who look promising and are responding to your content consistently.

This could lead you to achieve better reviews than pushing your content in all directions for unconditional approval. Once you have discovered your audience, start providing them with suitable content.

3. Produce Creative Content:

The most effective way of producing creative content is by hiring local talents. There’s always plenty of local talent in every city that is looking for exposure and recognition. Search for online website to make ads for your campaigns as well.

4. Tap Into The Emotion:

Quality content can gain you bucket loads of follower engagement. But if you can tap into the emotion of your followers, you will see exponential success. When you communicate with your followers via emotional content, you relate to them, and you join them.

5. Crowdsourced:

It is tough to balance your content quality while maintaining a steady consistency. Hence you should consider crowdsourcing once in a while as well.

Ask your followers to post relevant content under your made-up hashtags. This will allow them to feel engaged while you penetrate your followers’ audience.

6. Share Stories:

Retaining your existing audience is as vital as getting a new audience. Try to integrate relevant narratives into your content to stand out from other content creators. Instagram continues to introduce options like new filters and interactive reactions to stories that can encourage further engagement among its users.

7. Stay Relatable:

You should always keep your content relatable and relevant to get more engagement. Try searching for trending topics and subjects that can resonate with your audience. Relatable content gathers more shares than anything else.

8. Engage Your Audience:

Another smart move would be to ask your followers to participate in their original content in your Instagram contests to win rewards.

This will also contribute to your content engagement, as well. It would help if you also had contest deadlines to push your audience into taking instant participation.

People invest a considerable amount of daily time on Instagram, which has led to subtle yet huge impacts on their lives. The photo-sharing app has introduced subgenres, created business models while rebooting several market industries as well.

Hence, it should not be misjudged as a platform for artists, designers, and photographers only- Considerable study on the app can get anybody results.

Technical hacks for Instagram

Here’s a list of technical hacks that can provide tremendous success on the platform.

  1. Smart Implementation Of One Link: Instagram does not permit its user to insert links to their posts or multiple links in their bios. Therefore, the user needs to play smart with the limited space. Creating a bespoke landing page for the followers can help massively in this regard.
  2. Plan Your Posts: People on platforms like Instagram consume content on a routine basis- meaning they need a consistent supply. Hence, one must cash in on that promise by planning (or scheduling their posts) to maintain a constant presence online. While the IG app does not offer an option to schedule posts, there are alternatives on the internet.
  3. Get Innovative With Hashtags: The IG app allows its users to include thirty hashtags per post. While this can be a tad boring, there are great rewards for it. It is best recommended to study the best and effective hashtags going around to use them later.
  4. Brand Up: Instagram allows its users to create their feed, meaning they can choose to follow whoever and how many they like. It is easy to influence a personalized news feed as the people already have the user’s preference for it. Use color palettes while sharing content to develop a signature.
  5. Optimize Your Account: Growing an audience takes more time on IG than friends and family. Use the app’s Explore section effectively, along with the hashtags to appear on that browsing page. This way, your content will be reaching more people for engagement.
  6. Use IGTV: One of the latest yet most useful features in the app, this, as the acronym suggests, is Instagram TV- your dedicated section for video content. Your audience can learn more about your content and services by watching your videos every day.

Conclusion

Instagram has completely changed the advertising game for brands and their products. Companies are now strategically picking and choosing influencers for product endorsements- thereby enabling them to cash in on their readymade follower family. Bypassing the traditional advertising route has gained these companies a sustainable online presence.

People invest a considerable amount of daily time on Instagram, which has led to subtle yet huge impacts on their lives. Yet, it is tough to build an Instagram following in modern times. It is a comprehensive visual platform where marketing campaigns are primarily relying on spectacular images.

A Guide For Your Dataset Optimization In Backup

0

Today, data is valuable and essential to individuals and organizations. Whether it is client information for your small business or personal files, data protection is vital to prevent damage or loss. It is quite frustrating to lose all your information – photos, videos, bank account details, among many sensitive files. Therefore, you can never underestimate the importance of a backup exercise. It would help if you had an efficient backup strategy in place to secure your information. With rising malware and virus attacks, no one is safe from cyber threats. Your plan must incorporate a disaster recovery that ensures business operations continue without interference after an attack. Try Hype-V recovery and retrieve all your files with ease and at reasonable rates. 

This article aims to guide you on optimizing backup processes to ensure you meet your business objectives. Below are ways you can implement to back up your data successfully:

Use Remote Storage

One of the most critical aspects of any backup strategy is using remote backups. Do not backup data and store it in the same hard drive as the original information. It is risky and futile because if your system suffers an attack, you might lose all your crucial data. That is why an off-site backup location is viable since you will retrieve your data without any problems. Whether you opt to use a physical server or a cloud solution, your data is safe as long as it is remote storage. Off-site locations guarantee you successful data recoveries, which enhances backup processes.

Frequent and Regular Backup

Another way of optimizing your backup process is to conduct frequent backups at a specific period. It is imperative to set up a regular schedule for your vendor’s backups to avoid leaving out any crucial data. Creating a timeline of the exercise ensures that you utilize the process to the maximum. Whether it is an incremental or full backup process, ensure that you categorize the data priority levels efficiently. For instance, you need to continuously back up sensitive data, while cold data requires daily or weekly backups. 

Moreover, you need to set up a time that does not interfere with work operations due to data traffic on the network. Probably, in the evening or at night when employees are not working. However, you must ensure that your backup strategy aligns with your business objectives to achieve full optimization.

Backup Retention Period

How long are you planning to use your backup solution? It is crucial to have a specific span that you intend to retain the backup plan. Long-term retention strategies may not be feasible due to storage space. As time goes by, your business will keep growing, meaning that data amounts will also increase. Therefore, forcing you to get more space to back up the additional data. Most backup plans provide retention schedules ranging from hourly, daily to weekly per month. Then, the monthly data backups run into years. If you implement this schedule, you can have multiple backups that are recent. Hence, you can recover your data with ease in case of any threat. Having a long retention span is good for business since you will not change your plan frequently.

Encrypt and Protect Backups

You need to incorporate additional security measures to protect backups since an off-site location is not adequate. Incorporating high-level data encryption prevents third party interference at all costs. No hackers will infiltrate your storage location and steal sensitive information. Your information will remain secure since you will retrieve the exact data as expected during recovery.

Consider RAID Arrays

Storing backup data on RAID arrays entails distributing information on several drives to increase performance and consistency. It can also enhance data protection in case one drive malfunctions during a backup process. This technology allows extra redundancy, which lessens your chances of data loss during an external attack from malware or other natural disasters. 

Use Multiple Backup Solutions

Since each backup approach in terms of storage and retrieval, it is imperative to implement multiple strategies to secure your data. Do not rely on one vendor to deliver backup solutions. For instance, you can choose to store your data in an on-site physical server and in the cloud to improve efficient data recovery chances. 

Ultimately, having a backup strategy is crucial in securing your business data since cyberattacks can occur at any time. Ensure that you optimize each backup process to guarantee successful recovery in the event of data loss. 

Best Free Video Editing Software For Beginners in 2020

0

If you start counting up the number of video software options, you’ll probably never get to the end of the list. The industry is evolving and progressing every day, and it can be hard to find the right tools, especially for beginners. Not to mention the fact that most professional programs cost you a fortune and may not be easy to use.

But don’t worry, we’ve narrowed it down to fifteen free video-editing software programs. We’ve included below the main features, prices, pros, and cons, so you can decide what is the best tool for you.

What is the best video editor for free?

Most free video editors are online, so you can use them with any operating system. Full-featured free programs for Windows or Mac are rare and usually provide only a limited set of tools or don’t let you save your video without a watermark. Below, you’ll find ten online tools and five desktop editors for Mac and Windows.

These are, in our opinion, the best free video-editing software solutions available now:
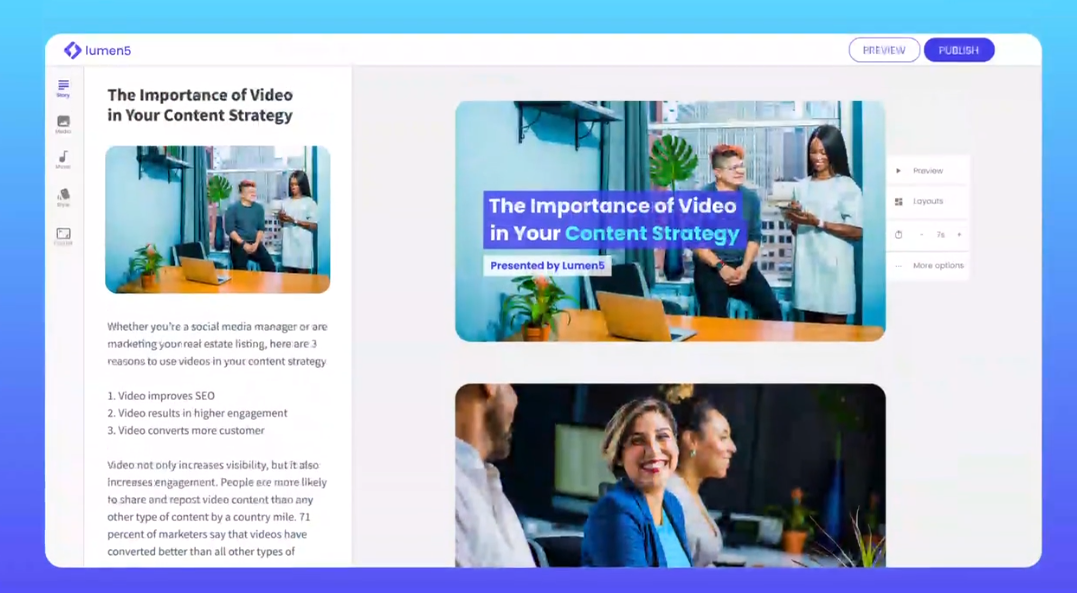
1. Lumen5

Available: Online

Signing up: Lumen5 or Facebook account

Pricing: Free with limitations and a watermark; monthly paid plans start at $29

Lumen5 is an online video editor that lets you create different kinds of marketing videos for social networks like Facebook, Instagram, and LinkedIn. Its unique feature is that you can upload your text directly to the template and transform it into a video. You can customize the slides according to your needs and add music and background images, either stock or custom. You can play around with the layout and aspect ratio to fit your video to the specific parameters of your target social media platform.

Lumen5

Pros:

  • Transforms a script into a video
  • Business-oriented video templates

Cons:

  • Signup form requires your full name, enterprise name, and business email

Best for: scripted marketing video

2. Renderforest

Available: Online

Signing up: Renderforest, Google, Facebook, or Apple Accounts
Pricing: Free with limitations and a watermark; monthly paid plans start at $6.99
Renderforest is an online branding platform, offering tools to create high-quality videos, logos, mockups, websites, and graphic visuals, with minimal time and effort. You can find hundreds of video templates in various categories, ranging from intros and music visualizations to explainer animations and promotional videos. Use easily customizable scenes to create engaging videos within a few minutes.
Pros:
– Cutting edge videos.
– Supportive customer support
– Tons of templates
– Good Price-Value ratio
Cons:
– Expensive for one time purchases
– Misses the offline editing feature
Best for Creating Broadcast quality videos.
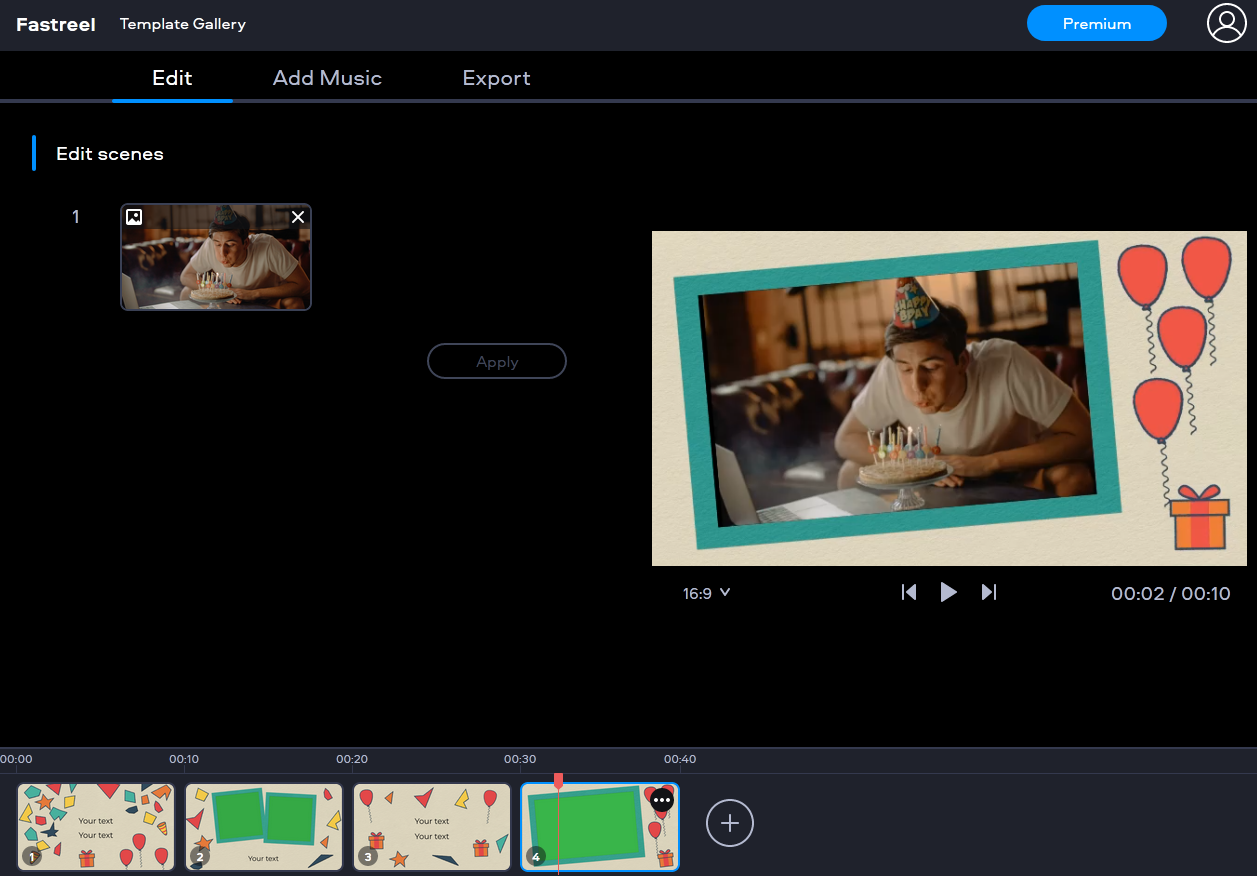
3. Fastreel

Available: Online

Signing up: Fastreel account

Pricing: Free with a watermark; monthly paid plans start at $5.95

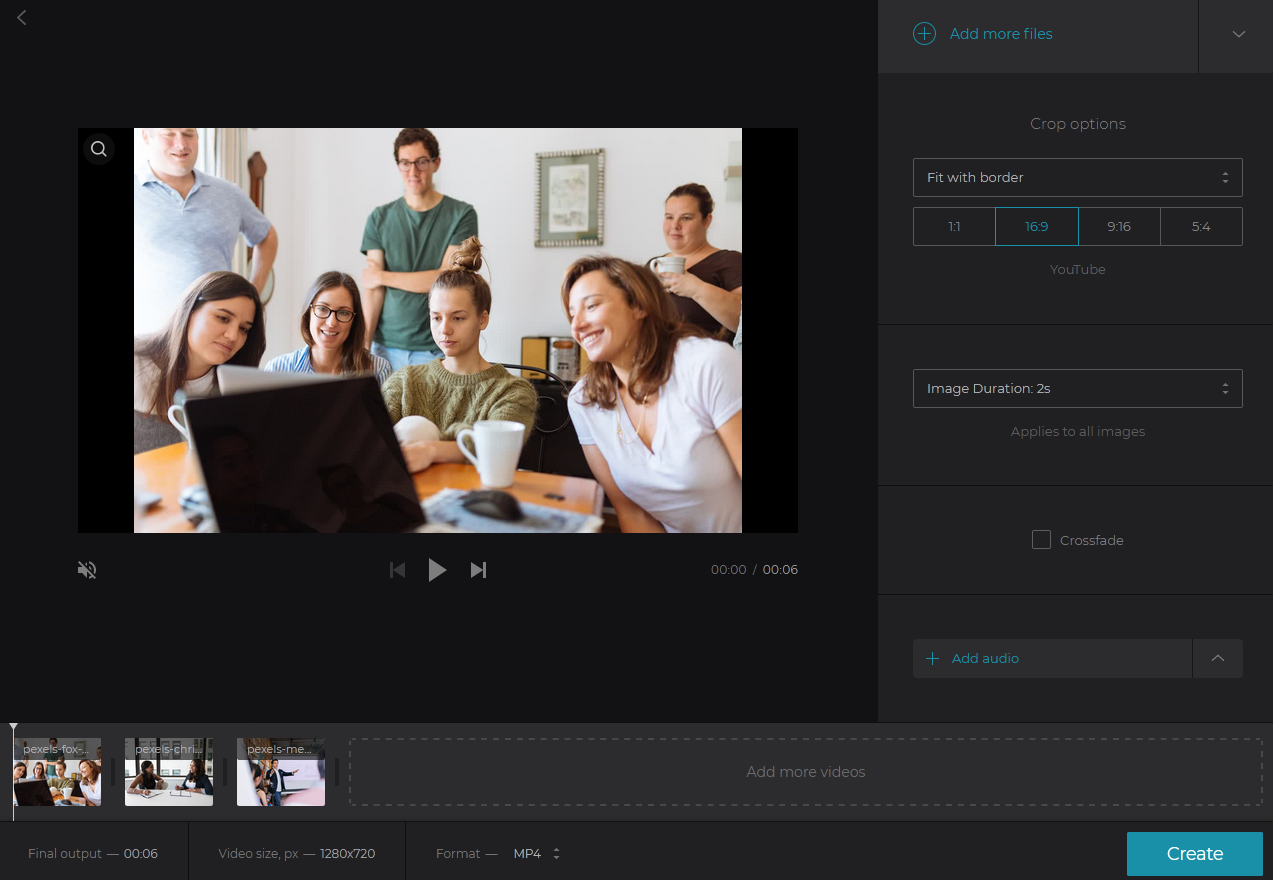
Fastreel can help you create a stunning video from a template: birthday greetings, advertisements, book trailers, explainers, and more. You are free to customize the templates as you wish: add more slides, insert text and pictures, and choose music. Besides video templates, Fastreel offers a whole range of other tools: cropping, looping, muting, rotating, resizing, stop motion, and more. You can enhance your clips with these tools, assemble them to make a video or slideshow, and then upload them directly to YouTube or Facebook.

Pros:

  • Themed templates and ready-made slides
  • Basic video enhancing tools

Cons:

  • You can’t upload custom music

Best for: short promotional clips
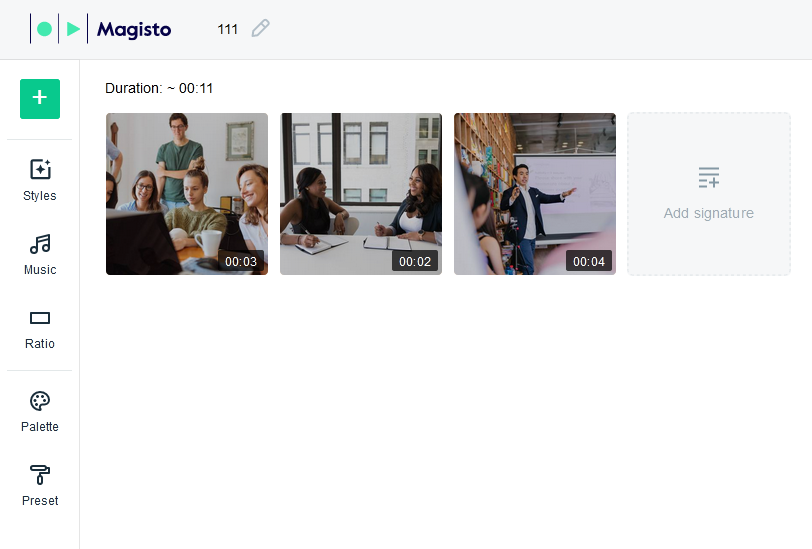
4. Magisto

Available: Online

Signing up: Magisto, Facebook, Google, or Apple account

Pricing: Free with limitations and a watermark; monthly paid plans start at $9.99

Magisto lives up to its name because your video is created automatically – just like magic. The artificial intelligence algorithms bring your clips together and overlay the effects and music of your choice. You can pick a palette for your clip, so it reflects your brand’s color scheme. There are themed templates for different styles: seasonal, minimalistic, fun, and more. You can select one as it is or tweak it as you please.

magisto

Pros:

  • Unusual effects and styles to fit every taste
  • Fast video creation thanks to AI

Cons:

  • Most content is available only with a premium account

Best for: simple slideshows

5. ClipChamp

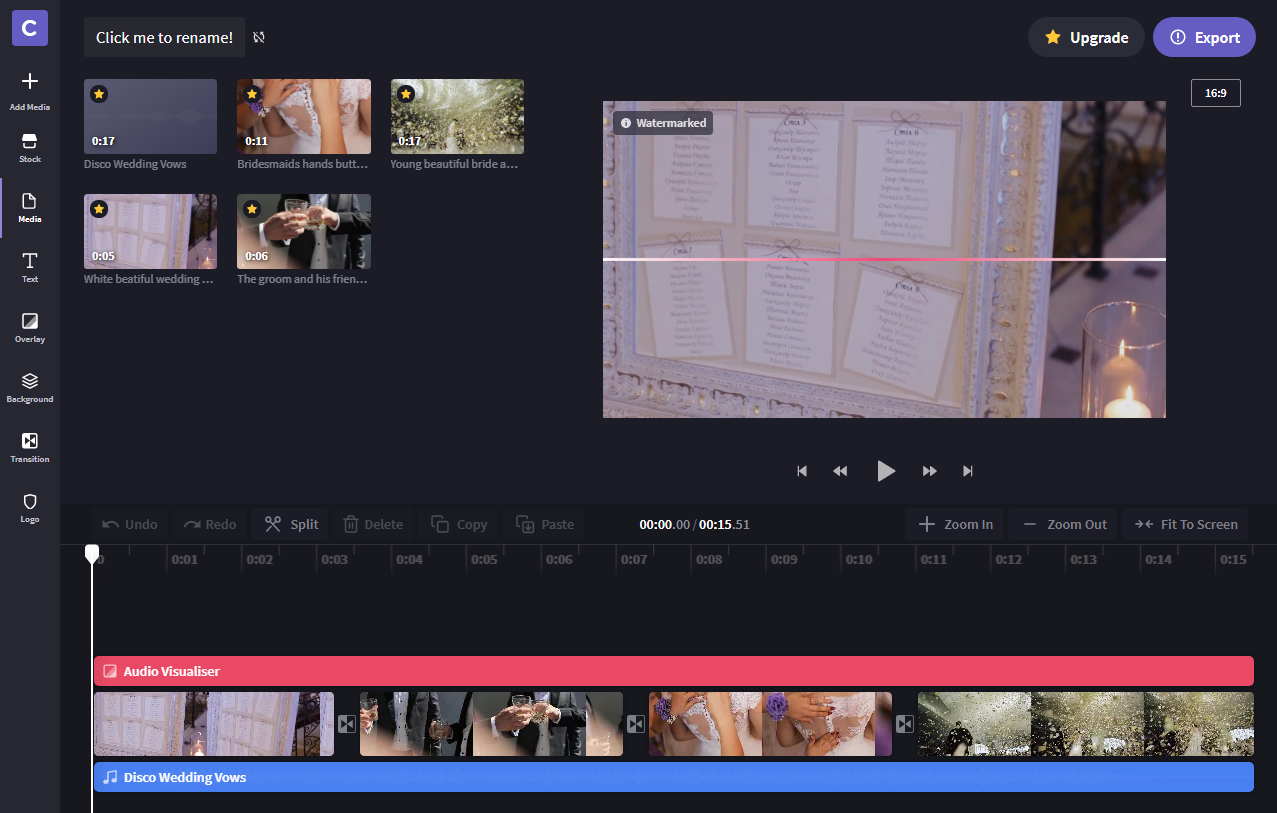
Available: Online, browser addon for Google Chrome and Microsoft Edge

Signing up: Email, Google, or Facebook account

Pricing: Free with limitations; monthly paid plans start at $9

ClipChamp is an in-browser editor that goes beyond just customizing ready-made presets. There is an editing workspace with a timeline, so you can work with your footage as if it were a desktop application. All of this lets you create high-quality videos with advanced transitions and effects. For instance, with the picture-in-picture layout, you can create a reaction video, a walkthrough, or a tutorial.

Pros:

  • Advanced movie editing
  • Webcam and screen recording tools

Cons:

  • Works only in Google Chrome and Microsoft Edge

Best for: reaction videos and how-to guides
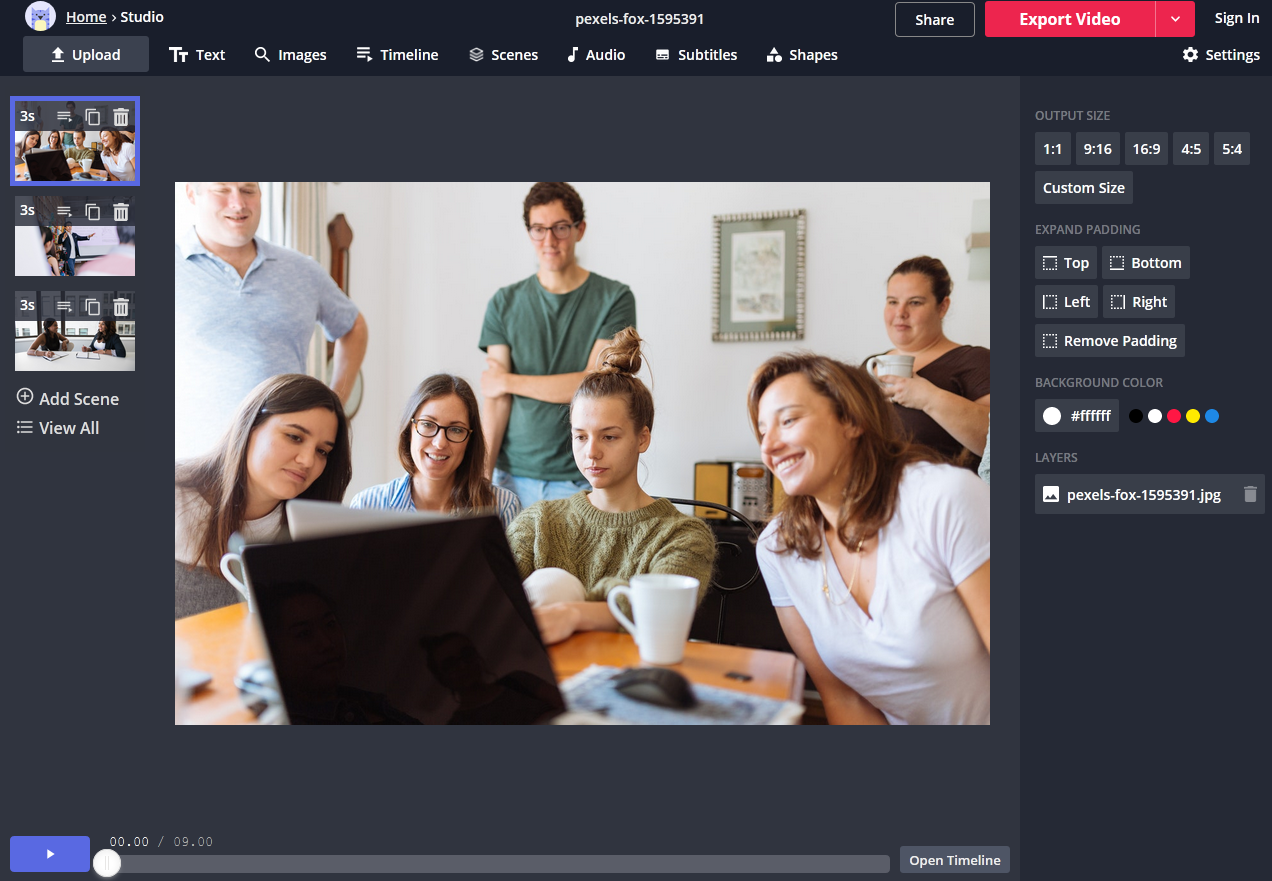
6. Kapwing

Available: Online

Signing up: Google or Facebook account

Pricing: Free with limitations; $20 for the use of pro features

Kapwing is not a conventional movie editor. It primarily focuses on images – or scenes – that you could use in a video later. In a virtual studio, you can enhance pictures, choose the output size, crop, zoom, insert subtitles, and more. In order to overlay music, you need to first choose the slide on which the music will start. You can also add shapes and text captions to create an annotated presentation.

Pros:

  • Tools for editing images
  • You can remove the watermark by logging into your account

Cons:

  • Unconventional controls

Best for: pre-editing pictures for making a final video
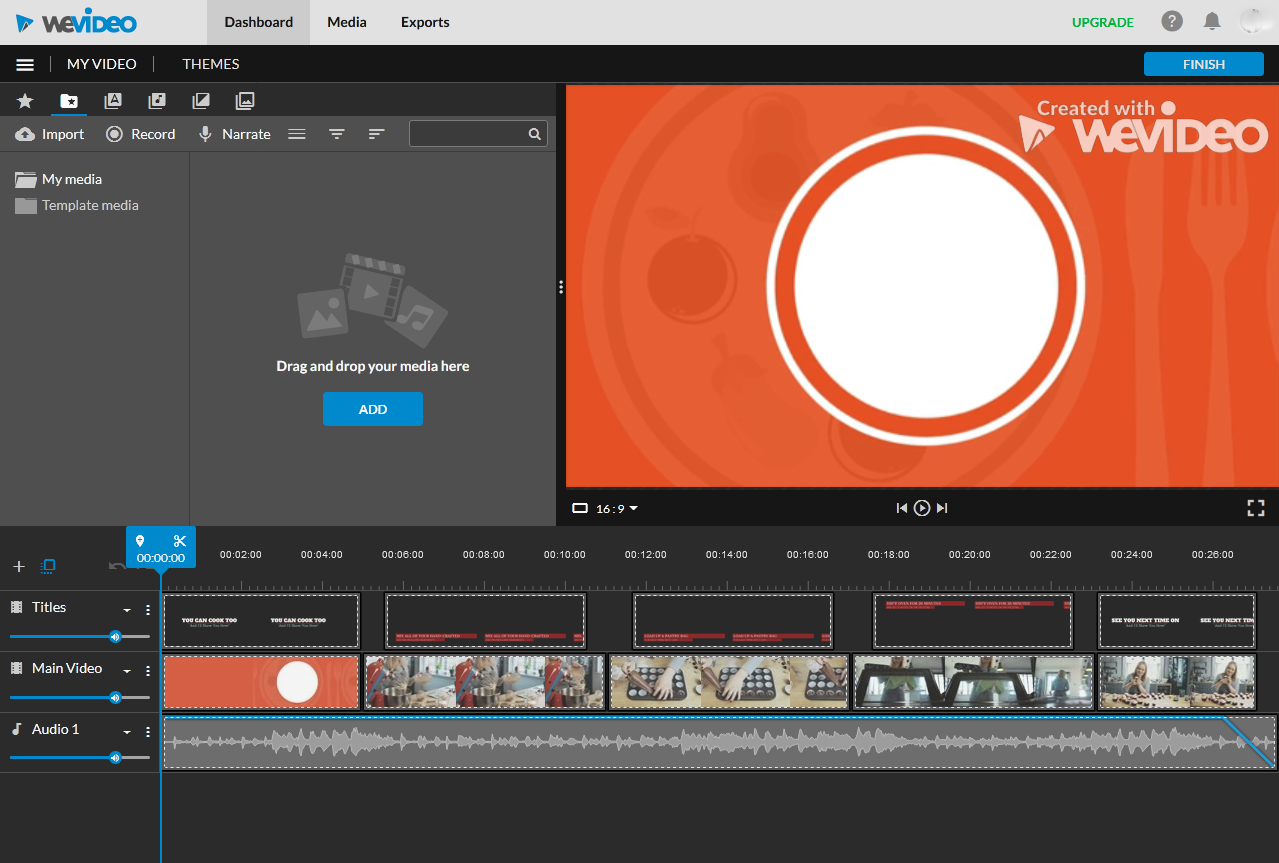
7. WeVideo

Available: Online

Signing up: Email, Google or Facebook account

Pricing: Free with limitations; monthly paid plans start at $4.99

With WeVideo, you can choose both a template and a theme for your video. If you want to add some original touch, you can change colors and fonts, upload other images and custom music. It also lets you add a voice-over to your videos and, if you are a Google Chrome user, you can record video from your webcam. It includes lots of realistic effects like TV noise, bubbles, light streaks, and more.

Pros:

  • A convenient multitrack timeline
  • Recording tools

Cons:

  • Needs to be reloaded if you’re idle for too long

Best for: editing in Google Chrome
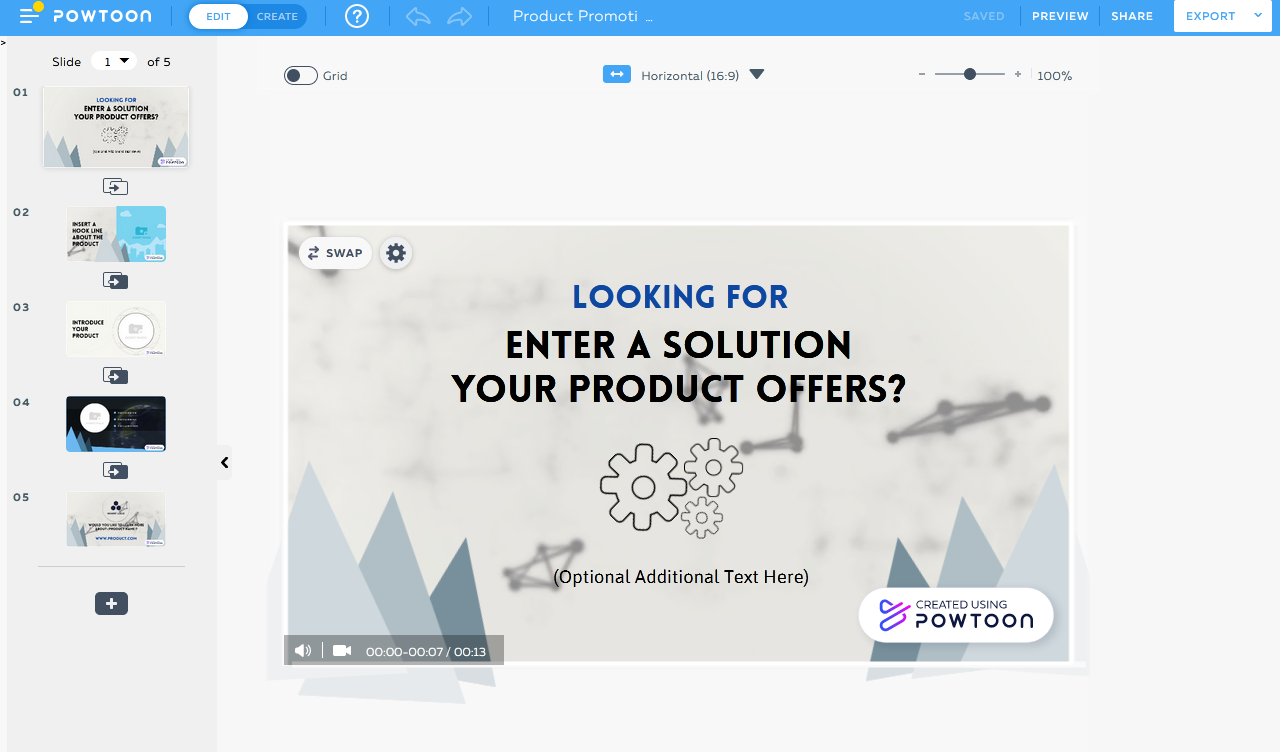
8. Powtoon

Available: Online

Signing up: Powtoon, Google, Facebook, LinkedIn, or Office 365 account

Pricing: Free with limitations and a watermark; monthly paid plans start at $89

Powtoon is a good alternative to standard programs for making presentations. As you would expect, you can modify an existing template or start a project from scratch. With a variety of clip-art objects, you can create a varied and dynamic presentation. You can also add animated characters, props, shapes, stickers, and captions. Powtoon’s advanced tools let you rearrange information within slides and change backgrounds. In free mode, you can save the results in PPT or PDF format; with a premium account, you can export your file as an MP4.

Pros:

  • Advanced presentation creator
  • Multiple export options: PPT, PDF, YouTube, Facebook

Cons:

  • Export in MP4 is available only in the premium version

Best for: creating professional presentations

9. Kizoa

Available: Online

Signing up: Kizoa account

Pricing: Free with limitations; lifetime membership plans start at $29.99

Kizoa consists of two modules: a movie maker and a collage maker. The latter creates a still or animated image while the former helps you with film editing.These tasks can be accomplished automatically, almost without your involvement, but you can also make your movie from the ground up yourself. As you open new tabs, pop-up tips will appear to guide you through the process of adding effects, transitions, music, and text.

Pros:

  • Two tools in one: you can create both videos and collages
  • Multiple export options

Cons:

  • No timeline mode

Best for: quick clips and collages
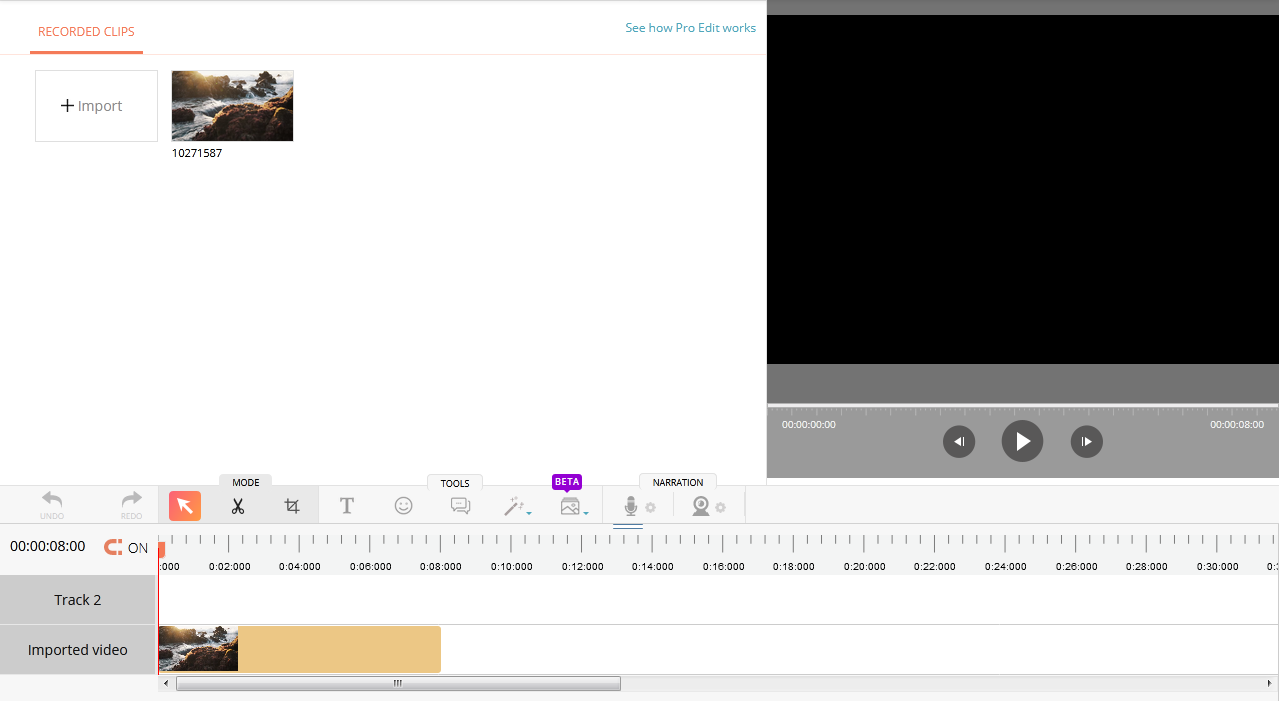
10. Hippo Video

Available: Online

Signing up: Hippo Video, Google, Microsoft, Facebook, or Twitter account

Pricing: Free with limitations; monthly paid plans start at $19

With the abundance of tools that Hippo Video provides, it’s easy to get lost on the way to the pro editing mode. However, it includes many useful tools: you can record your screen, create a slideshow, capture webcam and microphone output, and much more. In video-editing mode, you can do practically anything: overlay effects and captions, add speech bubbles and smileys. You can also add a poll to your video, insert a call to action, and use other marketing tools to promote your brand.

Hippo Video

Pros:

  • Specialized marketing tools
  • Multiple modes: screen recording, slideshow making, video editing, and more

Cons:

  • Confusing interface

Best for: professional marketing videos

11. Clideo

Available: Online

Signing up: Google or Facebook account

Pricing: Free with limitations and a watermark; monthly paid plans start at $9

Clideo has a clear-cut interface, so making videos is pretty intuitive. Plus, you can upload files from Google Drive or Dropbox, which means you are not limited to using only your computer – you can work with the program anywhere you have iInternet access. There are also some additional tools like a meme generator and a slideshow maker; you can merge, cut, join, and compress files, too.

Pros:

  • Import from Google Drive and Dropbox
  • Size presets for YouTube, Instagram, and Facebook

Cons:

  • Export only to Google Drive and Dropbox

Best for: cloud-based video editing

Easy video-editing software for desktops

Most desktop software available for free has restrictions like the size of the output video, a watermark, or a trial period. Completely free programs are usually lacking in some advanced tools.

  1. OpenShot

Available: Windows, Mac, Linux

Pricing: Free

Openshot is a free video clip editor for PC. It may seem a little bit old-fashioned, but it is the easiest way to create a movie if you don’t want to work with online tools. It includes five tracks by default, but you can delete and add to them according to your needs. You can place different types of media on the same track, which may seem confusing at first because other programs have separate tracks for audio, video, and captions. You can also insert animated titles and overlay effects: slow motion, time effects, and object animation.

Pros:

  • Free download
  • No watermark in the output video

Cons:

  • Non-intuitive controls

Best for: creating videos on PC for free

  1. Avidemux

Available: Windows, Mac, Linux

Pricing: Free

Avidemux is an open-source video editor that accepts code from third parties; this means that the program is frequently updated, and patches and translation packs may be added at any time. The editor is super simple, and it doesn’t require any professional skills on your part. It lets you add filters and effects, cut footage into clips, and adjust export settings. You can’t make a slideshow or join multiple clips, but it does have all the tools you need to enhance one video.

Pros:

  • No watermark in output video
  • Simple editing tools

Cons:

  • No timeline or storyboard mode

Best for: automated projects

  1. Machete Video Editor Lite

Available: Windows

Pricing: Free with limited tools

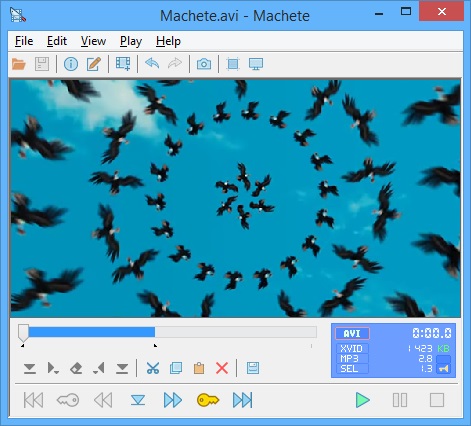
Machete Video Editor Lite is a Windows-based tool. Unlike its full-featured cousin, it can only cut and split videos into clips and rearrange these segments. You can also remove audio from video and edit meta-data. This tool may seem rather basic, but if you don’t need advanced editing tools, it can be a savior.

Pros:

  • Simple basic tools
  • Metadata editing

Cons:

  • The free version works only with AVI and WMV

Best for: quick cutting and splitting

  1. VideoPad

Available: Windows, Mac

Pricing: Free with limitations, licenses start at $60

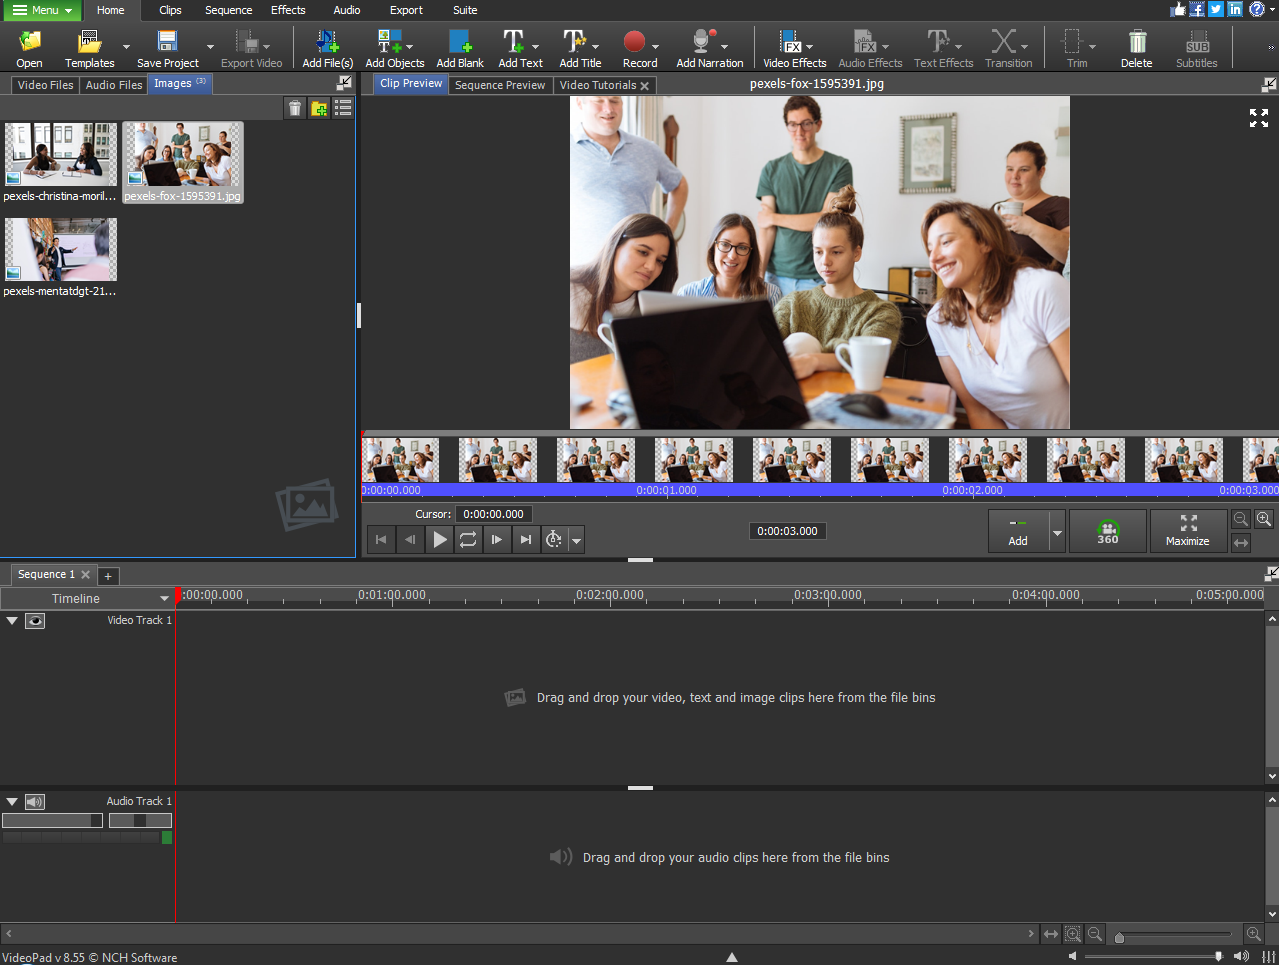
VideoPad Video Editor is one step closer to advanced video-editing software. It is free and has an intuitive interface. It is simple enough for beginners to feel safe trying new things and improving their editing skills. You can switch between timeline and storyboard modes to arrange video clips, images, audio, and titles as you like. Use special effects and animation to make your project more dynamic, overlay screen recordings and your own narration.

Pros:

  • Multiple export options
  • Video and audio recording tools

Cons:

  • Has a learning curve

Best for: beginners looking to improve their skills

  1. MAGIX Video easy

Available: Windows

Pricing: Free trial for 30 days, license – $49.99

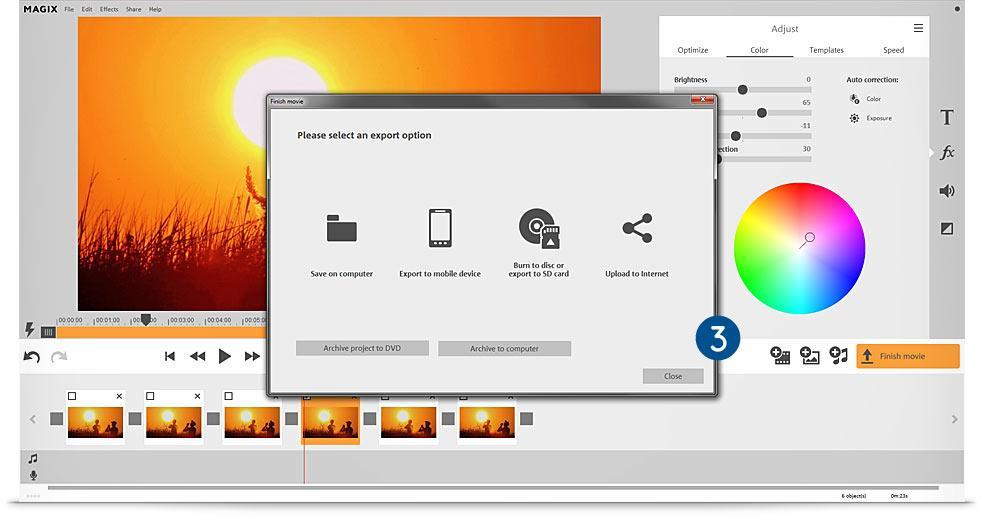
MAGIX is renowned for making professional video-editing software, but this program is aimed at less experienced users. Although it has some advanced tools, they are surprisingly easy to use. You can add special effects and insert text captions, use intro and outro templates, and work on the soundtrack.

MAGIX Video easy

Pros:

  • Advanced editing tools
  • Intuitive interface

Cons:

  • Available only for Windows

Best for: Windows users

Summary & FAQ

Free online solutions should be your top choice if you are on a budget, and your editing skills are not at the highest level. If you are feeling more confident, you could try out a premium plan for your favorite online tool.

Most programs with advanced tools are not free. However, they can bring your ideas to life in a more elegant way. When you’ve gained enough experience with the online tools, you can switch to desktop programs and even professional software in the future.

So, what program or service will best suit your needs?

What video editors do YouTubers use?

The answer is not unanimous, but the top choices are Freemake, Final Cut Pro X, and Lightworks.

What is the best video editing software for Mac?

If you are a Mac user, you should consider DaVinci Resolve, iMovie, or HitFilm.

What is the best video editor for Windows 10?

For Windows 10 users, we recommend Movavi Video Editor, MAGIX Video Easy, or VSDC Free Video Editor.

What is the best free video editor for Mac and Windows?

We suggest using one of these online tools: Lumen5, Fastreel, Magisto, or ClipChamp.