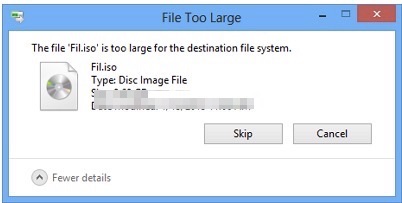
While working and operating your PC, you may abruptly face the problem on your system, saying “The file is too large for the destination file system”. This is not allowing you to copy any files on your drives in spite having adequate space on it. This you may face, when you try to copy files more than 4GB. It is because the external drives’ file system is formatted in “FAT32” that is not letting you do so.
The maximum size capacity on “FAT32” is 8 GB. Therefore, when you want to copy files, that exceed 4GB, it gives the command “The file is too large for the destination file system”. That doesn’t mean you cannot copy files on your external drive or USB drive more than 4 GB. There are ways to solve this problem.
Solutions to Fix “File too large….”:
Once you figure out the reason, here’s a way to fix the issue. There are normally two solutions to this.
Solution 1
- With the Windows default format feature, free formatting of FAAT32 to NTFS can fix the problem.
Solution 2
Another way is without any loss of data, converting of FAT32 to NTFS, using third party software can help fix it.
Now you might be thinking how to fix the “file is too large for the destination file system” error using these above two solutions. The simple methods below, will give you the idea of solving this error using the two solutions.
There are two ways by which you can fix it, one is without formatting and another way is through formatting. First, let’s show by formatting.
-
Fixing by Formatting
You must know this, to any error or software related problems, formation is the most convenient way to fix any such error issues. Thus, formatting and converting “FAT32” to “NTFS” is the easiest way for you in this case. But the data that are stored will get deleted, as you know formatting delete any existing data. Therefore, it is highly recommended, when there are no files on your USB drive or external drive, then only go for formatting. Here’s how to fix it for free using the built-in Windows format feature.
- First right click on the external Hard disk or the USB drive.
- Next click on Format.
- Now, after formatting, change the type to NTFS.
That’s all; “The file too large for destination file system” is fixed now. Now you can successfully copy larger files, which are more than 4 GB, onto your hard drive or USB drive.
Fixing Problem without Formatting
Sometimes there might be important data stored on your USB drive or in the external drive, and you are not willing to delete them. So you need some better fixing option for this. Therefore, to convert FAT32 to NTFS, you need EaseUS Partition Master, which will help prevent any data loss. Thus this familiar usage of third party software is a better option. It fixes the problem without demanding the need of formatting. Following are the ways to solve it without formatting.
- At first connect your Hard Disk Drive to your computer and then launch EaseUS Partition Master.
- After this Right Click on the disk that you wish to convert from FAT32 to NTFS, and then select Convert to NTFS.
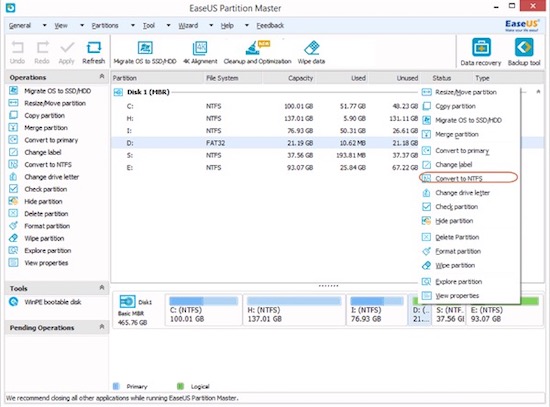
- A dialog box soon pops after the above procedure that shows the destination file system and the source. Now to continue click on OK.
Once you are done with all the steps, you can now convert all your external drive, USB flash drive or SD drive from FAT32 to NTFS and successfully copy larger files consisting more than 4 GB. Thus following these easy simple solution steps will help you overcome the problem.
")