Blog Page 141

How to reset or change BSNL broadband WiFi password?

0

Hi all!! This is one of the most basic article that needs to be written. Today I am here again to make you understand the procedure to reset your BSNL wifi password. If you are in India then you are most familiar person to bsnl on the earth. Bsnl stands for (Bharat Sanchar Nagam Limited) is an Indian state-owned telecommunications company headquartered in New Delhi. It is the largest broadband provider in India. If you own BSNL Broadband, then you might be interested to know How to change BSNL broadband WiFi password.

bsnl wifi modem confiquration

How to Configure BSNL wifi Modem

So here ends some of the basics regarding BSNL I thought you should know it somehow its short and simple to learn. I have been living in Rajasthan for a long time now and I also do have BSNL landline and wifi broadband also but the funniest thing is that there are only some houses in our area that uses wifi because other still prefer cabel internet the ancient one. I have been facing loads of trouble cause instead of taking the unlimited services I prefer the limited ones.

I don’t know how these children in my area got this password…..probably from my dad he is too generous.. they started sitting in front of my house with laptops and phones and I wondered what the hell they were doing all time there. Then one day I came to kow from my neighbour that they have been using my wifi and at the end of the month I had to suffer a bill costing 5000rs. So from my horrible personal experience I thought I might help you so here we go and look at these simple steps to save your bill and reset BSNL wif password:

How to change BSNL broadband WiFi password?

configure bsnl zte modem

1. Switch on your broadband and connect it to your desktop or laptop using Ethernet cable.

2. open your internet explorer and type this url http://192.168.1.1

How to change bsnl broadband wifi password
User name: admin
Password: admin

3. This will prompt you to enter username and password. But most of the times the username is: “admin and the password is also “admin“.

4. Go to modem configuration web page and under wifi security option select change the password and reset it.

How to change BSNL broadband WiFi modem password

4. There you will find the WEP or WiFi protected Access section choose any one , Now you can enter your WIFI key in this section.

5. Just save it and reboot the modem.

Wep is basic security that can not be easily cracked, so it will be fine to set WEP on your BSNL wifi modem. Or if you want to make it more secure then you can go for WPA (WiFi protected Access) , that is more secure and almost uncrackable.

For further help contact BSNL helpline:

  • Landline: 198/1500
  • Broadband:1504
  • Mobile:1503
  • Leased line:12676

Hope you have easily changed your BSNL Wifi password, you can also check my another post on BSNL wifi modem configuration.

Top 50 Best Karaoke Songs List Of All Time For All Song Genres From Rock To Pop

1

The 21st century is completely music driven by a wide range of songs released every month. Music has now become a crucial part of our lives. It does not matter which age group you belong to you certainly have your own favorite song genres which make you feel great. Earlier people were not exposed to music in a way that we are now. You switch on your TV and now there are at least 10 channels that you can find broadcasting music 24×7. So what factors have made these drastic changes. It’s all technology, the more we remain connected the more we get exposed to recent trends.

karaoke

Contents

Best Latest Karaoke Song List 

So we are going to cover some of all time favorite karaoke songs including the latest ones which you can sing individually or even in groups. Group karaokes are fun because you have those great props with you and the one with good singing covers the noise of dying seals created by non-singers. So without wasting much time let us go ahead and list out some most requested English karaoke songs which will give you a great singing experience.

EnglishHindi

Best of All-Time | Old | Latest | For femaleFor male | duet songs | Country songs

Best All-Time Karaoke Song

Title Links
Bohemian Rhapsody https://youtu.be/fJ9rUzIMcZQ
Summer Nights https://youtu.be/BnRshnWxkW4
Sweet Caroline https://youtu.be/1vhFnTjia_I
Total Eclipse of the Heart https://youtu.be/lcOxhH8N3Bo
Summer of 69 https://youtu.be/9f06QZCVUHg
Shape of You https://youtu.be/JGwWNGJdvx8
Suspicious Minds https://youtu.be/RxOBOhRECoo
Someone Like You https://youtu.be/hLQl3WQQoQ0
Rolling In the Deep https://youtu.be/rYEDA3JcQqw
Wrecking Ball https://youtu.be/My2FRPA3Gf8
All Of Me https://youtu.be/450p7goxZqg

Old Karaoke Song

 Killing Me Softly with His Song  https://youtu.be/8ppz-cwLeqo
 You’ve lost that loving feeling  https://youtu.be/xHKb_cFv5XQ
 Ice Ice Baby  https://youtu.be/rog8ou-ZepE
 Torn  https://youtu.be/VV1XWJN3nJo
 Zombie  https://youtu.be/6Ejga4kJUts
 Santeria  https://youtu.be/AEYN5w4T_aM
 Rehab  https://youtu.be/KUmZp8pR1uc
 Let’s Get It On  https://youtu.be/x6QZn9xiuOE
 Black Velvet  https://youtu.be/tT4d1LQy4es

Latest Karaoke

Let It Go https://youtu.be/L0MK7qz13bU
Shout Out to My Ex https://youtu.be/bFDzhKdrN9M
Rockabye https://youtu.be/papuvlVeZg8
CAN’T STOP THE FEELING! https://youtu.be/ru0K8uYEZWw
Cheap Thrills https://youtu.be/nYh-n7EOtMA
Hymn for the Weekend https://youtu.be/YykjpeuMNEk
Work from Home https://youtu.be/5GL9JoH4Sws
COLDWATER https://youtu.be/a59gmGkq_pw
Black Magic https://youtu.be/MkElfR_NPBI
You Belong With Me https://youtu.be/VuNIsY6JdUw

Karaoke Songs for Female

Shake It Off https://youtu.be/nfWlot6h_JM
I Will Survive https://youtu.be/gYkACVDFmeg
Like a Virgin https://youtu.be/s__rX_WL100
Wrecking Ball https://youtu.be/My2FRPA3Gf8
Emotions https://youtu.be/NrJEFrth27Q
Stronger https://youtu.be/Xn676-fLq7I
Black Velvet https://youtu.be/tT4d1LQy4es
Son of a Preacher Man https://youtu.be/DjydOI4MEIw
Damn, I Wish I Was Your Lover https://youtu.be/Lt6r-k9Bk6o
It’s Raining Men https://youtu.be/qqXUpe3jlkA

Karaoke Songs for Men

Sweet Caroline https://youtu.be/NsLyI1_R01M
Don’t Stop Believin https://youtu.be/VcjzHMhBtf0
Bohemian Rhapsody – Queen https://youtu.be/fJ9rUzIMcZQ
Wonderwall https://youtu.be/bx1Bh8ZvH84
I Wanna Be Sedated  https://youtu.be/ZLlLtSG7xe4
Losing My Religion  https://youtu.be/xwtdhWltSIg
The script  https://youtu.be/u6KdkcadH3o
When I Was Your Man  https://youtu.be/ekzHIouo8Q4
Never Gonna Give You Up  https://youtu.be/ON56AKnqbog
 Perfect  https://youtu.be/2Vv-BfVoq4g

Duet Karaoke Songs

We Don’t Talk Anymore https://youtu.be/3AtDnEC4zak
Feel This Moment https://youtu.be/5jlI4uzZGjU
All I Have https://youtu.be/yeSJ2YdhG5k
Islands in the Stream https://youtu.be/wz2ZBW_WetQ
Up Where We Belong https://youtu.be/bjrOcrisGyI
Need You Now https://youtu.be/eM213aMKTHg
Empire State of Mind https://youtu.be/LCINmOZGV6Q
Hunger Strike https://youtu.be/VUb450Alpps
Ebony and Ivory https://youtu.be/TZtiJN6yiik
I Know What You Did Last Summer https://youtu.be/ngORmvyvAaI

Love karaoke songs

Photograph https://youtu.be/nSDgHBxUbVQ
Hymn for the Weekend https://youtu.be/YykjpeuMNEk
You Belong With Me https://youtu.be/VuNIsY6JdUw
When You’re Gone https://youtu.be/0G3_kG5FFfQ
Paradise https://youtu.be/1G4isv_Fylg
My Heart Will Go On https://youtu.be/DNyKDI9pn0Q
Total Eclipse of the Heart https://youtu.be/lcOxhH8N3Bo
Right Here Waiting https://youtu.be/S_E2EHVxNAE
LOVE ME LIKE YOU DO https://youtu.be/AJtDXIazrMo
When You Believe https://youtu.be/LKaXY4IdZ40

Country Karaoke Song

Man! I Feel Like a Woman! https://youtu.be/ZJL4UGSbeFg
Ring of Fire https://youtu.be/mIBTg7q9oNc
Take Me Home, Country Roads https://youtu.be/1vrEljMfXYo
Something to Talk About https://youtu.be/mJ58TVYNFro
Your Cheatin’ Heart https://youtu.be/cS4LCoh0VGQ
Before He Cheats https://youtu.be/WaSy8yy-mr8
Stand By Your Man https://youtu.be/AM-b8P1yj9w
All My Ex’s Live in Texas https://youtu.be/gAzcHe8K8G4
Friends In Low Places https://youtu.be/mvCgSqPZ4EM
Celebrity https://youtu.be/B9mpDAJOPac

Best of All-Time | Old | Latest | For femaleFor male | duet songs | Love songs

Best All-Time Karaoke Song

Tum hi ho https://youtu.be/hQCLCWudpo4
Kal ho na ho https://youtu.be/mK-eYuuff48
TU MERI ‘ from BANG BANG! https://youtu.be/CcJXTKqjRr4
Soch Na Sake https://youtu.be/gwKHhKOFkro
Mai rang sharbaton ka https://youtu.be/NQxbEc_YW1U
Main Rahoon Ya Na Rahoon https://youtu.be/6ou5MiC7GuA
Jeena Jeena https://youtu.be/5pKfmK9HyrM
Meherbani https://youtu.be/STz4NPr3PA0
The Humma Song https://youtu.be/cemTrBXXP2w
Samjhawan https://youtu.be/ZTSnbLW28sY

Old Karaoke Song

Kya hua tera waida https://youtu.be/L3rOFNaUW-I
Mere Sapno Ki Raani https://youtu.be/RnW_mt336V0
Chookar Mere Mann Ko https://youtu.be/6eaKWgJNyJA
Chura Liya Hai Tumne Jo Dil Ko https://youtu.be/kobyRGc4gJ8
Meri Bheegi Bheegi Si https://youtu.be/qN2AgpHwi0A
Kisi Ki Muskurahaton Se https://youtu.be/z6FukwueP1o
Dil Hai Ke Manta Nehin https://youtu.be/L12Z9I2Dw1g
Pal Pal Dil Ke Paas https://youtu.be/6ch51tmH6jI
o hansini https://youtu.be/GR7OwKW20hY
Jab koi baat bigad jaye https://youtu.be/vj0yu1eQ31A

Latest Karaoke

Hawayein https://youtu.be/GcW1EtuWHaU
dil diyan gallan https://youtu.be/ltJb_Sr3DsE
Zaalima https://youtu.be/od7281LGnLs
hamdard https://youtu.be/TXBqQph7hfY
Mere Rashke Qamar https://youtu.be/Aj6Wuq6mnBE
love you zindagi https://youtu.be/u7FfAP95wLc
Raabta https://youtu.be/u0uhDjGOUpI
Agar Tum Saath Ho https://youtu.be/XQ_jpk4WI2M
Maana Ke Hum Yaar Nahin https://youtu.be/B_jeHRWYCsY
Soch Na Sake https://youtu.be/liY-xkrIpV0

Karaoke Songs for Female

agar tum mil jaao https://youtu.be/qbewRhGp1f4
jaadu hai nasha hai https://youtu.be/5OWgL47MsU8
main tenu samjhawan kee https://youtu.be/ZTSnbLW28sY
dil ko hazaar baar roka roka https://youtu.be/eY9mVWa0-ng
Zara zara behekta hain https://youtu.be/D2WCp_VBhlk
KAUN TUJHE YUN https://youtu.be/O0Ww71XgsdU
Mile Ho Tum https://youtu.be/NP5t7x3N9jk
moh moh ke dhaage https://youtu.be/lsE__bt5FX8
sawaar loon https://youtu.be/B574oQn1MSI
Lag ja gale ke phir ye hasi https://youtu.be/YL4g1_biEYM

Karaoke Songs for Men

badan pe sitare https://youtu.be/DqM455JxOC8
Gulabi Aankhein Jo Teri https://youtu.be/JzLs7JSwRB0
Tere Sang Yaara https://youtu.be/TenVO-7z4PU
Tu Jaane Na https://youtu.be/9Z8XY8fiOhc
Teri Deewani https://youtu.be/SQOttWQ3PgQ
Galliyan https://youtu.be/943dLt2leaM
Kabira https://youtu.be/alfuwCJFI-Y
Dil Diya Gallan https://youtu.be/hpIlXTyJk7c
Ikk Kudi https://youtu.be/CRRBB_Vuoik
yaaariyan https://youtu.be/SYhGLa1cf28

Duet Karaoke Songs

suraj hua mddham https://youtu.be/a303yL3l6tI
 nazm nazm  https://youtu.be/jclTV31KxQw
 Naina  https://youtu.be/vt-DdhOk15c
 Hamari Adhuri Kahani  https://youtu.be/xj0jKsJkip4
 Pehli Nazar Mein  https://youtu.be/jGmImIrxKrY
 Hasi Ban Gaye  https://youtu.be/7FNMc0j1qM0
 sun mere humsafar  https://youtu.be/Sd1UisIyvZ4
 The breakup Song  https://youtu.be/jeU7EygrPqQ
 Sau Aasmaan  https://youtu.be/ikkMhL8gS5s
 The Humma Song  https://youtu.be/cemTrBXXP2w

Love karaoke songs

Ang Laga De https://youtu.be/P0L6xRI8vaY
Pareshaan https://youtu.be/h78XeJQVXNY
Tumhi Ho Bandhu https://youtu.be/75wrFcjhIIo
Bulleya https://youtu.be/_QChCCrNwhs
Mujhko Barsaat Bana Lo https://youtu.be/r2g6vtV3tbg
Bol Do Na Zara https://youtu.be/kJw8yTxS56M
Phir Bhi Tumko Chahunga https://youtu.be/-tq7nVyFjzM
Tu Jaane Na https://youtu.be/9Z8XY8fiOhc
DO DIL MIL RAHE HAIN https://youtu.be/daiwaphxGoM
Tere sang Yaara https://youtu.be/TenVO-7z4PU

People are not just into listing all the time but there is great vocalist that you can find in every corner of the now. With more reality shows featuring every year and increasing the number of singers, we do get in line to try singing even if we sound bad like really bad demonstrating 100 seals shouting loud. Jokes apart, so is it that we are so fond of music now that we really want to sing whenever our favorite songs appear.

So, above we have selected some of the best all-time favorite karaoke songs which also list some great latest hits and we will keep on updating the list. With one the most renowned singers like Madonna, Beyonce and so many other we have selected some great hit singles as well as group album songs which are still on the charts. Well, some may have dropped but are still referred as best classics ever. So, if you can find some great songs to rock your karaoke party that will be great.

Increase or Boost RAM in Android without Root ( Unroot users)

If you own an Android phone which make you irritate of its low processing speed or hanging problem. Then you must be looking for some way to increase Android speed. But you must know that your Android device speed depends on your hardware like processor, RAM etc. But you cannot change the hardware of your device. So to increase speed you need to look for some alternative. You can improve your Android performance by increasing RAM of Android phone. Here i will tell you methods to boost Android RAM.
Also Read:

As such you can expand your RAM in Android device. But that is very complex process and also required rooting access. But if you need to optimize or boost your Android RAM , then there are many free apps available on Google play to increase or boost RAM in Android without Root. But these method only optimize your RAM by killing unwanted processes.

Boost RAM in Android without Root

There are lots of method to boost Android speed or increase Android RAM. But those method are complex but if you require simple methods. Then you can use these RAM Booster Android apps.

SMART RAM BOOSTER

andriod root

The task manager of your Android device only kill the low priority tasks. So it keep busy your processor and RAM in high priority task. And this is the reason of low speed of your device. Now to increase your device speed, you need to kill those high priority tasks also. This Smart RAM Booster app is designed to selectively kill the less important apps. This also helps you in increasing your battery backup.

Memory Booster – RAM OptimizerIncrease-or-Boost-RAM-in-Android-without-Root1

This app also do same function as the above app. But it has some additional features also.
  • Real-time RAM usage
  • Task Killer
  • Cache Cleaner
  • Garbage Collector
  • Auto Boost (in pro version)
  • Whitelist/Ignore list
  • System info
Free memory level is the main factor that affects how fast system runs. Memory Booster shows you real-time free memory level, and provides a live chart to demonstrate how memory changes

Super Booster- RAM Optimizer

Increase-or-Boost-RAM-in-Android-without-Root2

This app free up your device memory to increase your device speed. Its saves your memory and battery by killing background apps. And this app does not require rooting access.
As i already told these app only optimize or boost your RAM by killing unwanted processes. But if you really want to expand or increase RAM size then you can check my guide to boost Android RAM using SD card or increase internal memory of ANdroid phone. The above apps though help you in increasing speed of Android but these methods will really increase your RAM.

How to Fix iOS Error “Unable to Join Network “

We all know that functionality of iOS depends a lot on internet and without the net connection we cannot get to most of it. Most of the iOS users might have encountered an annoying problem which actually occurs when you try to go online manually or try to join a Wi-Fi internet connection.

unable-to-join-network

A message pops up that says “Unable to join the network” on your iPhone, iPad or iPod touch with an option to dismiss and doesn’t let you go online. Any sort of interruption on internet connectivity affects the functionality of the phone directly and indirectly so it is important to know what is the root cause and how can we fix it. Unfortunately the error doesn’t provide you detailed information along with the message and you cannot figure out why it is happening by just looking at it. Though, in most of the cases you can resolve this issue by following few simple steps that we have mentioned above and get connected to the internet quickly.

How to Fix iOS Error “Unable to Join Network “

Let’s see what needs to be done when the error occurs while attempting to join a network through your iOS device.

  • First of all, from the Home Screen, go to Settings
  • Tap on General

step2

  • Scroll Down and tap on Reset

step3

  • Select Reset Network Settings

step4

  • It will ask you to enter the device passcode, do that and confirm the reset

step5

  • Restart your iPhone, a spinning cursor will appear on the screen for a while
  • Once again go to Settings
  • Tap on Wi-Fi
  • Name of the Wi-Fi connection will appear on the list, click on it to join the network.

The phone restarts itself after resetting the network settings to get rid of remaining preferences or cache. It is important to know that when you reset the network settings of your phone, specific information regarding your network configuration and saved passwords also get removed so you need to enter those details again. After this, your Wi-Fi connection should be up and running.

In case it doesn’t connect to the internet after following the above mentioned steps then you can choose to forget the Wi-Fi network from the iOS settings and manually join the network.

  • Go to Settings > Wi-Fi
  • Look for the name of your Wi-Fi connection/Router and tap on info button (i) next to it

process2ndstep2

  • Tap on Forget This Network

process2ndstep3

  • A message will pop up on the screen, tap on Forget to dump the network from the list

Once you drop the current network, your Wi-Fi connection also goes away. If you have an iPhone then it will go back to the Cellular Data of the phone but if you are using an iPad or iPod touch that doesn’t support 3G/LTE then they will be left without any internet connection. The forgotten network gets listed under ‘Choose a network..’ section and will not get connected automatically unless you select it again.

In order to join a network manually, you need to select ‘Others’ from the Wi-Fi Menu. You need to enter the network name, encryption type and password of the router to do so.

These two steps will help you to resolve the error. If you have face any problem, do let us know in the comments section below.

How to Fix Youtube Black Screen Error Problem

It is since then that changed the world of videos and learning loads of other stuff by visualizing after YouTube came into the world of internet. YouTube, which is headquartered in California’s San Bruno is an American video-sharing website and this service was created by three former employees of PayPal in February 2005. It was then purchased by Google in November 2006 and now as one of Google subsidiaries, it is operated.

The site now enables users to view, upload, share, add to favorites, rate, comment and report on videos. It makes use of technology such as H.264/MPEG4 AVC, WebM, and Adobe Flash Video to display a huge variety of corporate-media and user-generated videos.

youtube-black-screen

Contents, including TV show, music videos, video clips, documentary and short films and other contents such as blogging, short educational and original videos are also seen on YouTube.

Now those who frequently access YouTube they might have faced the issue of black screen on YouTube. It is because of the numerous techniques that are operated behind such technical devices and apps. So if you are exasperated by this black screen issue of YouTube, below are solutions how to fix it the black screen problem on YouTube.

YouTube Black Screen Problem and its Solution:

Here are the black screen problems on YouTube with their respective problem fixing methods.

Problem 1

One of the familiar problems that users face with the black screen issue of YouTube is during the loading process the screen abruptly turns black. The video doesn’t stream, but the page keeps loading. No sound or pictures appear while this happens only blank screen is visible.

Solution

In some mere cases it is seen that slow internet connection is the reason behind it, so once the user gets their connection checked and upgrades it to higher speed the problems gets solved.

For those who are MAC users and log in to YouTube from Firefox browser, then logging out can help them to fix this problem.

Another way of solving is clearing up “history”, “internet files” and “cookies”. There is another method which you can follow is; first go to “tools” then “quick preferences” then “site preference” where you need to edit then click the “network tab” and then go to “browser identification” and identify it as Firefox.

Problem 2

Those who use Firefox browsers as their default browsers, they often face this black screen problem.

problem2

Solution

It is seen this problem occurs due to some internet bug issues which can be solved by the following ways;

(i) First, go to the “option” menu and disable the Firefox hardware acceleration by selecting the option “ use hardware acceleration when available checkbox”. After this restart the browser.

problem3-2ndsolution

(ii)  Open the Firefox tools option, then “privacy settings” then select “custom settings” and delete all the cookies from YouTube cookies. These two methods will help fix the black screen issue.

Problem 3

Chrome users who access YouTube from this browser have faced this problem where the screen appears to be black and also with a buffering logo where the actual video doesn’t open after a prolonged wait.

problem3

Solution

Users have recommended this “https://chrome.google.com/webstore/detail/disable-youtube-html5-pla/enmofgaijnbjpblfljopnpdogpldapoc/related?hl=en” extension for a convenient result.

Another way of solving is similar like that of the Firefox hardware acceleration disable by going to “system settings” then “systems in the “advanced settings” segment and setting it to “Use hardware acceleration when available”.

Problem 4

It is also seen that the YouTube black screen problem still appears even after deleting cookies just after watching a few videos which seem to be very disturbing for the users. It only permits few videos to play when the cookies are blocked, but the black screen issue resumes soon.

Solution

Feedback from users has depicted the fact that new installation of the Firefox browser is creating such problem where a “no script” option after updating is missing in the process is creating this black screen effect. So installing “No Script” can help to get rid of this problem. So in order to do so first open “tools” then you need to access “add-ons” and then enter extensions where you need to find the missing update and install it.

Problem 5

The users of the newest version of chrome came up with the complaints where the screen is black with no video display, but audio plays on without any interruption which is quite surprising. Some Firefox browser users have reported the same problem.

Solution

It is regarded that use of multiple browsers at the same time or an interrupted service of internet connection causes such problem. In some cases, it is assumed that problem may also occur due to Flash player. Thus, usage of a single browser while playing videos on YouTube and re-installing the Flash player will help solve the problem of black screen on YouTube.

Problem 6

The YouTube black screen problem has also appeared on browsers other than Chrome and Firefox.

problem6

Solution

If you find this issue on other browsers apart from Firefox and Chrome then you can fix it by HTML5 player. By clicking on this given link from, the browser you are using “www.youtube.com/html5”, request to play HTML5 player on your YouTube you can easily fix the problem.

Some other solutions for the YouTube black screen problem are:

  • Various usage of anti-virus and adds block apps cause the black screen problem on YouTube and this mainly seen with Firefox users. Disabling the add block apps or updating to the latest version can help to solve this problem.
  • You can either refresh or reload the page or you can also restart the browser itself that you are accessing by opening up safe mode can help fix the issue.
  • While playing and watching the video do not open more than 5-6 videos at a time. Since the browser memory gets filled with a lot of cache object the black screen problem appears. Clearing the browser data in such cases and re-opening the browser helps fix the problem.
  • Adobe flash player is another reason behind a YouTube black screen functioning. So uninstalling the current flash player and installing the latest version on your PC can solve the problem and make sure your browser has Javascript is on.

All these are the possible solution methods to get rid of the black screen on the YouTube and help you to enjoy uninterrupted service on YouTube.

If you still facing the problem of YouTube black screen on your desktop or laptop, do let us know. Also, if you are not able to follow any of the solutions we have listed below and know some other solution, contact us and we will include in our article

How to Fix iPhone Error “Visual Voicemail is currently unavailable”

If you are an iPhone user then you might have seen an error while checking for a new voicemail on your iPhone that says “Visual Voicemail is currently unavailable”. The problem usually occurs when your phone doesn’t get signals when you leave an area with EDGE or GPRS and re-join a 3G/4G network.

visual-voicemail-is-currently-unavailable

Fix iPhone Error “Visual Voicemail is currently unavailable”

Even if you have sufficient cell coverage in that area, you can get this error message. It is actually a software problem of iOS and Here in this article we will provide two simple steps that can resolve this issue quickly, most of the time. Let’s have a look at them.

Turn Airplane Mode on and off

When you toggle Airplane mode to on and off, it reboots the cellular modem and compels it to get back the signals from a cellular tower.

  • First of all, go to Settings app from the Home screen

step1

  • Toggle Airplane Mode to On
  • Wait for around 20 seconds
  • Toggle it to turn back Off again

These steps help the iPhone to reconnect with the cell tower and get better signals from it, which eventually helps the Voicemail feature to function properly. After toggling the Airplane Mode, head back to Voicemail and the error message shouldn’t appear this time.

Reset the Network Settings

The trick of Airplane mode helps you to get voicemail that were unavailable earlier, most of the time, but in case if it doesn’t, then it could be an issue with the network settings of your iPhone and that’s why we have another option for you. Though, it is advisable to make a note of your Wi-Fi router password in advance because when you reset network settings, network configuration details such as saved password get removed.

  • Go to Settings app
  • Tap on General
  • Scroll down and tap on Reset on the next screen

process2ndstep3

  • Select Reset Network Settings from the available options

process2ndstep4

  • Confirm the Reset

We recommend our viewers to restart their iPhones by pressing the power button after resetting the network settings so that changes can take effect. Once you restart the iPhone, wait for a while to re-join the cellular data network. Once you get connected, go back to Voicemail and it should work normally this time.

Resetting network settings is a very old trick and fixes many other issues related to cellular data connection, iMessage activation, OTA update and disappearance of personal Wi-Fi hotspot too. The reason behind most of the iOS network issues is the improper configuration which gets fixed by this.

Still getting the error? Call Voicemail

If you have already tried the above mentioned steps, but still getting the same error message then there is a possibility that you are out of range and your iPhone is not getting sufficient signals to transfer data and that’s why you are not able to access Visual Voicemail feature. It usually happens when people go to remote areas where phone fail to connect to 3G, 4G or LTE networks. In this situation you can tap the ‘Call Voicemail’ button and get your voicemails through a phone call after entering the account pin.

How to Fix Android File Transfer Not Working Problem

Android is maturing day by day as an operating system. There were many problems when it was first launched but Google worked on it and now it is one of the most powerful mobile operating systems. However, even after so many changes in UI, settings, features, and functionalities, there are some problems in Android OS that irritates us time to time. One such problem is “Android File Not Working” in many of the devices. In this article, we thought to come up the solution that will help you solve the problem. So, without further adieu, please have a look at the possible solutions to fix “Android File Transfer Not working“.

android-file-transfer

How to Fix Android File Transfer Not Working Problem

When you try to transfer the file to your Android Device and get the error “Android File Transfer Not Working then there could be few possible reasons behind it.

  1. The USB cable you are using does not support file transfer
  2. Your device is not set up to accept files via USB
  3. You have Samsung Kies file transfer application installed

If you have a Mac computer and want to transfer the files to your Android device, then, first of all, you need to download the Android File Transfer for Mac.

Make sure that the File Transfer is Enabled

Follow the steps given below to enable file transfer via USB on your Android device.

  • Go to Settings
  • Tap on Storage
  • You will find an icon with three vertical dots located on the to right corner of the screen, tap on that
  • Select USB Computer Connection
  • Put a check mark next to Media device (MTP)

step5

Below that there would be other options for Camera (PTP), if you believe that the issues are caused by a software then connect the device to your computer via USB, check the Camera (PTP) option and uncheck it again.

If you don’t see these options under Storage then you need to enable USB debugging and follow the steps given below.

First of all, you need to unplug the USB cable from the device and enable the Developer Mode

  • Go to Settings
  • Scroll down and select About Phone
  • Press the Build Number again and again till the time pop-up appears on the screen

Once the Developer Mode is enabled

  • Go to Settings
  • Select Developer Options
  • Enable USB Debugging

After this, you need to lock the device and connect it to the computer via the USB cable

  • Once the device is connected, unlock the phone
  • Swipe down the screen so that you can see the notification
  • Tap on USB for Charging

usb-debugging

  • Select File Transfer from the listed options

file-trasnfers

  • Lock and unlock the device again

This trick works on all phones running on Stock Android 6.0 Marshmallow.

Android File Transfer Not Working in Samsung Devices

If you have a Samsung phone or tablet and facing this problem, then there is a possibility that you have installed the Samsung Kies file transfer application which usually doesn’t let the native Android File transfer function. You cannot fix the problem by just deleting the app and you need to use the official uninstaller to get rid of it.

samsung-switch_smart

  • Within the file package, you will find the option to Uninstall the app, select that
  • Plug in the Phone via USB cable and swipe down the status bar when you see the USB symbol
  • It will show you “Connected as a media device. Touch for other USB options“, touch that
  • Put a check mark next to Media device (MTP)

Users should also check the USB cable and make sure that they are capable of transferring the file. It is also advisable to check the USB port because if the port is broken or damaged, then you won’t be able to transfer the files.

So, this is how you can solve the Android File Transfer Not Working problem within a few minutes using the tutorial we mentioned above. If you have any doubts, do let us know in the comments section below.

Top 10 Cool Command Prompt (CMD) Tricks and Hacks

You must be an advanced user of Windows and looking for some of the best things in it. Here is the best option to explore your windows. The following command prompt tricks are excellent support to ease your function over windows. It is obvious that these things are not known to all. So get through the following cool cmd commands and use windows much easier than all other do.

cmd tricks

Top 10 Cool Command Prompt (CMD) Tricks and Hacks

  1. You will find that a command runs automatically and you need to stop it, then and there. Just press Ctrl+C to stop the command flow at the moment. This is will stop the Command update immediately for you.
  2. To start copy paste operation, you will have to right click the command title and find the properties. There you will find the option called quick edit mode. Just enable this. You will find that you can now copy a selected segment, just by pressing enter. You can even paste the copied part with just a right click. This is one of the best cmd tricks, and you can apply for first actions.

  3. Have you forgotten the codes you have used earlier time? There is no big issue in it. Just use the command doskey/history as command and you will find the history of the commands you placed, the previous time. This is really one of the best cool things to do in cmd. So try it now.
  4. You are looking to do something new with the cool command prompt codes. Now copy those codes directly to your clipboard. This is ideal when you are explaining certain things to someone. Just put ‘Clip’ at the end of the command. This will help you to explain the things, while you are chatting with someone.
  5. Run the commands simultaneously with just to & signs. This is one of the greatest cmd hacks that will help you to several functions at the same time. You must give the idea to your friends even, since they will be getting aid from it.
  6. If you are looking for a help with your command, just put a / sign as a suffix to the code. For all the valid commands, you will find a complete help as shown in the figure below.
  7. Copy anything from the command prompt. Just right click anywhere, select Mark and then using your arrows, select the command you want to copy. Press enter to copy it down. You will get some real fun out of this fun cmd commands.


  8. If you are looking for the connection of your PC, you can easily go through the network tool. Use the command ipconfig/all in your command prompt and find the full network details. This is one of the great cool command prompt tricks. So use it, for your own purpose.
  9. You can now know the IP address of any website. Just type nslookup, give a space and then type the website name. You will find the IP address of the website.
  10. Make fun of the codes. Turn on telnet and then type telnet towel.blinkenlights.nl. You will find the Start wars movie in ASCII. So, here is a cool stuff for you. This one of the best cool things to do with command prompt.

Now, you are going to make your friends stern at you, with so many command prompt games. Just explore them and use them to become and expert user.

How to Solve Comcast Ref Code s0a00 Error

Comcast Company is identified for its widely used cable and internet service provider in the USA. It does not only offer flawless internet but also cable services. Comcast internet speed an average 105 Mbps. This is certainly the fastest in the entire country. To installing and setting up a Comcast is not a big deal.comcast-ref-code-s0a00-error

However, at some instances, users face some random errors while trying to set up their Comcast device. The user who didn’t have any technical knowledge does not do anything.

One of such error is the s0A00 error. This error comes frequently and is encountered by a lot of Comcast users globally. So, today we are going to tell you how you can fix it by yourself. All you have to just simple step and your error will be resolved.

Fix COMCAST REF CODE S0A00 ERROR

If You are installing the Comcast receiver, you may come across the following message: “One Moment Please, This Channel should be available shortly. Ref Code: S0a00”. There are many reasons behind this common error. If you want to resolve this problem as fast as possible, you must identify the actual root cause of the error. We have listed two major reasons behind the Comcast ref code s0a00 error:

  1. A faulty Cable Box

  2. A faulty cable or connection

Now to resolve this error here are the best methods:-

Reset your Cable Box:

One of the first solutions that you can try to fix thes0a00 error in a Comcast box is to reset your cable box. Sometimes these error comes by some random reason. By resetting your Comcast box it will automatic resolve. To reset your box fallow this:- First of all, unplug your adapter and wait for 1-2 minutes and press the button of reset and wait for 10-15 min. Then plug-in the adapter back and then start-up the box. The Comcast ref code s0a00 error should be fixed by now.

A Faulty Cable Box

If you have installed it very well and after that you are facing comcast code s0a00 error. It could be the reason of your faulty cable. According to experience, resetting the cable and box will help you fix the error. In order to reset the cable box, you must fallow the above given method and check the cable if it is dameged from somewhere. After checking if you found any damage the call at servies and they change the all cable for you. After that you won’t face any kind of error.

Bad or Broken Coxial Cables

Some time this error cause of the coaxial cable of your setup box. To reset your coaxial cable, power off your setup box and tv and now remove the coaxial cable from the cable box and TV. Now, replace with the new cable and check the coaxial cable is damaged or have aby cut. If didn’t then fitted correctly and tightly to the wall. Now check you tv the error must be resolced from there.

Expert Help

Now if you tried all the way which is mention above and still can’t resolve that error. Then you must call the expert and take their help for that. Some time this error could be becsuse of the server side. There team is brilleant and they will help you for sure in this. To give Comcast a call you can directly call them or just follow these steps:-

Step 1: Press 2 for “All other inquiries

Step 2: Press 1 for “Trouble with service

Step 3: Press 1 for “Cable television

Step 4: Enter your Comcast account #, or the last 4 digits of your Social Security Number.

Step 5: Press 2 for “For total service interruption

Step 6: Press 1 for “For blue, blank screen or error code

It’ll ask you to make sure everything is plugged in and turned on… then press 2 when its done talking. I hope the error is resloved by now. If not then contact with expert help.

Guys these are the best methods to solve the Comcast ref code s0a00 error. You don’t need to worry about anything, your are not the only one who is facing this error. If the comcast ref code s0a00 error appears on your TV screen. This is a very common problem faced by many user. Share this with your friends so they can also try these methods and if you have anyother method which worked for you, then share with us through comment section.

20 Secret Snapchat Tips & Tricks That You Must Look

0

Hello and welcome to this exciting article in which you are going to learn so many things and like it for sure. In this article I will share some secret Snapchat tips and tricks that you make you smarter than any other Snapchat user.

snapchat

Snapchat is very popular nowadays with over millions of active users and over 2 billion messages/snap sent per day. Nowadays Snapchat is equally popular as WhatsApp but has some cool features too. Using the Snapchat app might be difficult for any new user or there are many users who just know the basics of the app.

But the fact is, Snapchat has some excellent features and tricks which you don’t know. This is the reason why today I have decided to share best Snapchat tricks which will make you a pro in using this app.

So, I will not stretch this anymore and lets check out 20 hidden Snapchat tricks and tips that you must know.

20 Hidden Snapchat Tips and Tricks

  1. One Shot, Two Filters:

So Snapchat has many amazing filters which is the one of the best feature of this app. But did you ever thought what if you can use two filters at once in a shot? This is possible with Snapchat and you can use any picture filter with one of data label filter, all you have to do is some multitask with your fingers, I mean hold your finger on the screen after applying a filter then use another finger to choose any filter available. This is pretty easy right

2. Add Some Music to Snapchat:

It would be awesome to add your favorite music matching to your Snapchat videos. Well you can do this too, all you have to do is play the music on your smartphone and start taking snap/video while the music is playing in background. The music which you have played will be automatically added to your video.

3. Using volume keys to control camera:

Sometimes taking snaps by holding the finger on the screen may become difficult, this problem usually arise when you are using the selfie camera. But I have a trick for that too. Very few people know that you can take snaps and videos just by using the volume keys of your smartphone.

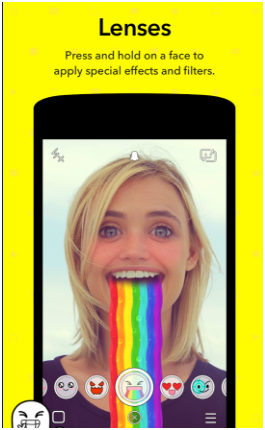
4. Make your selfie awesome with all your cool effects:

There are various lens of Snapchat with which you can have many fun with your excellent selfies. For using this effective lenses all you need to do is just of press and keep the center of the view finding front face camera. But you have to make sure that you keep your face still as well as using the effect of the camera lens.

5. Save your data by using travel mode:

Yes, on using snapchat it is sure that your data will be consumed in bulk. While using snapchat you will be able to use travel mode to save your data because in travel mode your data is being saved a lot. Enabling Travel Mode in your phone is easy just go to setting and go to manage and then finally enable the travel mode on. So now you will be able to use snapchat by enabling travel mode and loosing your less data.

6. Rewind your video clip and use Slow Mo filters:

Not only you can enjoy snaps in your snapchat account but you will also be able to take a video clip. In snapchat you can take a video clip of anything and add some filters in your video so that it look funny and excited. There are three filters that you can use in your video clip and those are rabbit, snail and reverse.

 7.Deactivate Snapchat account:

This is the last trick and here I am going to share you how to deactivate your Snapchat account. Yes, sometimes you may want to deactivate your Snapchap account for any reason. But unistalling the app from your smartphone is not enough, all you have to do is go to https:/support.snapchat.com/delete-account and sign in their with your Snapchat username and password and there you will find “Delete Account” option. Once you click on the delete account button you cannot revert changes, so be careful while doing this.

8. Emojis and options:

Nowadays who don’t like to use to funny emojis and texts to their images and make them fun to see.Snapchat has option to add emojis and texts to your pictures very easily. The best feature is you can resize the emojis and texts just by pinch to zoom option and also rotate them. So you can fit suitable emojis wherever you want in precise size.

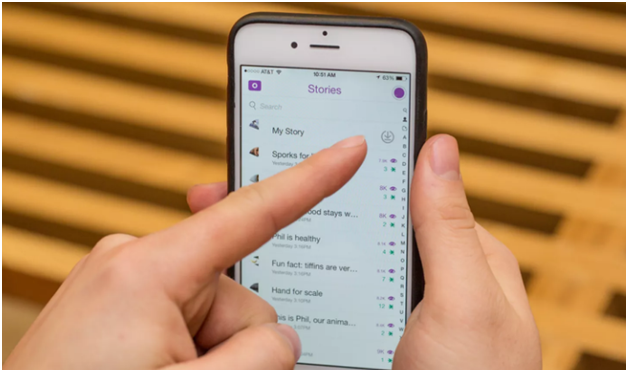
9. Count total views of any story:

One of greatest feature of Snapchat is that you can create stories. In this part, I am going to share with you the trick by which you can see how many people have visited your story. You just have to click on the My Story section and swipe the screen up, there you will be able to see total number of views of any story.

10. Try switching camera mode by tapping:

There are two camera modes in every app so switching between front and rear camera is very difficult in any other app. Snapchat has made this type of switching very easy, so you will be able to switch your camera from front to rear just by double tapping the camera viewfinder.

11. Night Camera Mode:

When the Snapchat first released in the market, there was a complaint by maximum of the users that the pictures taken by the snapchat is very poor in image light. SO now you will be able to find a hidden features in Snapchat by tapping which your photo will automatically look bright even when you are in a dark place. Many Snapchat users are unknown to this trick and this features is symbolized by half moon. Which means when your night camera mode is activated you will see a half moon in your left top corner of the screen.

12. Do a Video chat:

You can easily connect with your friends or families with video chat using easy video chat features of snapchat. But you will be able to connect to your friends or families only when both of you are online at the same time. You will see a blue button glowing instead of yellow button that means you are now able to connect with your friends with video chat. Keep pressing the blue button to start a video chat. Remember not to leave your finger until and unless you are done chatting with your friends, once you leave the blue button your video chat will be rejected.

13. Enable your verification of your Login:

Snapchat is a secret photo sharing site where you will be able to share funny selfies or photos with your mate. But maximum of the time it gets hacked so it will be better for you that you enable your verification your login. On enabling this login you will be notified if any one login your account in another device through text message.

14. Emojies:

This is one of the important tricks that you should know about your favourite snapchat. Here you will also be able to share emojis with your mates, which means now you will be able to know more about your mates by sharing emojis with them. This is one of the tricks that make snapchat different from any chatting app.

15. Send your photos from the gallery:

Now share your best selfies with different lenses with your friends directly from gallery. So now finally you won’t need any other things to share your excellent selfies with your mates. This tricks is the most I need because sending photos is one of the most important thing hat anyone needs.

16. Use two type of filter in one time:

Did you ever know that you can also use the two types of filters in your picture in just one time. For adding two filters in your photo at one time swipe above your photo as you do for adding filters, and for the second filter, hold your photo with one finger and then swipe over your photo carefully to apply another filter over your photo. Hence, you will be able to use two filter at once.

17. Edit your name in snapchat:

IN snapchat you can also change your name that any one who chats with you will see. As the default name is given as team snapchat, you can delete that name and you are now able to add your name in your own snapchat account. This feature is very friendly that you can now chat with your friends easily because you can know their name now.

18. Add some text in your snaps:

You can also add some text as caption in your photos. Adding text in photos make it more effective and understand able. For adding text in your picture you will first need to add in an open note pad in your phone, then you will be able to add in your photo after opening the snapchat.

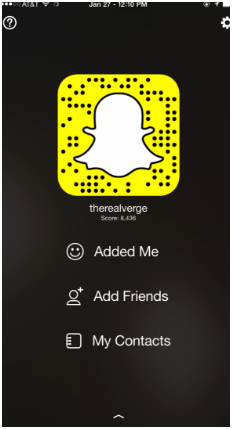
19. Add friends without contact:

The “add nearby” function ofsnapchat is very effective to every user because on using this you will be able to add even those who are not there in your contact list. If you want to add some near by friends in your snapchat tell them to on add nearby function. You will be able to see him or her in your list. So this is all you can do to add your nearby friends.

20. Change your lens by changing the date of your phone:

Hey there, finally you can change your phone lens by changing the date of your phone. Don’t think that this is impossible because just by simply changing the time you will be able to see the change in your lens in snapchat app.

So this is all the top 20 tips and tricks of Snapchat that you must know. This Snapchat trick is very simple but only few of the users knows about this all features so I have shared this with you.

I hope you have liked reading all this unknown trick of snapchat here in our site. If you have any problems then please don’t hesitate to comment us below. Again thanks for reading the article in our site; I hope you liked reading this.

5 Ways to Fix “Nvidia Installer Failed” Graphic Card Error in Win 10

Recently, lots of gaming users reporting about the NVIDIA Driver. Every time they install the NVIDIA Driver it shows that “NVIDIA Installer failed” or “NVIDIA Installer is not installed correctly.” I also have a gaming PC and faced that error. I search all over the web to fix this error, and after the long research, I found some useful solution for this error. If you were also facing the NVIDIA Installer Failed error, then don’t worry today we are going to see the Best solution to fix NVIDIA Installer Failed.nvidia-installer-failed

How to Fix “Nvidia Installer Failed” Graphic Card Error

Solution 1:

This is the first fix, I check when any driver shows this kind of error “Compatibility.” This is the essential thing you want to check before installing the driver. It happens often we download the wrong software which is not compatibility with you windows version. To test the compatibility, right click on the “.exe” file and go to property of the software and click on the “Compatibility.” If it matches with you PC or Laptop then okay, otherwise you have to download the other version of that software.

Solution 2: End All NVIDIA Processes and related to them

This is one of the best fixes for the NVIDIA Installation Failed. You need to stop All NVIDIA Processes and associated file to NVIDIA. Here are the step by step guide and process you have to end:

Step 1:  Tap these keys “Ctrl+Alt+Delete” to start “Task Manager.” Now select “NVIDIA software” and click “Nvidia installer failed.” It only ends the Application we have to stop all the process.NVIDIA Installer Failed

Step 2: Click on the Process and end the process listed below:

  • C:\Windows\System32\DriverStore\FileRepository\nvdsp.inf file
  • C:\Windows\System32\DriverStore\FileRepository\nv_lh file
  • C:\Windows\System32\DriverStore\FileRepository\nvoclock file
  • C:\Program Files\NVIDIA Corporation\
  • C:\Program Files (x86)\NVIDIA Corporation\

they all are associated with NVIDIA driver, so you have to end them all.

Step 3: Restart your computer or laptop and again install the NVIDIA driver. We hope this time you won’t face this error.

Solution 3: Disable All Antivirus Software

Antivirus might interrupt the installation of the graphic driver. The reason is the .exe file is also a virus file as per the some of the antivirus like AVG, Avast, Norton, and FortiClient, etc. They automatic delete some of the records of the program which are essential for the software. To disable the Antivirus follow the given steps:

Step 1: Tap these keys “Ctrl+Alt+Delete” to start “Task Manager.” Now select the Antivirus process and click on the “End Process.” If you didn’t find the all antivirus process then here is the other way does it.

Step 2: Click the small triangle on your Windows taskbar to access the notification area. Right-click on the Avast Antivirus icon for a list of options.

Step 3: Choose the “Avast shields control.” You can select the option depending on how long you wish to disable Avast Antivirus.

4 5


Step 4: After selecting the option, you will be prompted to confirm the operation. Click Yes to make a confirmation. This will disable the antivirus for some time. Now try to install the NVIDIA Driver.

Solution 4: Update the NVIDIA Graphics Driver

In some cases, NVIDIA Graphic driver problem is probably caused of the incompatible of NVIDIA graphics driver issue. In that case, you have to update the NVIDIA Driver. There is two way to do that either you can download the new Driver from the official site or update with the help of third party software.

For manual download via NVIDIA official website, you have to take care a lot of things link Product Type, Series, Model, and Operating System.

If you didn’t want to do the knowledge part, then you can use the third party tool. The tool I preferred is Driver Talent. How to use it here are the step by step guide:

Step 1: First download the software from the site and install it on your machine.

drive-talent

Step 2: Run the Driver Talent and “Click on the Scan Button.” It will automatically scan all the driver of the PC and let you know the best fix of that. You can also download the latest version of the software with the help of this software.

nvidia-driver-install-fix driver-talent


Step 3: After the fix done restart your PC and check the NVIDIA installation is fix or not.

Solution 5: Update Windows System

If above mention method doesn’t work for you, then try this one. We all know how boring is windows updates are. It will consume your data and won’t provides you anything new. But in some case, you need to update your windows settings. Update your windows and restart you PC then check whether your problem is fix or not.

Some sites were telling you to reinstall the Windows, but I don’t think that would be an excellent choice. By doing the installation, you have to take the Backup of all the data, and after installing the Windows again, you have to install all driver, the software you had.

In my opinion, you should contact the NVIDIA team. Share the all methods you tried to resolve this error. You can contact them from the form of the NVIDIA site. They can provide you the best solution for this.

Verdict

We hope that the above mention all the fix will work for you. These fixes are safe it won’t harm any other driver of your system. Let us know which fix works for you. If you have any other fix for “NVIDIA Installer Failed”  do share with us.

What is 502 Bad Gateway Errors and it’s Solution

Have you ever come across a message saying “502 Bad Gateway Error”? You might be thinking there is some programming error in your PC. So you start formatting your PC, rebooting and all sorts of thing. But still, when you start working you get the same message. Well, there is nothing wrong with your PC; the error message comes from your server. It may be the case that the site is overloaded.

What is 502 Bad Gateway Errors and How to Fix It

502 Bad Gateway Error is a status code of HTTP. This means that on the internet one server received a response from another server, which is invalid. This can be solved by simply refreshing the loaded page or customizing each website.

This Gateway Error is often caused due to issues between two online servers that you cannot control. Sometimes such problem may also cause, when your browser thinks there is some problem, hence starts sending such error messages. There may also be an issue in the control or even networking equipment within your home connection. However, here are some solutions to this Gateway error problem.

Solutions to 502 Bad Gateway Error:

Here are some ways to fix the issue of 502 Bad Gateway Error. Follow the solutions that have discussed.

  1. Close all the already opened windows on your browser and start with a new browser session. Now again try opening the web page.

It may be so that the 502 error you received was due to a problem with your system that at times occurred during the usage of your browser. A simple restarting of the browser program can even help.

  1. Another way of solving it is, press the F5 button on your keyboard and try to reload the URL again. You can also click on the reload/refresh option on the tab page.

The case may be highly temporary, that the server is indicating a 502 Bad Gateway Error which is out of your control. Trying the above reload option may seem to successfully solve this issue.

  1. The 502 Bad Gateway error message issue may also cause due to the corrupted or outdated files that are being stored by your browser. Simply clear all the cache files on your browser.

If the error is causing due to this fact, then clearing all the browser’s cache files will fix the problem.

  1. Another similar reason may also be the cause of such error like the above mentioned one. This may be the case of numerous stored cookies on your browser. Clearing all the cookies can solve the problem.

It’s not necessary that you have to delete all the cookies from your browser. You can only delete those cookies related to the respective sites that are showing 502 error messages. Though it is best to delete all the cookies that won’t affect much, you can also delete cookies from the particular sites individually as well.

  1. Another way is starting your browser in “Safe Mode or Incognito Mode.” Running the browser in safe mode means starting the browser newly with its default settings without any extensions or add-ons, along with toolbars.

If starting the browser in Safe Mode solves the issue means it was happening due to some settings with the browser or with the browser extension. To find out the accurate cause, return to the default settings of your browser or manually disable the browser extension and fix it where you find the issue.

  1. If your computer, browser and the network seem to work fine and if the website also reports its working accordingly, yet it shows the error message, then contacts the service provider of your internet or “Internet Service Provider (ISP). Such a network issue is often responsible due to your ISP.
  2. Sometimes you get to see a notification ‘Come back later”. This kind of error message is surely caused either by the network of the website or your ISP. In such cases, either of the two parties has been informed about the issue if you have contacted them directly and you are not the only to get the 502 gateway message. So, you will have wait till the problem gets solved, if this is the case.
  3. There may be some temporary problem with your PC and the way its connecting to your network, so simply Restarting your computer may also solve the problem. If you are getting 502 error message on more than one site, then Restarting your computer will help to solve the issue.
  4. There may also be an issue with your router, modem, switches or other networking devices that are causing the bad gateway error problem. In such case, Restart of your network equipment/device will simply solve the problem.
  5. You can also try the different browser for browsing. Some of the well-known browsers among many others include; Mozilla Firefox, Internet Explorer, Safari, and Chrome. This may also be helpful.

If changing the browser fixes the issue, then you are now sure that the problem was mainly caused by your current browser that you were working with. If you have gone through the above solution and applied it, you may now reinstall your default browser, and check if that solves the issue now.

  1. You can also change your DNS servers, on any one of the devices; either your router or computer or device. Due to some temporary issues with the DNS servers, such bad gateway errors are caused.
  2. If you receive the error code message as “502 proxy error”, and have “MS Forefront TMG SP1 installed, then for “Microsoft Forefront Threat Management Gateway (TMG) 2010 Service Pack 1”, download “Software Update 1”.

To be noted, for 502 proxy error messages, this is not a standard solution and can only be applied in this case. If you have Forefront TMG 2010 installed, then you must know it is a kind of business software.

  1. Another good way of solving this issue is directly contacting the website. There is a possibility that the websites are at fault, and the administrators are already engaged in working on such issue. So letting them will be much helpful, feel free to contact them.

These are some of the ways that will hope to help you fix the 502 Gateway Error problem. Try the solutions to solve this error and have a hustle free access on your system. If you still face the problems even applying the above methods, do let us know in the comments section below and we will try to find out.